Sunday 30 November 2014

Queen Amidala make up tutorial

One of the most distinguishing features of Queen Amidala is her make up. When I wear my Amidala I'm pretty sure that people don't recognize the costume, but they do recognize the face and understand that it has something to do with Star Wars. Through the years I've come up with a way that is actually pretty quick in achieving the look that I want.

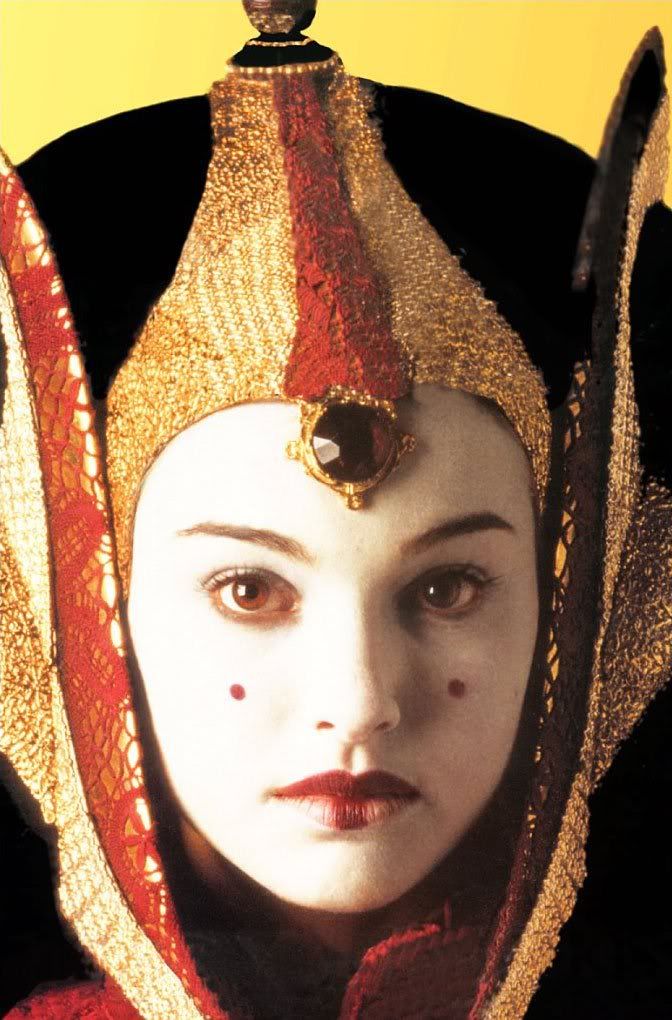
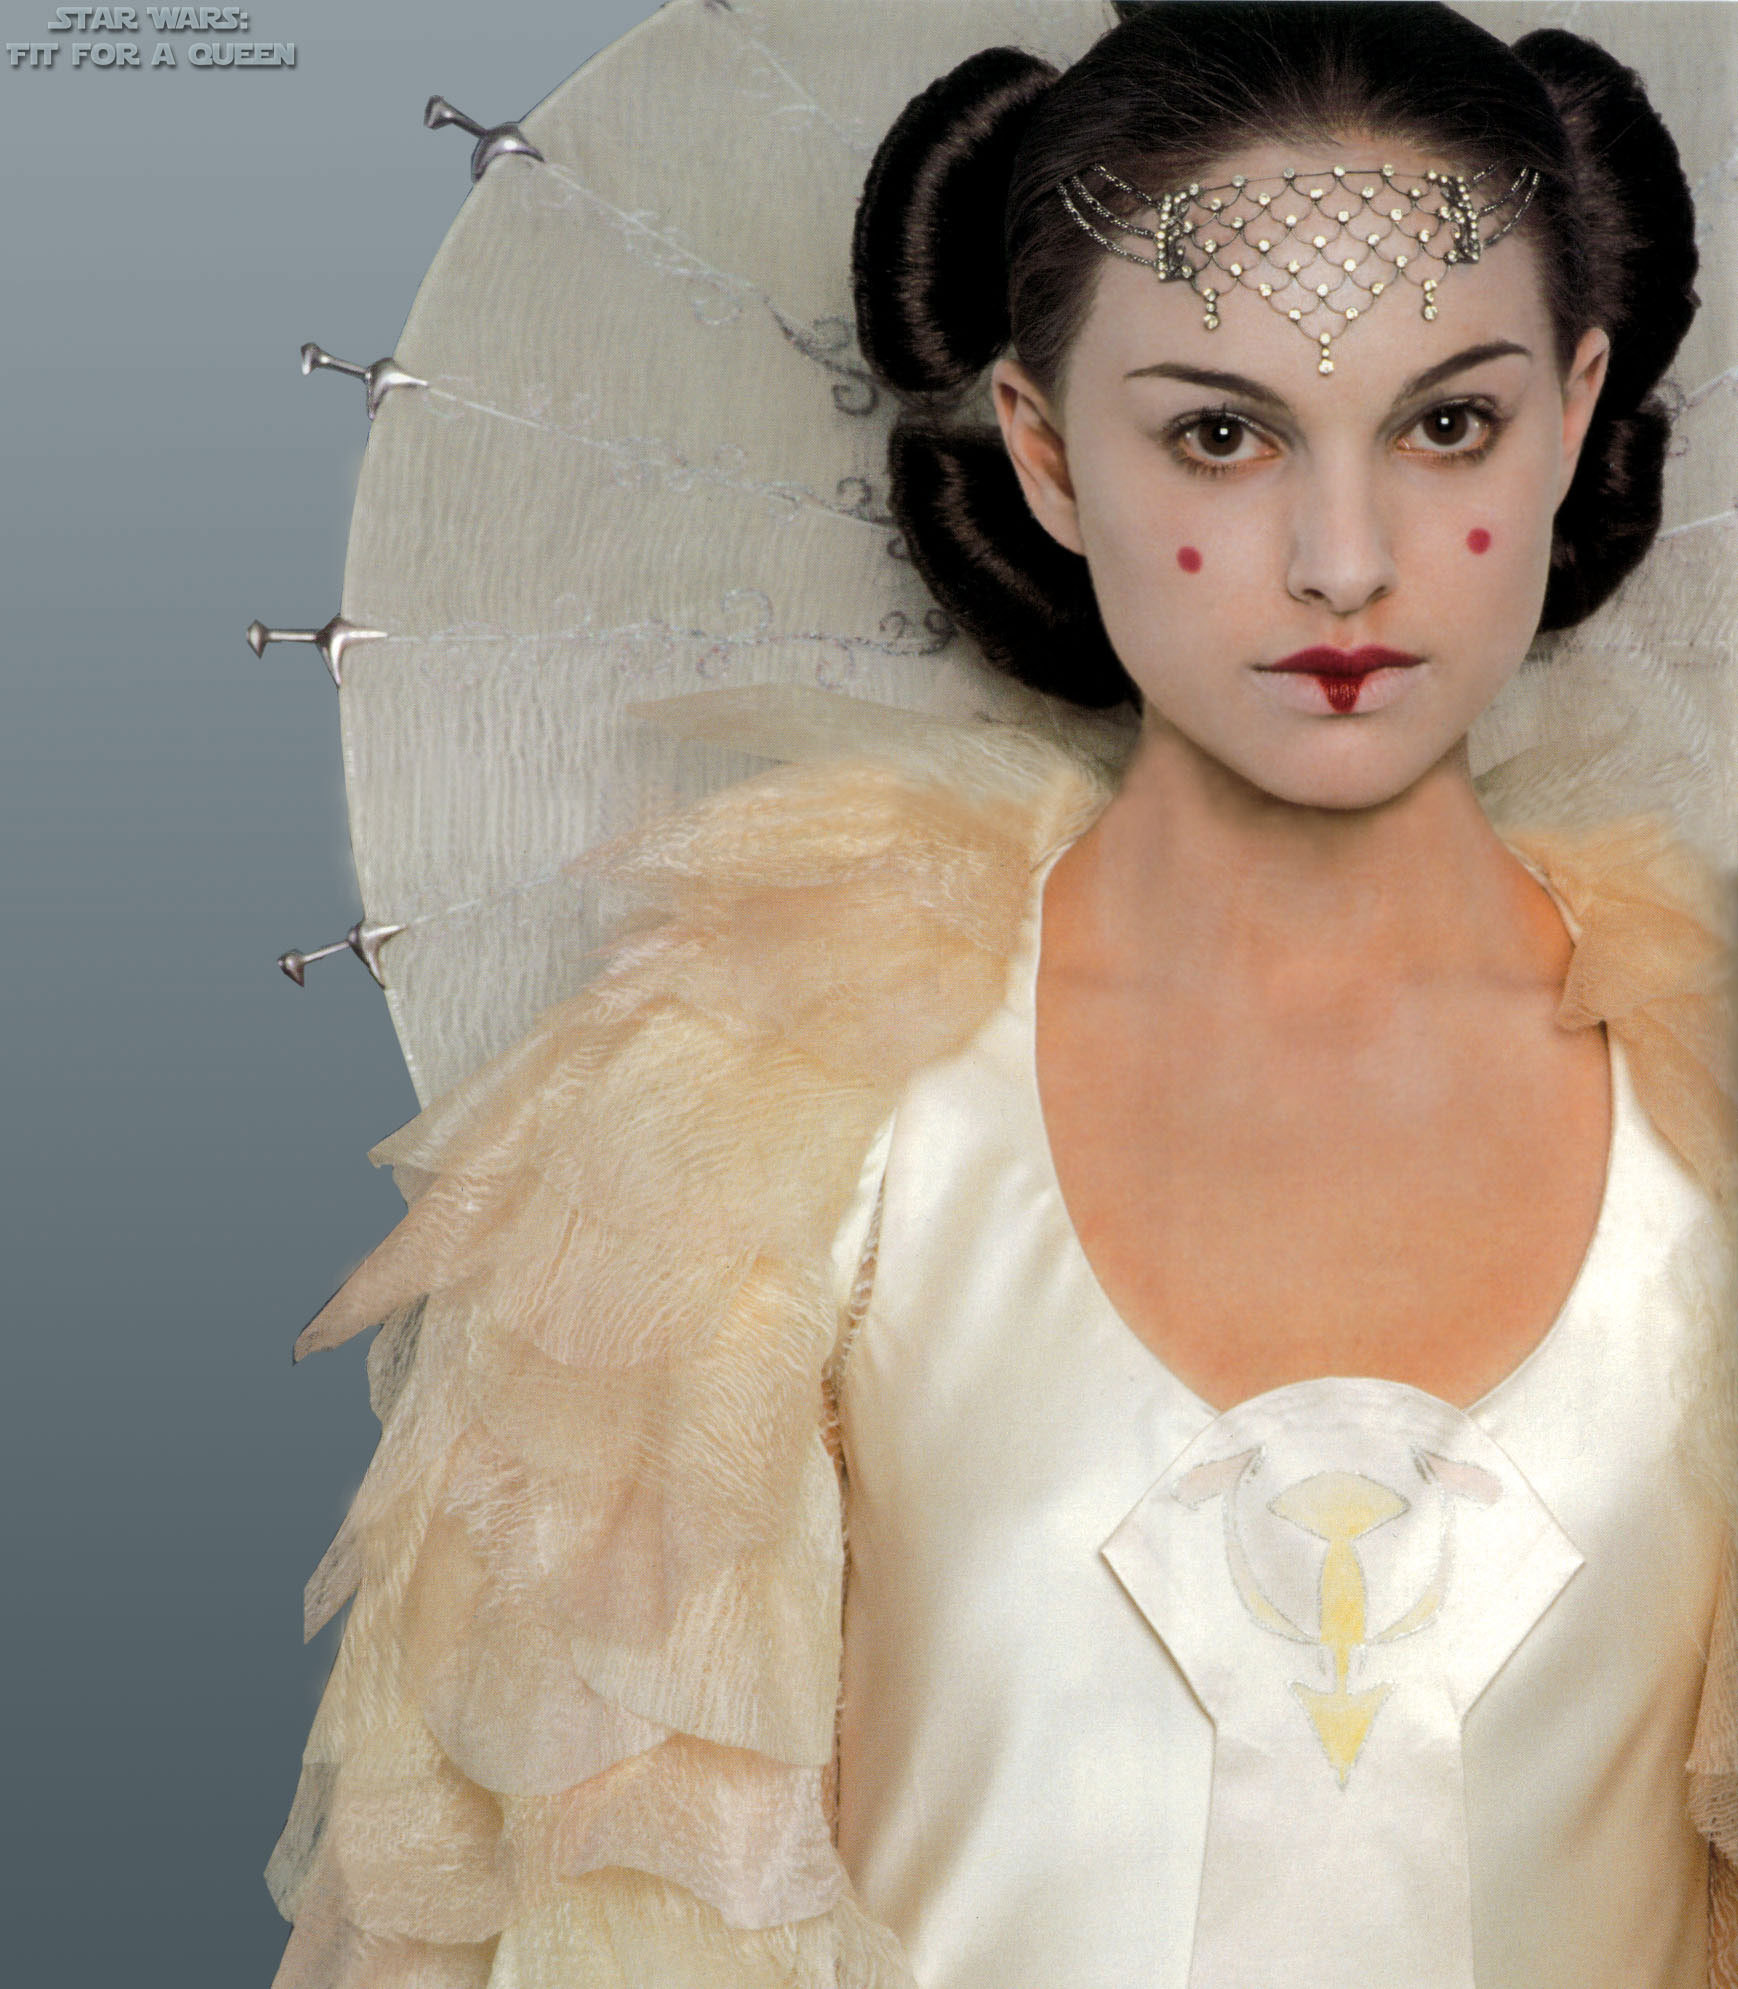
First some background though. On Padawan's guide you can read this about the make up used for Amidala during Episode 1.

The Queen's makeup was designed with a Japanese Kabuki style. For the porcelain white base color makeup artist Paul Engelen used RCMA Ivory (He found clown white was too bright and made the eyes look red). The powder applied after the ivory base was Channel 01 Aube Power Lumiere PressÈ. The circles on either cheek were done with red "lake" lip pencil. This same color was used on her top lip and the center section of her lower lip. Nars "Fire Down Below" is the brand and exact color. A white base color was used on either side of the red mark on the bottom lip. Other makeup used included Lancome Elancil black mascara and Givenchy Prizm Topaz (eyeliner?). The eyebrows were sculpted in brown/black.
Now of course it's not just go out to hunt for the make up listed above and start applying it, because if you look at Amidala in her different costumes it's clear that the make up isn't the same on all her costumes.

 In her most iconic red dress you definitely have the porcelain white face.
In her travel gown, the one I've made, her face is not as bright white and her skins shows through a bit.
In her parade gown at the end of the film she uses even less make up, in fact I think the advice for this to go rather for a very pale foundation rather than applying white make up.

Now I'm doing the make up that's inbetween the porcelain-doll look and just the pale face. For make up I'm using things that I've picked up in different make up stores, hobby stores and party stores. I don't think the specific brand names are really important, since most brands carry similar products.

The first thing I do is to apply a layer of foundation primer. This is just to even out my skin, and protect it from the coming layers of make up . Then I apply white eyeshadow around the eyes, both above and under, and along the sides of the nose. I've learned that those places are hard to get fully covered otherwise.


As you can see I have also attached the hairbuns that will keep the veil in the right shape. This was actually an experiment, since I've gotten headaches from my previous hairpiece. This time I tried to just pin two foam donuts in shape, and it worked. No headaches at all. They were a bit too big, but now when I know that they can work I will create something more proportional, and attach combs to them instead of just pinning them on.


Anyway, the next step is to to apply the base layer of white make up. I'm using Kryolan aquacolor, meaning that it's water soluble and is applied with a sponge. The trick is to put it on smoothly, the worst that can happen is that the sponge is wet enough to leave a mark, I've found it's almost impossible to blend and smooth out such an edge. For that reason I'm using as little water as possible on the sponge and goes all over the face dabbing it lightly on.

The next step is to finish the eyes. I'm using black cake eyeliner and black mascara for the eyes and a darkbrown eyebrow shadow.

After that I use a cream white clown make up on the lips. The clown make up stays on a lot better on the lips than the cake make up. It's quite thick though so I only try to put very little on. For the clown make up I'm using my fingers to apply it. From the lips I work very think layers of clown make up onto the face, to blend the line between the lips and the rest of the make up, and also to sculpt the face a bit. I try to put a bit more on the cheeks for example. If there are any spots that are uneven I also work with my fingers to mask them. I finish everything by powdering baby powder all over the face to make the white make up set.


Then comes the tricky part, the part that I love to have help with, but I mostly need to make do on my own. It's the red dots on the cheeks. For this I'm using Lumene Lingonberry Lip Lacquer, and this is the only place where I really recommend a certain brand. When this one runs out I'm going to have a hard time finding anything like it. It's quite wet and shiny, and the applicator is round. That means that I only have to put it straight on, and I get a nice circle. In order to aim I try to just look straight ahead in the mirror and put it under my pupil. This is tricky, especially when you need to get another dot on the same level on the other side of the nose. I love it if I have somebody else around to help me. I have a tendency to make my dots a tiny bit too small, but I rather have two small but uniform dots than if I have to keep adjusting them, by making them bigger. Trying to remove the dots inevitable needs to the whole makeup disappearing and I have to start over with the white make up.


Then I go and put the rest of the costume on, leaving the lips until the very last thing I do.

I think this picture of me attacking an unsuspecting AT-ST driver is probably the best close up of the make up, at this time it had been worn for 1,5-2 hours. You can see that the upper lip has rubbed off on the lower lip, but otherwise it's holding up.


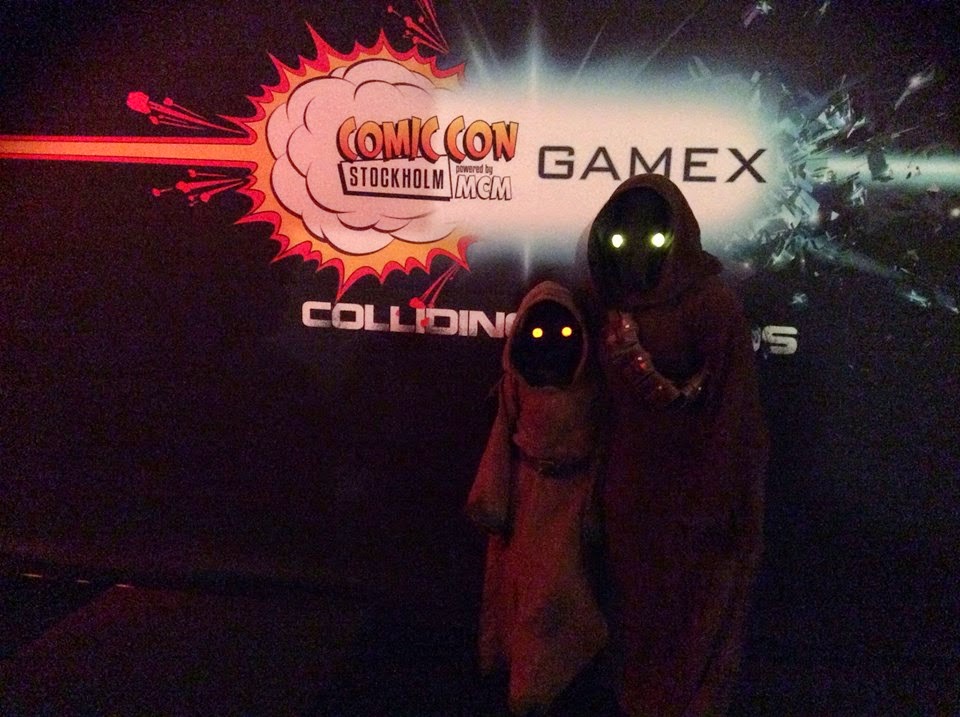
 This photo of me posing with a jawa was taken at the same time and shows the whole face, and that the buns are too high on the head..


Tuesday 25 November 2014

My hair at the ball

For the ball I of course wanted to have a nice and elegant hairdo. My hair now is quite long and since I've started with more historical costumes I've learnt quite a few tricks about styling hair, and even if I'm not good I wanted to do something that looked a bit more refined. My main inspiration was the hairstyle I did for the 1920's party I went to this summer. With all the stress of preparations, my friend that I stayed with hadn't even finished her ballgown until just before we left, I didn't take any progress photos of my hair work.

I started out with rolling up my hair. Previously I have used the long foam rollers, but now I had bought the hard plastic rollers that are used for perms. The plastic rollers were a lot easier to manage than the foam rollers, something I really noticed since I couldn't get all my hair up on them and had to finish with the foam rollers. I sprayed some water on the rolled hair to make it damp. I did not roll quite a large chunk of my front hair, wich I had parted very much to the side. This I put in a braid, to get it out of my face and then I went to sleep.

Or rather tried to sleep, it was not easy get a comfortable sleeping position with the hair. The rollers themselves weren't too bad, but every time I moved my head they pulled on my hair. I did suspect this was how it was going to be, but the ball started at 14:00, instead of in the evening, and my hair takes a really long time to dry, and I didn't want to get up early just to start with the hair. Anyway when I woke up the next morning the hair was a bit frizzy, but I had a lot of curls.

Now I tried to make the front hair into fingerweaves. I didn't get quite as good as a result as the first time I tried, I actually think it would have looked better with less hair. I also can't really manage to get them even, it feels as if I need three hands for that. With some practice I can probably get a nice result though.

When all hair was dry, including the front hair, I took the rollers out and had a lot of unruly curls. Now my hair is quite frizzy in it's natural state, and I had a big halo of frizzy hair. I have discovered the joy of a volume and anti-frizz gel though, so put it on generously all over the hair. It really works wonder and helps give that that finished and sculpted look to the hair. After having just let the curls loose a bit with my fingers I had a lot of volume as well. I put on a headband that I bought, and then I simply pinned the curls over the ribbon that closed the headband in the back. It's always hard to see what you are doing in the back of your head but I didn't go for perfectly symmetric. I also pinned the front hair in place. I didn't get the distinct finger weaves that I had hoped for, but I got a bit of voluminous wavy hair, and it still looked good.

Front. Just having a side part instead of my usual middle part totally changes the look of my face

Side. I actually think the hair looked best from this side

Back: A curly and voluminous messy look


Sunday 23 November 2014

HSF Challenge 23: Modern history - or going to the ball

Yes, I am really early, since the HSF:23 isn't due until December 15. This is such a good example how the HSF really has inspired me to do more historical clothing. As I've mentioned in my previous posts about the 1895 ball skirt my first plan for the the skirt was to make a simple black skirt. Sure it would probably be a bit historically inspired, but I was definitely planning on putting a zipper in and do it all on the machine. Thanks to the HSF challenges and all the inspiration you get from the other participants, when I got going I decided to make a proper late 19th century skirt, in the period way.

The ball I was going to celebrated the 375th anniversary of Västmanlands-Dala Nation at Uppsala University. The student nations at Uppsala and Lund in Sweden, and at Helsinki and Åbo in Finland are student organisations,  they provide a lot of services and entertainment for the students at the universities. They are also quite important cultural institutions, for example V-Dala nation owns and is based in one of only two houses in Sweden by the famous architect Alvar Aalto and actually has the largest private library in Sweden that actually lends out books, the king has a larger collection but he keeps them to himself. When I was a student I was very involved in the V-Dala nation, especially with the library and spex (a special kind of comedic theatre) and was elected as a senior member before leaving the student life behind, it is kind of an honorary title you get when you have been involved as a member long enough, it also means that you continue to get invitations to all the festivities and fun stuff, like the anniversary ball.

For the ball I was clear on that I wanted to use the corset and shrug that I made to wear at my sister's wedding,. and then a black skirt, the construction posts for the skirt can be found under the tag 1895 skirt. The ball started with the opening of an exhibition about the history of V-Dala at Gustavianum
which was the main university building in the 17th century and is now housing the Uppsala University museum. It also has some nice stairwells so I got a couple of photos taken of me there.


 Later on the ball continued at the V-Dala nation's house. And even if it's a big house, with 400 people in there quite a few still managed to step on the train of my skirt. I managed to dance at least the waltz without too much trouble though.


Just the facts
The Challenge: 23 Modern history
Fabric: 3 m of black silk taffeta, 3 m of cotton broadcloth for lining
Pattern: The Ladies' treasure 1895 skirt pattern, taken from Young Ladies' Journal 1895. To save some fabric I used a single, but gathered, back panel instead of two shaped ones though.
Year: 1895
Notions: regular sewing thread, 5 sets of hooks and bars, 1 m sturdy cotton tape to reinforce the waistband
How historically accurate is it? I would say that this one is pretty spot on, except that I just zig-zagged the raw edges instead of finishing them properly. I have probably done some misses in the process though so maybe 90%.
Hours to complete: 15 hours
First worn: At a ball on November 22.
Total cost: I picked up the silk in New York for $5/yard and then I had the to only by the hooks and bars and the cotton tape. The cotton for the interlining was scrounged from bits and pieces in my stash in total I would say around $40 if I calculate what the cotton would have cost to buy new.

What I learnt with this projcet
I made a placket for the first time, following these instructions It worked perfectly, eventhough I miscalcualted the width for it and the part that goes under the opening was just 0,5 cm. I also used hooks and bars for the first time, and I loved it compared to hooks and eyes or hook and eye tape. The lower sets of the skirt opening did not stay closed though, since there was no tension in the fabric there, but thanks to the placket nobody except me noticed that though.

Future plans
I actually made the waist a bit too big, so I need to take it in a bit, or maybe just change where I put the hook and bar on the waistband. I've also gotten the advice to alternate the position of the hooks and bars, so I will redo that to see if all the sets stay closed that way. I will also need to clean the train, since there are visible footprints on it, or at least grey smudging. As for using the skirt in the future. I love this skirt and I have around one meter of black fabric left that should be enough to make period correct bodice. I also have a lot of ideas on how base a steampunk outfit around this skirt. Simply put I see this as being my big, black skirt that can be just as usable as an LBD.


Bonus
The corset is also a modern usage of historical clothres, since it's Truly Victorians basic TV110 late 1880's corset. The shrug is my own frankenpatterned creation though.

Thursday 20 November 2014

Skirt is done

And with that I'm finished with what I'm going to wear on Saturday, now it's only the little matter of packing it all, and cleaning up before leaving tomorrow morning.

My hooks and bars arrived, and I'm really happy with the result, much more secure than hooks and eyes. I'm going to put together a more proper post about this when I' have pictures of me wearing it but here's a glimpse

It doesn't have the petticoat under it, so it will be poofier. I did leave a small train on it, but when I'm wearing heels the front should just touch the floor or be slightly above it.

And here's a teaser for what I'm going to wear.

Wednesday 19 November 2014

Just the hem left, yeah, right

So today my plan was to just finish attaching the hem, should be easy. Yesterday I had pieced together a deep hem facing from the leftovers of the fabric that I had used as flatlining. I had sewn it to the skirt edge and it should only be to attach it to the flatlining.

Well my piecing apparently hadn't been as precise as I wanted, and since it was pieced the grainlines of the pieces didn't line up properly with the fabric. The result was a lot of stress wrinkles in the fabric. I tried to pin both fabric into submission, then I even cut some deep cuts into the hem facing to release some of the stress, it still didn't look good though. So after around three hours I gave up. I cut down the hem facing, so instead of a knee deep hem facing I know have just around 10 cm, but it looks so much better and the wrinkles have disappeared.

I still have to attach the hem facing, by hand, but I'm not too stressed. I have one evening left, and that should be enough to finish the hem and mend the shrug that I'm going to wear, it had a bit of tear in the underarm seam. If I have time I would like to add an extra dust ruffle to either the petticoat or the skirt, since the hem facing isn't as deep as I want and I want to protect the skirt properly.

Sunday 16 November 2014

Decisions, decisions

So I need to decide if I should be practical and cut off the length of the skirt, or let it stay majestic with a train that puddles nicely in the back. I love the look of the train, but wearing it outside in November will be a nightmare, even if I make a really deep hem facing for it. Tomorrow I will have to start with the hemming, so I need to decide until then.

I've been away in Uppsala over the weekend, but I got some sewing done anyway, alas it wasn't for me. I helped Kee to start on her ballgown, since she has almost no time to make it until Saturday. I could at leat help her with flatlining and assembling most of the bodice and finishing the neckline, and come up with a solution for some gaping in the bodice, she will have to make the rest herself though.

I was also glad to discover that Åhlens in Uppsala carry hooks and bars, so if the ones I have ordered don't arrive until Thursday, since I leave for the ball before I get the mail on Friday, I can at least get hold of some expensive ones. My hooks and bars have been shipped though so I hope they will arrive in time. I also couldn't help myself and I have picked up a little tiara to wear, and if that feels like too much I bought a soft lace/flower hairband as well so I have something to choose from.

I haven't been to a ball in a really long time I'm really looking forward to this.

Thursday 13 November 2014

The black, crispy ballskirt

I have made progress, and enough progress that I don't feel too stressed about finishing the ballskirt for the ball next weekend.

Now with my big petticoat I needed something to match it, and I figured why not make an accurate late 19th century skirt to go with it. This is not an era that I'm terribly fond of, or have studied a lot, so my first step was to go out and find some inspiration. I was definitely drawn towards the late 1890s when it came to skirt. I put some of the pictures that I found on my pinterest board. Two of the dresses that I fell for immediately were thes

Portrait of a Lady in Black", c. 1895, by William Merritt Chase (American, 1849-1916).
Evening Dress 1898-1899, Metropolitan Museum
I liked the fairly simple front, and then you have all the fabric cascading in the back. For a pattern I went to this free pattern for an 1895 skirt. I didn't try to scale it up, I rather used it as a guiding line for making my own pattern.

It turned out I definitely had enough fabric of my fancy fabric, but I could just find bits and pieces of dark fabric I could use as an underlining, I didn't want to use light fabric under the black taffeta. That made me do some changes to the pattern, most of all I didn't do the two back pieces, instead I've cut out one rectangular piece that I'm going to pleat in the back. In that way it's more like the back of an 18th century gown. The skirt consists of one front piece, cut on fold, two side pieces, two side back pieces and one back piece. The front piece has two darts and all the others, except for the back, has one dart to give shape to the skirt.

My process so far has been to first flatline all the pieces. Then I made a placket between the left side and side back piece, according to these instructions It's the first time I've made a placket, and except for making it a bit too narrow it wasn't hard at all  Then I sewed all the darts and then I finally attached all the panels to each other.


 I've started to play around with the pleating in the back, nothing really serious but I haven't decided about using knife pleats or box pleats yet. I need to wait with that until I have fixed the front though.
.The front is way too big. I can't pull it tighter, then it gets too tight over the thighs and knees, so I will have to make the darts much bigger, and possibly take in the side seams as well.


Monday 10 November 2014

HSF Challenge: 21 redo, or attack of the Edwardian snow monster

Some times things just happen. In two weeks I'm going to an anniversary ball. At first I hadn't thought about making a new ballgown, but rather reuse one of my old ones or actually go in one of my 18th century gowns. Then I made the really fancy corset for my sister's wedding, and I want to use it again, so I decided to wear it for the ball. Only thing is that I needed a long skirt to wear with it. In New York I picked up some black silk taffeta and this weekend my plan was to sew the skirt. I had planned, and bought fabric enough, for something similar to this Truly Victorian pattern, without the train.

As the good costumer I am I realized that before making a skirt I need a petticoat to go with it, so on Sunday I started to cut out a simple petticoat. I didn't want to have seam at the centre front, so it consisted of three trapezoid pieces, 80 cm at the bottom and 40 at the top.


The front piece was stretched fairly tight, with just two small pleats to give some room over the hips, and the two back pieces were pleated to give some fullness there.


It's a actually a bit too tight over the hips, so there is some wrinkling, but that's a good lesson for when I want to make an outer skirt.

Then I went online to look get some inspiration to add a ruffle or two. I especially fell in love with this petticoat from 1895
Metropolitan Museum
And then it spiralled. I started with adding a quite wide ruffle of the same material as the petticoat. The ruffle is about five times longer than the circumference of the petticoat hem. In order to make the hem sturdier, and also because I thought it looked good, I reinforced it by making four rows of stitch lines on it.

Now unlike the originals I didn't have a lot of lovely and soft lace to go on with, but I had around three meters of cotton voile. I cut it up into strips, and gathered them as another layer of ruffles. When I started sewing them on it started to feel more like a battle with a snowmonster than a sewing project.
The added layer of voile ruffles made a lot to make the petticoat more airey and floaty.
I even had a bit of cotton voile left, so I cut that up as well and added a small extra ruffle on the back, there wasn't enough for it to go all the way round.
Then I wanted to add another ruffle, that was a bit sturdier than the voile ruffle. I once again used the same fabric as the main skirt. To decorate that fabric my plan was to add several rows of pintucks at the bottom of the ruffle. I used my pintuck presserfoot and twin needle, only to discover that I didn't have sewing thread that was good enough. This is a lesson learnt, the sewing thread that I had kept getting fuzzy and breaking when it was treaded to the twin needle. I had a tiny remnant of offwhite Güterman thread and with that one I could just sew on and on and on, but it only lasted for half a row of pintucks. With the bad thread I had to retread the machine after around 20 cm, and after three rows of pintucks I gave up. By now it was around 22, and I had been sewing since 9 in the morning. I added the ruffle on to the petticoat, without as many pintucks as I wanted.

 
Up until the problem with the pintucks this is one of the most stressfree projects I've made in a really long time. Only problem is that the petticoat is now bigger than my original plan for ballskirt, so I have to think about it. I've just flung the black fabric on my dressform, and it definitely speaks to me, but that will involve more complicated pattern making and construction that I had planned, and what I have time for since I only have a couple of weeknights to work with to get the skirt done.

Just the facts
The Challenge: 21 Redo
Challenges re-done: #4 Under it all
Fabric: 5 m cotton (now the store called it cretonne, but it is simply a cotton plainweave) 2,5 m cotton voile
Pattern: My own,  
Year: 1890s
Notions: regular sewing thread, hook and eye  
How historically accurate is it? The fabric and style is correct. I did use modern presserfeet to help with sewing the ruffles and the pintucks, so I would say around 80%.
Hours to complete: 12 hours
First worn: Not yet
Total cost: $30

What I learnt with this projcet
Only use good quality thread

Future plans
This will be the foundation for a ballskirt, I'm already thinking about how I can use that skirt to make some kind of 1890s ensemble or steampunk outfit some time in the future.


Thursday 6 November 2014

Star Wars Costumes - The Original Trilogy

It actually arrived last week on my doorstep, but it's taken some time to fully go through it and absorb it all, and I still haven't really dived into the hard armour costumes.

It is a beautiful book and a must have for a Star Wars costumer. It's about the same size as the Dressing a Galaxy, the book about the prequel costumes. I really enjoyed the forewords from the costume designers, as well as the texts about each costume where they go into the detail on what the costume meant in the development of the character.

As for costume info,well it's clear that it's made for us serious costumers. They are clear to note that for example the picture of the Classic Leia gown is from the ESB gown and not the ANH gown, and that the fabrics in them are different. Just the same there are three folodouts, one for each variation of stormtrooper from ANH, ESB and ROTJ. There simply are lots and lots of details, I would actually say it's more detailed than Dressing a Galaxy.

Another difference to Dressing a Galaxy is the focus on background characters, maybe not so strange when you compare the amount of costumes worn by the main characters in the two trilogies. Here it's a lot about pilots and troopers, so definitely more "male" costumes than in DAG.

My favorite new info is that it actually tells that both Bespin Leia and the Classic Leia are made out of crepe de chine.

The only disappointment was that it's not a single picture of Leia's ceremonial gown, from the end scene of ANH and that the only Leia spread out is of the bikini.

For my personal costumes I now feel that my A-wing pilot is so inaccurate, but I'm stoked to add more details to my Endor trooper. I've totally misjudged how the Endor poncho is constructed, but I still think mine looks good enough.

The costumes featured in the book are:

ANH
Classic Leia
Imperial Officers
Rebel Fleet Trooper
Darth Vader
Stormtrooper
Obi-Wan "Ben" Kenobi
Luke Skywalker, farmboy
sketches of cantina costumes
Han Solo
Chewbacca
C-3PO
Tatooine Protocol Droid
Jawa
Tusken Raider
Death Star Droid (protocol droid)
Imperial Guard & Gunner
TIE pilot
X-wing pilot
Luke's ceremonial pants

ESB
Luke Skywalker - Hoth Uniform
Han Solo - Hoth Uniform (the parka)
Princess Leia - Hoth Uniform
R2-D2
Rebel Commandos (Hoth)
Rebel Officers  & Technicians (Hoth)
Snowspeeder pilots
Snowtrooper
AT-AT driver
General Veer's battle armor
Yoda
Boba Fett
Bounty Hunters
Han Solo
Lando Calrissian - Bespin administrator
Princess Leia - Bespin gown
Bespin Security guard
Luke Skywalker - Bespin fatigues
Stormtrooper MK II

ROTJ
Princess Leia - bounty hunter disguise
Luke Skywalker - jedi knight
Bib Fortuna
Gamorrean Guard
Slave Leia
Lando Calrissian - skiff guard
Skiff guards (humans)
Skiff Guards - Queequeg & Barada
Skiff Guards - (Nikto & Woof)
Skiff guards - helmets
Sandstorm outfits
Mon Mothma
Lando Calrissian - General Uniform
Rebel technicians
The Emperor
Royal Guards
Imperial Dignitary
Rebel Endor Commando
Han Solo - Endor Duster
Luke Skywalker - Endor poncho
Princess Leia - Endor Uniform
Rebel Prune Face
Biker Scout
Princess Leia - Ewok village dress
Ewoks
Darth Vader
Stormtrooper
AT-ST driver
Admiral Ackbar
Rebel Pilots (A-, B-, Y-wing)

Monday 3 November 2014

Con Report: Comic-Con Stockholm 2014

In the end I went to Comic-Con for 1,5 days. I couldn't take Thursday or Friday off and then I felt that it was better to take the first morning train so that I was in Stockholm by lunch on Saturday rather than just spending a lot of money in order to get to Stockholm and stay an extra night at a hotel.

My big plan for Comic-Con had of course been Coronation Elsa, but since that one is now pushed back to just some date in the future I reverted back to rebel cheerleader, jawa and Endor Leia, my three most comfortable costumes.

My general impression of Comic-Con was that there was still a lot of focus on games, but there was some interesting panels and stuff. I didn't go to any, but that was because they ones I was interested in took place on Thursday and Friday. II ended up spending all my time with the Nordic Garrison and Nordic Base.

As for costumes, it was great to see so many costumes, and quite fun costumes as well. I could hardly recognize anyone, but that's not the point, it was still so fun just seeing cosplayers around. It was definitely the right venue to wear my cheerleader, and the cancan trooper would have worked here as well. Both those costumes have been total flops at the SSFGGC.

The best costumes that I saw, and recognized, were the Disney ones.

 This Merida was great, and the quality of the fabric and stitching was really nice.
There were a couple of Elsa:s and Annas:s there was another pair of them but I only saw them when one of the was standing eating, and I don't want to take pictures of cosplayers who are "on a break".

The costume that made me most excited though was this
I am a huge Les Mis-fans and it almost made me sad that I didn't have any of my red Enjolras-inspired jackets around so that I could take a picture with her. After this I've been going around humming on Les Mis for two days now.

As I said my own costuming was the jawa and Endor Leia. The jawa was my main costume, so I wore it for the parade on Saturday, and after that I ran around with my partner from Finland. He's a wonderful child that has gotten both his parents involved in SW costuming.
He's adorable, and has a proper soundssystem with jawa sound files, so we were stopped quite a lot when we walked around. A big problem for me though was that the whole convention hall was darkened down and I could hardly see anything. After all my eyes are covered with black fabric, and right under them I have two glowing lights that totally destroy my night vision. Still the jawa is so much fun to wear. You can jump around and play with people and just act like a big kid. I think I need to wear a sports bra under the costume though, since I got a few comments about being a clearly female jawa.

I had brought the Endor Leia as well, and since our regular Leia felt a bit out of sorts for the parade on Sunday I wore it for that, so we would have Han, Luke and Leia present. Even if I was Endor Leia I got a bit of jawa sitting duty and took care of both the Finnish jawa and an even smaller one that is the child of one of our members in Skåne.

We got one big photo outside as well, with most of our members in costume.

There weren't too many of us from the Nordic Base at this convention, so our NB only photo wasn't quite as impressive.

I was out of costume here because I had been in a panel about the Nordic Legions. On Saturday I presented the panel, but since organizers had named it "how to become a stormtrooper" I also brought one of the TK experts from the NG with me. There were around 25 people for the panel, which wasn't too bad since it was the last point on the programme, and collided with a special 30th anniversary screening of Ghostbusters. I also felt that the people that listened were seriously interested, so hopefully we have gotten some new recruits for both the base and the garrison. * a special wave to Johanna that I spoke with for around 40 minutes about making a Leia costume, if you read this* On Sunday Andrew from the NG held the talk, but I went there and assisted him in case there were any questions about soft costumes.