About the blog

Saturday, 26 July 2014

HSF Challenge 14 Paisley & Plaid

What is this, me doing an HSF challenge, shouldn't I be busy sewing a wedding gown. The thing is when I first read about this challenge I was sure that I was going to skip it since I'm not a fan of either patterns. Then when I cleared out my stash in the winter I found that I still had a remnant blue/brown plaid wool. This is actually the oldes remnant in my stash, I originally bought this fabric back in 1995, when I was 13, and I made a skirt and a jacket out of it. I got a lot of help from my sister, but still it was the first time I did something I could wear. I loved the skirt and had it for many years, the jacket didn't get much use though. When I found this remnant I realized that it was just about enough to make a fitted skirt from it, and that made me really want to do this challenge

Also the pattern I've used for the skirt was me testing a pattern that I want to make a skirt for myself for the wedding, so it didn't feel like I was wasting time doing a challenge. Lastly it's actually been really relaxing to make a simple pattern in fabrics that behave nicely, and it was a good thing to make me remember the pure fun of sewing.

I didn't have enough fabric to make a very wide skirt, and even though the pencil skirt would come later than 1945, the cut-off date for HSF, there are examples of slim skirts from the 1940's

McCall 1940, it's even plaid
Du Barry, 1945
McCall's, 1945
Having found enough references to fitted skirts with darts I was happy to be able to make that kind of skirt for the challenge. The last McCall's pattern was the one closest to what I was going for, I put the tiny slit in the back and eliminated the center front seam though.


The Challenge: 14 Paisley & Plaid
Fabric: 70 cm blue/brown plaid wool, 70 cm poly lining, 5 cm brown wool blend (waistband)

Pattern: Butterick 4451

Year: 1945
Notions: regular sewing thread, zipper

How historically accurate is it? I really don't know, since I've never really researched vintage sewing techniques. The lining is poly, but except for that everything should be period correct, so maybe 80%

Hours to complete: Two evenings

First worn: Not yet, we are in the middle of a heat wave so not really the best weather for a wool skirt

Total cost: The lining, $6, the rest from the stash, the wool would probably have been quite expensive back in the days though so I'm not counting this as under $10.


What I learnt with this projcet
This project was a simple one, but now I've found a skirt pattern that I really like so I'm pretty sure I'm going to use it for more skirts in the future.

Future plans
I probably have enough of the brown wool I used for the waistband to make a jacket, I've also saved the scraps from the plaid fabric so I would really like to do a matching jacket with plaid details, I'm not sure if I'm going for a vintage style or more modern style for that though.

I'm definitely going to use this skirt for work as soon as the weather gets colder.


Saturday, 19 July 2014

How to do a very simple 18th century hairstyle

I took a bit of a break from sewing the wedding gown on Thursday. Some of the summer workers wanted to hear about 18th century hair and fashion, since we are invited to a Venetian ball in early August. I of course decided to dress up and bring my dresses with me. It was a hot day and I was really tired so I didn't feel like wearing a wig, or doing some advanced styling of my own hair. I've also managed to loose my small cap, so I needed to do something about the hair.

I decided to do a quick ca 1770 pouf. The pouf is a hairstyle where you want to go as high as possible. Of course doing a high pouf requires a lot of hair, and some structure to pile the hair to.
Fashion plate ca 1770, from http://damesalamode.tumblr.com
Not all poufs were this high though, there are quite a few paintings showing lower, and more restrained poufs.

http://www.wga.hu/detail/c/copley/henshaw.jpg
http://www.wga.hu/frames-e.html?/html/l/levitsky/portrai1.html
In order to create a simple pouf I used hairpins, three bump-its and a hairbrush. I never got around to taking pictures of the finished result, but here is when I tried to redo the pouf earlier today. As usual I have just used the selfie angle on my mobile, so the photo quality is dreadful, but I hope you can see what I did at least.
 This is my hair in its natural state. It falls to a bit below my shoulders. My hair is very fine, but there's a lot of it. On Thursday my hair was newly washed and it had more volume, which made the end result look better. Today when I did it I hadn't been washed, the same day so it was flatter and a bit greasy, which meant that the end result wasn't quite as poofy.

Step 1 - I plugged in my curling iron.

Step 2 - I combed all the hair down over my face, making sure that I didn't get a visible parting at the center of the head.


Step 3 - I placed the three bump-its on the top of the head. I have one larger and two smaller bump-its, and I placed the largest one in the middle. It's of course possible to use something else than bump-its, before I bought them I had a nylon sock filled with scap fabrics that I used, and of course you can use a proper hair rat. I like the bump-its because they don't need to be pinned in place and they are so light that I hardly feel them.

Step 4 - I combed the hair back over the bump-its and pinned it in place. If I had had someone to help me I would have curled some of the longer strands of hair and pinned them up towards the bump-its, now I just pinned everything except one strand of hair, up unto the crown of the hair so I got a smooth eggshaped hairstyle.

Step 5 - I used the curling iron to get one curl that hung down the neck. The whole process of getting the hair in position didn't take longer than it took the curling iron to heat up. I also looked for what I had around and added a feather up on the top. I'm not totally happy here with how flat the sides look, but if I make sure that I  have newly washed hair it will automatically have more volume.

Finish it all off with hairspray.

If you want to have more volume, and depending on your hair, it can definitely help to tease the hair before it's pinned up, but this was a hairstyle that I wanted to make in less than 10 minutes, and don't spend hours afterwards to untangle the hair.

Then of course if you want it more glamorous it's just to add loose hair, pearls, feather and basically as much as you can on top.


And for those of you with shorter hair I give you this picture of the Leigh family, where the two older girls definitely have short hair, almost like a long pixie cut.
http://www.wga.hu/art/r/romney/leighfam.jpg

Wednesday, 16 July 2014

Costume plans

So working on a project for someone else, like my sister's wedding dress, has made my head starting to spin about future projects. I'm also definitely feeling a bit of trooping abstinence, so even if I had a nice time in Sala I would love to do a larger costuming event. Well it looks like the next one might be the new ComicComic that is starting up in Stockholm in the first weekend of November. I have decided that I want to be part of the cosplay competition, and I have started to gather supplies for that project. I'm going to hold back on it until I'm ready to commit to it.

So I promised myself that I wouldn't buy fabric unless I had a plan for it, but I've already broken that. I was in town and passed by the only decent fabric store, and they had a sale. Unfortunately the sale is because it's closing down. I've tried to make my best to make it profitable, but it is a shop for home textiles so except for some quilting cottons with historical prints I haven't been able to buy anything but ribbons, threads and beads, and that's not exactly large sums of money.

I picked up 3 meters of this fabric, even with a sale it was still $18/m. I guess I'm going to add it into the pile of fabrics suitable for 18th century jackets. I would love to make it into a pet en l'air, but it's really narrow so I'm not sure if it's enough for that.

Thursday, 10 July 2014

Dreaming of future pasts

I got inspired by this post by Isis to put down what I would like to do in the future. My main focus for the near future will probably continue to be 18th century, since I want to make a versatile wardrobe for that era, and of course Star Wars.

To finish off my 18th century wardrobe I would like to do two jackets and two skirts. I would like one pierrot style jacket.

and one pet en l'air
I have fabric for these two jackets already. I would also like to make one or two  petticoats in different fabrics so that I will have quite a variety of jackets, robes and petticoats to mix and match. For the pet en l'air I would also need to make a pair of pocket hoops. All in all the pet en l'air would be a training project before I finally make a proper robe francaise. I'm usually more in favor of the English fashion, with fitted backs, but I think a proper 18th century wardrobe need a robe francaise as well.
Before finishing this I need to make a pair of 18th century stays that actually fits well, and I think it's time for me to leave the premade patterns and actually draft my own, then finally I might achieve a fit and shape that I'm happy with.

Other centuries

I've never been a fan of medieval fashion, but I've seen a couple of nice cotehardies, so I might very well do one in the future. Something along the lines of this quite simple gown.
I think I would like to get more comfortable with draping before trying this kind of dress though.

A fashion that I do love is the German renaissance, This was also a fashion that was popular in Sweden, so yes I would like to finally be able to dress like my favorite era in Swedish political history. I would like something similar to this
I'm not a big fan of too puffy, or too slashed, sleeves so I would probably like to keep it quite simple and muted.

As for the 17th century. Well I'm not a fan of that century at all, but one day I will recreate the simple dress of the woman, a master miner's wife, that can be found on a map of the Falun mine from 1682. It's a quite simple thing, a jacket and a skirt and with some kind of wimple.

Then comes my ever favorite era, but an era where I didn't think I would be able to find any events, and that is the late 19th century. I've loved the bustle era for a really long time, but lately I've started to get more and more fond of the natural form, with its sleeker shapes, so something more like this


That's it for historical fashions. When it comes to Star Wars there are two major costumes I would love to do. I'm not joking when I've said that I've been obsessed with Padmé's picnic gown ever since the first photos of it on the Vanity Fair cover in 2002. I have already gathered some material, several years ago I was part of a group buy with made it possible for me to get hold of both the exact arm wrapping ribbons and the sequins for the skirt and blouse, I also have the hair nets.
Another dream project would be to make Leia's Bespin gown, but oh to sit down with the energy of doing all those crazy embroideries.
So there you have it, some of the kinds of costumes that I would like to do one day, and that is even without what might surface with the new Star Wars Rebels TV sereis and the new Star Wars films. I am a "one project at a time"-person though, so you all realize that making these costumes would take many years, and in that time period I might as well change my mind.

Sunday, 6 July 2014

Combining light and dark

Today I got a new icon/avatar for the Nordic Garrison forum. I've used my tusken female since I became a member, but last week I decided to retire that costume from the database. It only felt fair since by now the only thing I still have from that costume is the hood. I need to make a new undergown, fix my mask kit and put a bone to the bag. I still have the jawa to keep my 501st membership until then though.

Anyway Nordic Garrison has decided that we should use "buckets off"-pictures for our avatars, since it's nice to be able to recognize the faces you meet at troops and not only see helmets and masks. Another new thing is that Nordic Base just moved in to the forum, so it's nowadays called the Nordic Legions forum, even if the url keeps the nordicgarrison.net adress. I used the picture that I took in December with me as a jawa, but I was in a hurry so I never removed the Amidala make up before putting on the jawa. And I must say that the make up held up surprisingly well under the jawa mask.

Now I have an icon that I think combines both my 501st and Rebel Legion identities, and you can see it also has both the imperial cog and the rebel bird in the corner. Maybe I should call it Amijawa.

Anyway if you are interested in Star Wars costuming, no matter if it's on the dark or light side, and you are in Sweden, Denmark, Norway or Finland you are very welcome to the Nordic Legions forum


Yes, jawas are supposed to be shorter than me, but there are no height restrictions if you want to be a member of the legions and there are actually tall jawas in the background in A New Hope. I still prefer my Tusken, so this is more a costume to just make me able to troop until the new Tusken is finished.


Saturday, 5 July 2014

Revolutionary shoes

The last thing I needed to complete my revolutionary outfit was a pair of red shoes. I'd love to get my hands on a pair of red Kensington from American Duchess, but I will have to wait and see if they'll come back. Without any luck in finding accurate shoes, I had to make decent shoes. I'm not going to start with shoemaking, so it was a question of refurbishing a pair of excisting shoes.

These were a pair of beige leather pumps that I picked up from a second hand store in May. The first thing I had to do was dye them red. I found a product called All-in-one leather shoe recolouring/dye stain pigment paint on ebay.

I didn't clean the shoes properly before starting to apply the paint. The first layer was a real disappointment. I used just a thing layer, thinking that it would be good to use as a primer, the result was a blotchy pink shade. You could see every stroke from the inbuilt brush and the shade was horrible. I was ready to give up, especially since the colour wasn't the bright red that I wanted, but decided to try some more layers. For the next layer I took a lot of paint on the brush, it was dripping with paint, and applied generously all over the shoe. That was the trick, all of a sudden the the shoes turned an uniform bright red shade. I had the shoes rest over night and then I added another thick layers just to be sure.


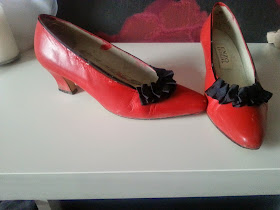
I was very happy with this result. In the original fashion plate the only thing visible is a plain red toe, I felt that it was a bit too plain though. The shoes I had dyed basically looked like just a red pair of pumps and didn't look 18th century enough. I decided to trim them a bit, but not too much. I added a thin black piece of satin ribbon round the opening, using superglue. Then I boxpleated two pieced of grosgrain ribbon. I put a row of stitches down the middle, to keep the pleats in shape, and then I used more superglue to attach them to the front.
This is the final result, after having been worn a full day. You can see that I've missed and put some dye on the inside as well. I didn't put any sealer on the paint. After having worn them a whole day in quite moist conditions, and including dancing on asphalt, I still think they hold up very well. There are some scratches on the toes, but I can touch up on the paint no problem, and the dye hasn't bleed. I don't have any marks on my feet, or my white stockings either. The only bad thing with the shoes are that they are pointier than I'm used to, so my little toes felt quite squeezed after a couple of hours. The heel was very comfortable though.

Just the facts
Materials: one pair of second hand pumps, one bottle of all-in-one leather dye, satin ribbon, grosgrain ribbon.
Cost: $30 (split more or less half between the shoes and the paint)
Year: Late 18th century
How historically accurate is it? Not very, 10% for the general look.
Hours to complete: 2, but a lot of waiting time to let the paint dry
First worn: 28th of June for Silvergruvans Dagar in Sala.

What I've learned with the project
My main lesson was that it isn't hard to dye and trim shoes, and I'm probably going do similar things in the future.