About the blog

Saturday, 30 December 2017

Favorite photos of 2017

In this post I have picked out some of my favorite photos of the past year. In no particular order.

Bellosom found the sun in the shadow of an Onyx.

With my TLJ Leia I finally have a costume where I feel that I also resemble the character physically

This summer I found my inner calling to be a 16th century ninja

Captain Carp and Bellossom-Girl

I never thought that I would go out and actually feel great while  wearing just spandex superhero garb. 

Who do you call short?

Rebels tearin down the Empire

Me and Denis Lawson, the one and only Wedge Antilles.

Tuesday, 26 December 2017

Looking back at the 2017 sewing projects

It's time to look back at this year and see what I did. First of all this year didn't turn out in any way what I had planned. Of the projects on my planned list I only finished one of eight. Overall I didn't feel very inspired or productive. A large part was probably due to the fact that I remodelled my kitchen. Not just the time it actually took, but also the planning around it and how it actually took me until the autumn until I had finished putting everything back in the kitchen from my living room, the kitchen was done in March.

That being said one of the best things that have happened this year was that Cosplay Dalarna evolved into a weekly meeting where you hang around and talk about costuming plans, it has also taught me a lot when it comes to working with different materials, ie anything outside of fabrics. Through Cosplay Dalarna I also came up with some smaller projects that I had no idea that I would make when the year started. Overall this has been a year of making smaller things, but it hasn't felt as fulfilling as a big costume project.

Anyway these were my plans.

And this is what I actually made this year.

A pair of 18th Century pocket hoops.
My plan on making a full robe à la francaise stayed with the pocket hoops, but at least I have a pair of functioning hoops


A Queen Amidala vintage style outfit, complete with a hat.

I finished my pet en l'air and made a frilly cap to go with it.
I dyed and added sleeves and guards to make my 1520s undergown look like a proper outer gown.
My favorite part of this outfit was the wulsthaube and veil that I made, I also made a hat but that was more of a failure. I loved my wulsthaube though, and it's probably my second favorite piece of the year.

In the summer I also made the 1910's Rilla Corset
.

Then it was time for my craziest project of the year, when I made Pokémon cosplay, and walked around NärCon as Bellossom, I even finished second in the Pokémon cosplay contest. 
The Pokémon cosplay didn't end there, instead I also made a superhero/Pokémon mashup and went to Comic Con Stockholm as Bellossom-Girl.

I made my second fandom fashion piece as well when I used the leftovers from my Greedo dress to make what I call my little Greedo dress.
On a whim I also decided to throw together a Luna Lovegood costume in October.
The year, just like the last two years, ended with a new Star Wars when I made my The Last Jedi Leia in time for the premiere of the film. This felt like my only big project this year, and it felt really good to go so wholeheartedly into something, including patternmaking, wigwork and making the jewellery.


So looking back, maybe I wasn't as unproductive as I felt, it was just that most of my energy was spent on smaller, fun and non-accurate projects. 

Favorite pieces of the year

1. TLJ Leia
2. 1520's wulsthaube
3. Bellossom Girl

Conventions/events that I attended

ArCon, Falun


Most worn costumes
1. Mon Mothma
2. X-wing pilot
3. 1520's gown

I felt that this year I have mostly learnt some smaller craft things, like beading the jewellery for Luna Lovegood and working more with worbla, I also managed to style a wig successfully for the first time.

Saturday, 23 December 2017

The Rilla 1910s corset

This was actually a Project that I spent most of my time in the summer with. I finished it and planned to take some nice photos of it, but it never happened. The corset is packed away for now, and the photos that I did manage to take are not really photos I would like to share, except for this one.

The reason why I made the corset is that I was offered by the Dreamstress to be a pattern tester for it. Since I have plans to someday make a 1910s outfit I felt it would be a fun thing to do, I was also honoured to be chosen as a pattern tester.

The reason why I have these quite ugly photos of me in them is because I had to send in photos together with my review of the pattern.

Overall I can really recommend the pattern for anyone trying out this era. I made sure to follow the instructions exactly as they were written, having done a few corset I could have jumped a few of them, but they were clear and I ended up with a corset with a perfect fit. In fact it was so perfect, according to the measurment instructions that I had to take it in a bit. It closes fully in the back, while I'm used to ending up with a gap.

Since I don't have a 1910s ensemble, I haven't been yet worn the corset for any length of time, but from the fitting and this photo session it felt really comfortable. It's definitely softer than what I'm used to from 18th Century stays or Victorian corsets.

A fun thing though was that when I took these photos I didn't have a shift around, since it's an underbust I needed something to make me a bit decent. Well I was at my mother's house, so in her storage I actually found a shift from my paternal great grandmother. The shape of it makes me pretty certain that it's actually an original piece from the 1910s. Now it was a bit too small fr me, but not worse than when I will start working on a 1910s wardrobe I will just add a small extension (1-2 cm) to the shoulder strap and I would be able to wear it comfortably.

If you want to make your own Rilla corset you can buy the pattern at Scroop patterns.

Friday, 15 December 2017

A quick apron for Mrs. Santa Clause

With The Last Jedi premiere over and done with it's time for me to clean up my workspace, which has taken up my whole living room, and prepare for Christmas. I can definitely say that this is a year when it would have been nice if Chrismas Eve hadn't been on the fourth of advent, basically robbing me of one week to prepare.

Anyway I have some small things to post about before it's time to summarize my costume year.

At my job we have one of the largest Christmas fair's in central Sweden on the second of advent. We go all traditional on it, and our Santas are traditional Swedish Santas or rather Tomtar/Nissar. You can read up on them here.

This year our Tomtar were to be outside the whole time, so they needed a new warmer wardrobe. Most of their clothes were bought, but when our female tomte needed a new apron, and we found a nice green fabric in the storage I sewed one for her.


It was a nice wool fabric in green with yellow and wine coloured stripes. It's pleated to a waistband in the same material. All sewn on machine.

I didn't get any photos of our female tomte, but here is one of our male tomtar wishing you a Merry Christmas.


Thursday, 14 December 2017

The Last Jedi Premiere post

On the 12th of December the Nordic Base, Nordic Garrison and the Mandalorian Mercs in Sweden were invited to the Swedish gala premiere of The Last Jedi. We were offered 11 places in costume, and I was one of them in my TLJ Leia.

I loved my TLJ Leia, I can definitely say that it's one of my favorite SW costumes ever. It's comfortable, but still very regal, and the hair held up.

We mingled around with the other guests until the film started, and then we watched the film at the IMAX 3D.

I got some nice photos, taken by Anna Vikmanis during the evening.


The only group photo we got was taken at the end though, when our Kylo Ren and the stormtroopers had already gone to change so that they could sit down and see the film.

You can see that the red carpet was actually black this time. 

Before the film TV4 was there and interviewed some of us as well.

I had also been contacted by SVT to be on their morningshow, Morgonstudion, so it was an early morning the day after to be at the studio in Stockholm. Well they let me go in taxi from Uppsala, and their make up people made me look nice and fresh despite it being morning.

My sister snagged this screenshot of me. Of course I wore my Greedo-dress and R2 Pearl necklace, but I still think it was too subtle for people to notice it, the other guest was a bit more obvious in his Star Wars sweater.

In the afternoon SVT:s Kulturnyheterna also made an interview. Now for this interview you have to excuse the state of my wig. I had just seen the film for a second time, and the wig had started to slide back and come undone in the back, I also had a blood sugar drop, but I still managed to be coherent.

The whole first 3 minutes of Kulturnyheterna was about Star Wars.

So I've seen the film twice, and when it comes to the costume there are a couple of things I want to change before I submit it to Rebel Legion, it's all to do with the hair and the jewellery.

The hair in the back consists of two small rolled buns, it's basically the classic cinnamon buns but smaller and put on at the nape of the neck. I also need to trim the lace edge better on the wig.

The earrings curve up behind the ear in a small tendril.

The bracelet needs to be redone, both because it was actually too big, and I want it to be in a shape closer to the film.

I want the one stone ring to be bigger.

As for the film itself, well my spoilerfree view is this:

I like it a lot more than TFA. I think Rian Johnson did a great job and I'm really looking forward to him taking care of a whole trilogy. I've never laughed so much in a SW film, but it never turned into a silly comedy. My main issues are with plot points that were taken over from TFA, and that he simply couldn't ignore. So all in all great director that kept me emotionally invested during the film, I just wish he had had a better material to work with. 

If you are familiar with the old expanded universe you can say that the sequels are like the New Jedi Order book series, with TLJ being the Aaron Allston installements.


Monday, 11 December 2017

TLJ Leia hair

I have managed to style a wig good enough to be happy with it, and this is really the first time that has happened.


This is the wig that I started off with, brown lace front wig. I would actually say that I think it's a bit too long, I think it would be easier to work with a shorter wig and add hairpieces to it. And the stand for my dressform works great to put a wig on as well.


It was quite layered and uneven in the back, so I simply cut off the longest layers.

Then I should have taken progress photos, but I didn't. Basically I put the wig on my own head and added a foam roll to the back. I combed the front hair over the foam roll and took twisted a piece of the hair from the back and rolled it around the foam roll. I did this while wearing the wig. When I was happy with the front I took it of and put it on my wig block and worked the back. For the back I divided the hair into four loops, and held them in place with elastic. I saved some strands of hair so that I could twist them and hide the elastics under them. 

Here is the finished wig.

And here is me wearing the wig, but without trying to hide the wigline.

Now I need to construct a wig box so that I can transport the wig when I leave for Stockholm tomorrow. 


Sunday, 10 December 2017

TLJ Leia dress

This is the grey dress Leia wears under the coat.


The dress is made of a poly micro satin, but I used the wrong side out so it's less shiny. It's a great fabric in that it doesn't wrinkle, but it's also dreadful to try and press since it almost refuses to stay pressed.

I wanted the dress to be just big enough to be able to pull it on and off, so I wouldn't need a zipper. For that I used a fairly fitted back, and had the extra material in the front. The dress is based on my standard dress pattern, but I made the skirt an A-line skirt instead of the pencil skirt it is.


I decided to go with a t-shirt sleeve, also to make it easier to pull over the head. The dress is lined in the bodice with the crepe de chine that I failed to dye grey. The lining is attached at the neck opening, but hangs loose as a slip under the dress. The sleeves are unlined.

The belt is a loose belt, with elastic in the back, to keep it tight. It fastens with a hook and bar.

It's threaded through two buttonholes at the side, and then inbetween the lining and main fabric in the back.


Saturday, 9 December 2017

TLJ Leia jewellery

I'm at that time in the costume process where I'm too stressed to take photos of my progress. Yesterday I struggle and struggled with the wig until too late, and now I'm too tired to actually get things done. So I took a step back and decided to take photos of the jewellery that I have made.


Worbla is a cosplayers best friend.

The bracelet is a piece of worbla that has also been reinforced with strips of worbla on the back. The strips made it strong enought to hold the shape, but flexible enough to be able to easily take it on and off. I covered the worbla with coppercoloured string, that was attached with wood glue. Then it was painted with acrylic brass paint.


The earrings are semiovals of worbla that I heated and bent into shape. I'm really happy with one of them, but I couldn't get the other one as good. I will probably redo these, or at least one of them. They are attached with a stud that's been glued on and also painted with the same acrylic brass paint.

The ring with two blue stones was bought on etsy from a Canadian 3d printer, there are also metallic copies from China on ebay. For the other ring I didn't have a clear reference until last weekend when someone posted a photo, I couldn't find the reference again though so had to make it from memory. The size might be off, but until there are more available reference photos it will have to do. It's made with fimo clay, similar to sculpy, and painted with acrylic paint in blue and brass.

Overall I am really happy with the jewellery and the brass paint turned out to be really good. I'm surprised that it actually is so shiny and metallic looking even if it's just paint.

Finally I couldn't help myself, so after having struggled to get the wig into a reasonable shape I wanted to do a full costume test. So ignore my bleary face, and the frizzy wig, but I am getting there.


Sunday, 26 November 2017

TLJ Leia coat is finished (almost)

Over the weekend I finished the coat, except for hemming it. I started on Saturday, but then I was thwarted by the fact that I realized that I wouldn't be happy with the fabric I had for a lining, it was both too light grey and to flimsy. I needed another fabric. There are no fabric stores in my town and the one in the closest neighbouring town is closed on Saturdays. I wouldn't let that stop me though. I searched the two op-shops for anything that could work, but my hope of finding black taffeta curtains were squashed in a sea of red. There were just Christmas stuff everywhere. In the end I found two sets of 100% cotton satin bedsheets in white, and even if they were expensive at least they were marked down for Black Friday. Then it was off to the paint store, where they have a small sortiment of textile dyes, and I got all the black dye packages they had (4) for dyeing by hand and not in a machine. I spent the afternoon cutting up the sheets and putting them in a dye bath, I normally just put all the fabric in the dye bath, but I suspected that I had too much fabric and not enough dye so I wanted to just put enough fabric in the dye bath. I ended up with a dark grey fabric with a slight sheen to it, so I was pretty satisfied. I was also really behind my original time plan.

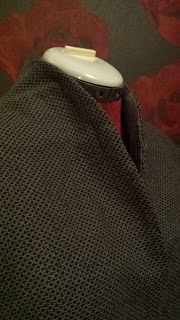
I used my coat pattern, and in the end the coat did go together really well. It's a simple design, with basically just four pieces. Wool and cottons are such easy fabrics to work with as well, you can make them do almost anything you want just with some steam and pressure. I did find the main fabric through etsy. Ever since I started thinking about doing this costume I have searched really wide on both etsy and ebay. This fabric showed up when I searched for grey wool. It's a black or very dark navy wool, with a chainmail pattern in grey yarns over it. The pattern and texture is great, but the fabric is a bit too soft and not shiny enough to be perfect. I am very satisfied with it though.

I sewed the lining the same way. In order to help the stand up collar I added fusible interfacing to the collar part, and down to the bust, on the inside of the lining. I then sewed the lining and outer fabric together at the neck and front by hand.

The lining photographs quite brown, but it is grey. This is the part with the interfacing.

On Sunday I continued with the sleeves. In order to make them more structured I also added fusible interfacing to the straight seams of the sleeves.

If you wonder why I have added the interfacing even out in the seam allowance it's because I don't trust it to stay fused to the fabric, so I wanted to sew it in place as well. I baglined the sleeves and gave them a good press before sewing them to the coat. I sewed the sleeves to both the coat fabric and lining, and then used the lining of the sleeve to cover the seam.

With that the coat is done. I need to hem it, and I want to wait with that until I have finished the underdress. All in all I really love this coat already. Since it's based on a mid 16th century loose gown
I definitely need to make one of those for myself. I guess with the older Leia I finally have a character that I can cosplay, with a body similar to my own. Both with this one, and the general Leia costume from TFA, it's obvious that the costumes are made to accomodate a fairly short and curvy person. The proportions and where the pieces emphasize some parts and hides some part of the body simply makes me feel that they flatter me and that isn't something I'm used to when it comes to cosplay costumes.


Now I need to start on the underdress, and I'm actually more worried about that. I have more fabric to make mistakes, but the fabric that I have will make every mistake clearly visible, and I don't have that much fabric.

Saturday, 25 November 2017

The Last Jedi Leia coat pattern

I finished the pattern for the Leia coat, and even if I didn't take a lot of photos of the process I will share what I did. It also shows how I usually work when I make my patterns.

I cut up my first mock-up. I cut it off at the hips, since it's not fitted below the hips it felt a waste of fabric to work on a full-length version, when I only needed to fit it on the upper body. I also cut the back piece in half, since I had discovered that there was a center back seam.


On this photo the left side looks smoother and better fitted than the right. That is because I start working on both sides, by pinning and repinning the pieces to each other. Once I feel that one side is starting to look better than the other I concentrate on that side and don't work on both sides. I don't take it off though, since I still need the other side so I can hang the mock up on my dress form and on myself.

This stage is a lot of testing. Once I'm happy with what it looks like on the dress form I make sure to test it on myself. The dress form is a great help, but it also has an idealized shape, while I have lumps and bumps and soft flesh that makes me less than ideal.

Most of the shaping was done on the back seam, I also cut the shoulder seam shorter, which make the armscye larger than the first version.

Then it was on to the sleeves. The sleeves were made through trial and error. I simply started with two large square pieces of fabric that I sewed together to create what looked like an oversized pillow cover, with two open sides. Then I folded more and more fabric away, and cut off the excess until it had a shape that I liked.

The last thing I did was to sew the sleeve to the bodice to make sure it all fit together.

back of the mock up

Front of the mock up
The fabric that I'm using is a little bit too flimsy to hold the shape of the sleeve. I will try to make the sleeve with just the main fabric, but I am prepared to do some kind of reinforcing to make it stiffer. I won't know until I have started working on the actual fabric though.

While the mock up is still on the dress form I make sure to write all notes I will need. The most important is of course which piece it is, and how much seam allowance I have used. I also make marks where the pattern pieces should join up.

After I have made all the markings I need on the mock up I cut it up, I do that by simply cutting the seams. During the work I have usually changed the seam allowances while adjusting the fit, by cutting at the seamline I know it will all go together and I can then add my own seam allowance when cutting the main fabric.

These are my final pattern pieces. Top left - back piece, top right - front piece, bottom left - back sleeve, bottom right - front sleeve.

Here is also a close up of the sleeve pieces. They should be joined at the bottom and where they face each other.