About the blog

Monday, 29 July 2024

HSM24 - a new stitch in town: a docken baret

 I couldn't help myself, I just felt that I needed to make a hat for the landsknecht costume that I am making. One thing that helped me was that there are pattern available, so I didn't have to draft my own.

I ordered the pattern from Thimble&Plume - available at their etsy shop.

They don't only have the pattern, they also have a sew-along on their youtube channel, where you can follow each step in the constructions - available here

Since this was made from a commercial pattern, and that there is a youtube tutorial I won't post much about the construction here.

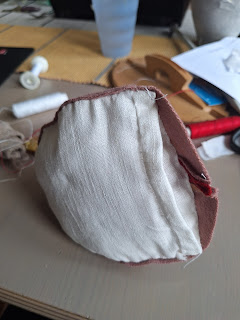
The HSM September challenge was about learning a new stitch, and following the instrucions from Thimble&Plume I learnt the fell stitch. I used that to attach the lining to outer fabric of the hat, previously I would have used a whip stitch, but the fell stitch is basically a whip stitch, but the other way around, and of course Thimble&Plume has a video tutorial describing the differences and taking you through them, available here.

The hat was made from the same wool that I have used for the whole outfit. The most fun part was blinging it out, and for that I used antique silk ribbon, some freshwater pearls and reproduction 16th century buttons that I had in my stash. I did buy some ostrich feathers from a sale, I had first planned to have more, but we will see if I will add more at a later time.

The baret with the silk bows.
Detail of the pearls, feather and bling.

The fell stitch that I used for attaching the lining to the outer fabric.


And my husband trying out his new hat.

What the item is: A 16th century docken baret
How it fits the challenge: I learnt about the fell stitch to attach the lining to the outer fabric
Material: 0,8 m red wool, 0,5 m linen
Pattern: Thimble&Plume´s docken baret
Year: 1520s
Notions: bling, ostrich feathers, antique silk ribbon
How historically accurate is it? around 90%
Hours to complete: 6
First worn: Not yet
Total cost: around $40 (hard to say since everything except feathers were from my stash

Sunday, 28 July 2024

NärCon and the debut of winter Daisy

 After skipping it last year, of course I wanted to go to NärCon this year. After all it is the largest cosplay and nerd festival in Northern Europe. Me and my husband were originally invited to a party that would have made it impossible for me to visit more than one day, and when that party was cancelled due to some sad reasons I couldn't find a decently priced hotel. Then I realized that it only takes a bit more than an hour for me to drive from my parents-in-law's house to NärCon, and since we were visiting there for a week anyway it was an easy thing to drive back and forth for two days.

I of course was there with the Swedish Garrison, and could once again wear my Admiral Daala.

I am so happy that my gastric bypass has me fit into, and feel comfortable, in my old costumes again.

Twice a day we organized a Star Wars parade, where we started and then picked up Star Wars cosplayers alont the way, we also had a talk a day where we presented our costumes and organisations,  501st Legion, Rebel Legion, Mando Mercs, R2 builders and Galactic Academy.

I had great fun debuting my new Princess Daisy from Supermario at the Winter Olympics, or as I call it winter Daisy.


It was such a comfortable costume. I made it when my old computer had died that's why I haven't posted about it before. But it basically consists of a long sleeved t-shirt, that I patterned by simply tracing a t-shirt of my own, a pair of tights from a Burda Style Magazine pattern and a tunic that I frankenpatterend from free jersey dress pattern. The boots were a second hand find and then I just had to add a pair of thin gloves. The whole costume is made in think bamboo jersey, so it was like walking around in a cool set of pyjamas. I reused the crown and jewellery from my regular princess Daisy. The fake fur on the edges was actually from when I bought some fake hermine fur for medieval purposes, and I could carefully cut around the black parts to get strips that were long enough to edge the sleeves and tunic.


The most fun part was that I had found a pair of mini-skis in orange and a pair of ski poles with yellow ends on them, so I just painted the shafts orange, and then I had some fun taking photos on one of the grass hills at NärCon.


This is definitely a costume that will be my go to costume for comfy convention costume, but maybe I need to find something more to carry around instead of skis.


Thursday, 25 July 2024

HSM challenge November - worn by all: a pair of short hose

  I have finished the hose and doublet for my husband's landsknecht outfit, but since we are right now at my in-laws and I didn't have enough points and/or ribbons to be able to close all of the closures and connections a final post will have to wait until we are back home. From the last remnants of fabric I did manage to squeeze out a pair of short hose for him as well.

Short hose are basically long socks when it comes to the 16th century. Women had worn these kinds of hose earlier, but up until then the men had had long hose. There is definitely a theory that by the 16th century, when the men had storted to wear joined hose it was more simple for movement to cut them off at the knee and wear separate hose and socks. 

For inspiration I used this instruction from Rowantree workshop. I would say it was inspiration since I am at my in-laws and didn't have scrap fabric to produce a good pattern before cutting the wool, and also several years ago I made a pair of hose for myself and used a whole sole, instead of having a seam at the instep like in the instruction.

Not being able to make a proper pattern first involved a lot of teeth-grinding and frustration in trying to make something at least fairly fitting. I also didn't have enough fabric to make a pair of the same fabric so had to do one of each, which is of course is good for a landsknecht but maybe not for the middle class or lower upper class that I personally aim for.

The red hose is better than the pink one, and with that one I started with sewing the sole on and fitting that one before closing the back seam, with the pink one I started with the back seam and it made for some strange fitting around the foot. Instead of the triangular gusset in the instruction I had to take in a dart on one of the sides of the foot. The hose will need some kind of garters to stay in place, but at least they are finished. He can also wear the in his normal shoes, I was worried that they would be so bulky that he his normal shoes would be too small, which is good to know when it's time to buy him proper historical shoes.

What the item is: a pair of short hose
How it fits the challenge: Short hose were worn by both men and women of all classes in the 16th century
Material:  around 1 m of wool twill
Pattern: inspired by Rowantree workshop. but with a lot of draping and pinning done during construction
Year: 16th century
Notions: line thread
How historically accurate is it? Around 90%, if we assume that even in historical times not everyone wore well-fitting garments
Hours to complete: 8
First worn: My husband is breaking the in while doing gardening at his parent's place right now
Total cost: $50


Tuesday, 23 July 2024

landsknecht hose part 2 - the codpiece

 So it was time to sew the hose together. For all the seams I have used a rolling stitch with a back stitch every few centimers. I am not sure where I read it, but I am sure that someone recommended the rolling stitch because it is a bit more stretchy than the backstitch, even if the backstitch is stronger.  For the crotch seam I only sewed themtogether down to basically the start of the bum itself. To cover the crotch itself I need a flap, and that flap is also what I attach the codpiece to. 

The general shape is basically a wedge. This first version was a bit too funnel like, I did narrow the top part to make it look more like a wedge in the end. I cut it out on the bias. It was attached to the hose using a backstitch, since it will get a lot of stress when sitting and moving around. 

I didn't make it a two.coloured flap, most of it isn't seen anyway, but I added red square on the top part as an applique to keep the two-colour scheme going.

As for the codpiece itself. Among reenactors it's common to see the rather oblong codpiece as the most common thing, but looking at woodcuts a lot of the codpiece are more round. I simply googled "free fabric ball pattern", and there were loads and I cut out three pieces to make a half sphere instead of six to make a ball. In the photo below you can see the pattern piece above the codpiece. 


I continued with the two colours. The codpiece was stuffed with fabric scraps from the project.


To keep the stuffing from falling out I sewed a backpiece in linen. The backpiece is also a pouch, so that it will be possible for my husband to keep his snuffbox and a credit card in the cod piece. The top of the codpiece isn't stuffed but keeps it shape anyway.

This was the final codpiece.

The codpiece was sewn to the flap, except for the top which was kept open.

To keep the flap, with the codpiece attached, in position there are four lacing holes. The ones on the sides attach to lacing holes on the side of the main lacing for the hose. The middle holes attach to lacing holes under the main lacing. I need to try if I can take them through the same lacing holes. 
The middle lacing also goes through a single hole on the codpiece so it is possible to close the codpiece and keep it attached to the top of the flap. This is not the final laces that I am going to use, but they work for now. I'm actually thinking of using pink silk ribbons and make bows, since a lot of woodcuts have a lot of bows on them, but you rarely see bows on landsknecths today.

And with that it was finally time to be able to put both the doublet and hose on, to start marking out where I should make lacing holes to tie them together.


So for now it's lacing holes and hemming that needs to be done on the hose, and more lacing holes on the doublet, but then it's finished. This is basically what I had set out to do before Medieval week in 10 days, but since I do have time I and some fabric left I am thinking about doing a pair of short hose for the lower legs as well.

I would also love to have the time to adjust my own gown and maybe make a hat, but my main focus is to make sure that he is well dressed in Visby.


Saturday, 20 July 2024

Landsknecht hosen part 1

 A landsknecht needs something on his legs, and for that you need to make a pair of trousers, or hose.


Last year I woked on a pattern for a set of full length hose. That didn't work out very well, they ripped, I tried to repair them, they ripped again and then I cut them up and used the fabric for other things.

I then spent a lot of time searching the web for instuctions on making hose. Here are some of the tutorials and information that I read to get me to understand hose construction better.

Schamlatzhose - Very good instructions on how to avoid mistakes when making them. (In German)

um1504.de - has a pattern for a full length pair of hose that you can print, and instructions on how to sew them. (in German)

When I was working on my own pattern Tudor Tailor also published patterns for both bias cut full length hose and doublet. When this pattern became available I was so long ahead in my own pattern that I decided to stick with it rather than buying their pattern.

Anyway I started my new hose pattern just like I started last year's pair, by tracing a pair of my husband's well-fitting trousers. Now wise from the failure last year I decided that I would finetune the pattern until it was perfect, rather than hoping I could fix it by adjusting it in the final fitting.


This is during the fitting process of vesion 1 of the pattern. After this I needed to make the rise a lot higher, this involved a lot of touching and grabbing of his private parts so it's a good thing he is my husband. I also had to raise the waist and shape it more after his bum. This was made by simply adding darts, and then redoing the patten again and again. The final pattern that I had is numbered as v. 4, so it was a good thing that I had a lot of scrap fabric to use.

Once I was happy with the pattern it was time to decide on if I should use a lining or not I have heard arguments both for and against it. The main reason not to use a lining is that linen and wool stretch differetly and that linen might be too tight and rip, the main reason for a lining is to have it be more comfortable and that the lining will take upp more of the strain so that the finer outer fabric don't rip as easily.

In the end I did make a pair of linen hose from the same pattern, but shorter than what the final pair will be, and this will be mounted inside the hose. One thing that is important is to cut the the hose on the bias, but with this pattern that I had come up with it was impossible to get the full pattern on the bias. The narrow piece, that forms the mid back, is at such an angle that I had to chose if I wanted that piece, or the main piece to be on the bias, the rest of the patter would be straight. For this I decided that it was the narrow piece that had to on he bias, since that would experience the most stretch when sitting and moving around. I had my husband walk around in this short pair of linen hose for a while to see that it wouldn't rip or fail before it was time to cut into the wool.

Now here I had decided that I wanted this rectangular pattern on them.


So I started with cutting a lot of strips of the fabric on the bias and then sewing them together.


Now getting nice rectangular pieces to line up perfectly with each other in such an irregular shape as the hose pattern was impossible. 


I had to do some piecing, but most if is on the inside of the leg and under the crotch, so I hope that it won't be too visible.


When I had an approcimate piece of square fabric I placed the pattern on it and cut it out according to the pattern.

Then it was time to start assemble the hose.


Thursday, 18 July 2024

landsknecht wams/double part 3 - the sleeves

 The main thing with this outfit was going to be the sleeves.

I based the sleeves on my regular S-sleeve pattern that I have made and then did a quick mock-up and tried them on.


I enlarged the pattern and made the shoulder curve a lot more shallow, in the end it would probably have worked just as well with a simply square piece, that would have made it easier all along.


The sleeves where marked with squares and slashes, just like the bodice, but I made the slashes a few centimers larger on the sleeves. Then it was on to hemming them, there were around 50 slashes on each sleeve.


Now for the end of the sleeves I made two circles. This is not something that I have found on other tutorials for making landsknecht sleeves on the web, but a good friend (who has previously worked professionally with sewing) showed me how he had done his sleeves, and that another member of our group also had this kind of sleeve. This circle makes it possible to keep the main sleeve wide all the way to the end, and you don't have to deal with a lot of gathering at the wrist.


The sleeves were constructed with me sewing the outher fabric and one of the sides of the interlining together, then I attached the other side of the interlining over the three layers of fabric. For the sleeves the lining was sewn on its own and I attached it last to cover all the seams of the sleeves, both at the cuffs and the armscye.


To finish the sleeve I added a cuff in linen and the interlining wool. The sleee was basically done, but I wanted more and decided to add some decorations and the seams.


For the decorations I cut strips of the pink wool, rolled them up and then wrapped them in strips of grey wool. I would have preferred black, but I didn't have enough black wool in my stash. I then attached these rolls over the seams at the top and bottom of the sleeve. The rolls could have been thicker, but I have a limited amount of fabric and with the hoses still to be made I didn't want to cut away more than I really had to.

I will say that this sewing all these layers of wool together was really hard on my hands and they really hurt, just like the muscles after a hard training session. Sharp needles are essential to make them go through all the layers of fabric.


The doublet is finished with three sets of lacing holes to one side to close it, and one set of lacing strips holding the flap of the front bodice in plase at the other side. I have also added a small cloth button to close the cuffs.

And now it's on to the hose


Monday, 15 July 2024

Landsknecht wams/doublet part 2 - sewing the bodice

 Once I had hemmed all the slashes it was time to sew the bodice together. For this I started with the linen lining. I don't know if this is the historically correct way of sewing a doublet, but I took my experience from making 18th century bodices, where you first make sure that the lining is fitting well and then you attach the outer fabric to the lining.

First the lining was sewn together and put on, and then I sewed the interlining layer to that. I simply overlapped the seams  to avoid bulk, and since this was done in total three times, two times for the interlining and once with the outer fabric, the seam is basically sewn three times so very strong. Here you can also see that I had started to make alterations of the pattern on the interlining layer, so that I could then cut the lining into the same shape as the altered pieces.


Here you can see some other alterations that were made to the interlining and then the lining was adjusted. Once those two layers were done it was time to add the outer fabric. 


For the outer fabric I attached the front pieces by simply sewing it to the foundation on the side seams and shoulder seams. The back piece had the raw edges folded over the previous seams and raw edges and attached it with a prick stitch.

The bodice was finished, but just pinned together. At this stage I should have added the lacing holes for closure, but since I hate making lacing holes and was eager to start with the sleeves I did them instead. It was a lot bulkier to finally add the lacing holes with the huge sleeves attached to the bodice and it would have been a lot easier to have it done at this stage.


Saturday, 13 July 2024

The landknecht wams/doublet part 1 - slashes

 In the last post I had started with deciding the style, and gotten a basic pattern done. Then my computer totally died, and that is why I haven't updated more until now.

Once I had the main pattern done I did some tweaks on the pattern, but now I twas time to start on the slashing on the main body of the doublet. As a note in Swedish I prefer to use the word "tröja" for this, if I wrote in German I would say "wams", but since this is a blog in English I will use doublet. I have a petpeeve of reenactors mixing languages, when there are adequate words in each language. I am not innocent of doing this myself, but I try to stick to one language at a time. 

Anyway I wanted to make a lot of slashed, but how should I make them.

There are basically three ways to make the slashes. To simply cut them into the fabric, cut them in a specific shape, and to and hem them. All three exists and it depends on fabric and how you want the final look to be.  To just make a slit didn't give me the huge almond-shaped slash that I wanted. To try and cut it into shape was hard with a pair of scirros, I didn't get the hole totally even. If I had had a pinking tool this would have been a lot easier. To just cut a slit and then hem the edges did give me that open, almond shape that I wanted though. So I groaned a little over the thought of having to hem all the slashes but decided that I would have to do it to get the look I wanted.

To makr out the slashes I started with making a grid of even squares all over the backside of the cut out pattern piece, this is the back.

When I had the grid I marked out diagonal lines through the squared and cut them out. 

Then it was on to hem all the pieces. In total the bodice of the doublet had around 100 slashes.


In this final photo you can see the difference in look between the hemmed slashes, and the ones that had just been cut, before hemming them.