Monday, 26 August 2019

Finishing the bodice of the kirtle

The finishing touches of the bodice was to make lacing holes and finish the edges around the neckline and armscyes. This is going to be mainly an underkirtle, and I want it to be really snug and tight, and then lacing is easier to adjust than hooks and eyes.

To stabilize the lacing I added an extra strip of thick linen between the lining and the outer fabric where the lacing was going to be. I'm hoping this will be enough without having to add any boning. My current kirtle is made of the same fabric as the extra strip, and it doesn't need any boning.


I make the lacing holes with a buttonhole stitch, using double waxed linen thread. I definitely need to practice doing more lacing holes to get them really even, I noticed a clear improvement from my first to the last one.

In order to make the holes I didn't want to punch or cut holes, something that every corset pattern says that you should never do since it weakens the fabric.

To make the holes I started with using an awl to make a small hole. This doesn't cut any fibres in the fabric, it just moves them to the side.

When I had a small hole I pushed a larger knitting needle through. This is the only knitting needle that I own, and I have it becaue it makes perfect holes for 00 grommets when making corsets.

I wanted the holes to be a bit larger though. I had used the knitting needle in my teal 1490's gown, and the lacing holes ended up being very small. I didn't have a larger knitting needle, so I simply used the handle of a paintbrush that I thought had a suitable size.

When I made the lacing holes I had to keep reinsirting the paintbrush quite often, or else the holes both get a lot smaller and they loose their round shape.


This is the finished front of the bodice. It is going to be spiral laced, that is why the lacing holes are uneven and not straight across from each other.


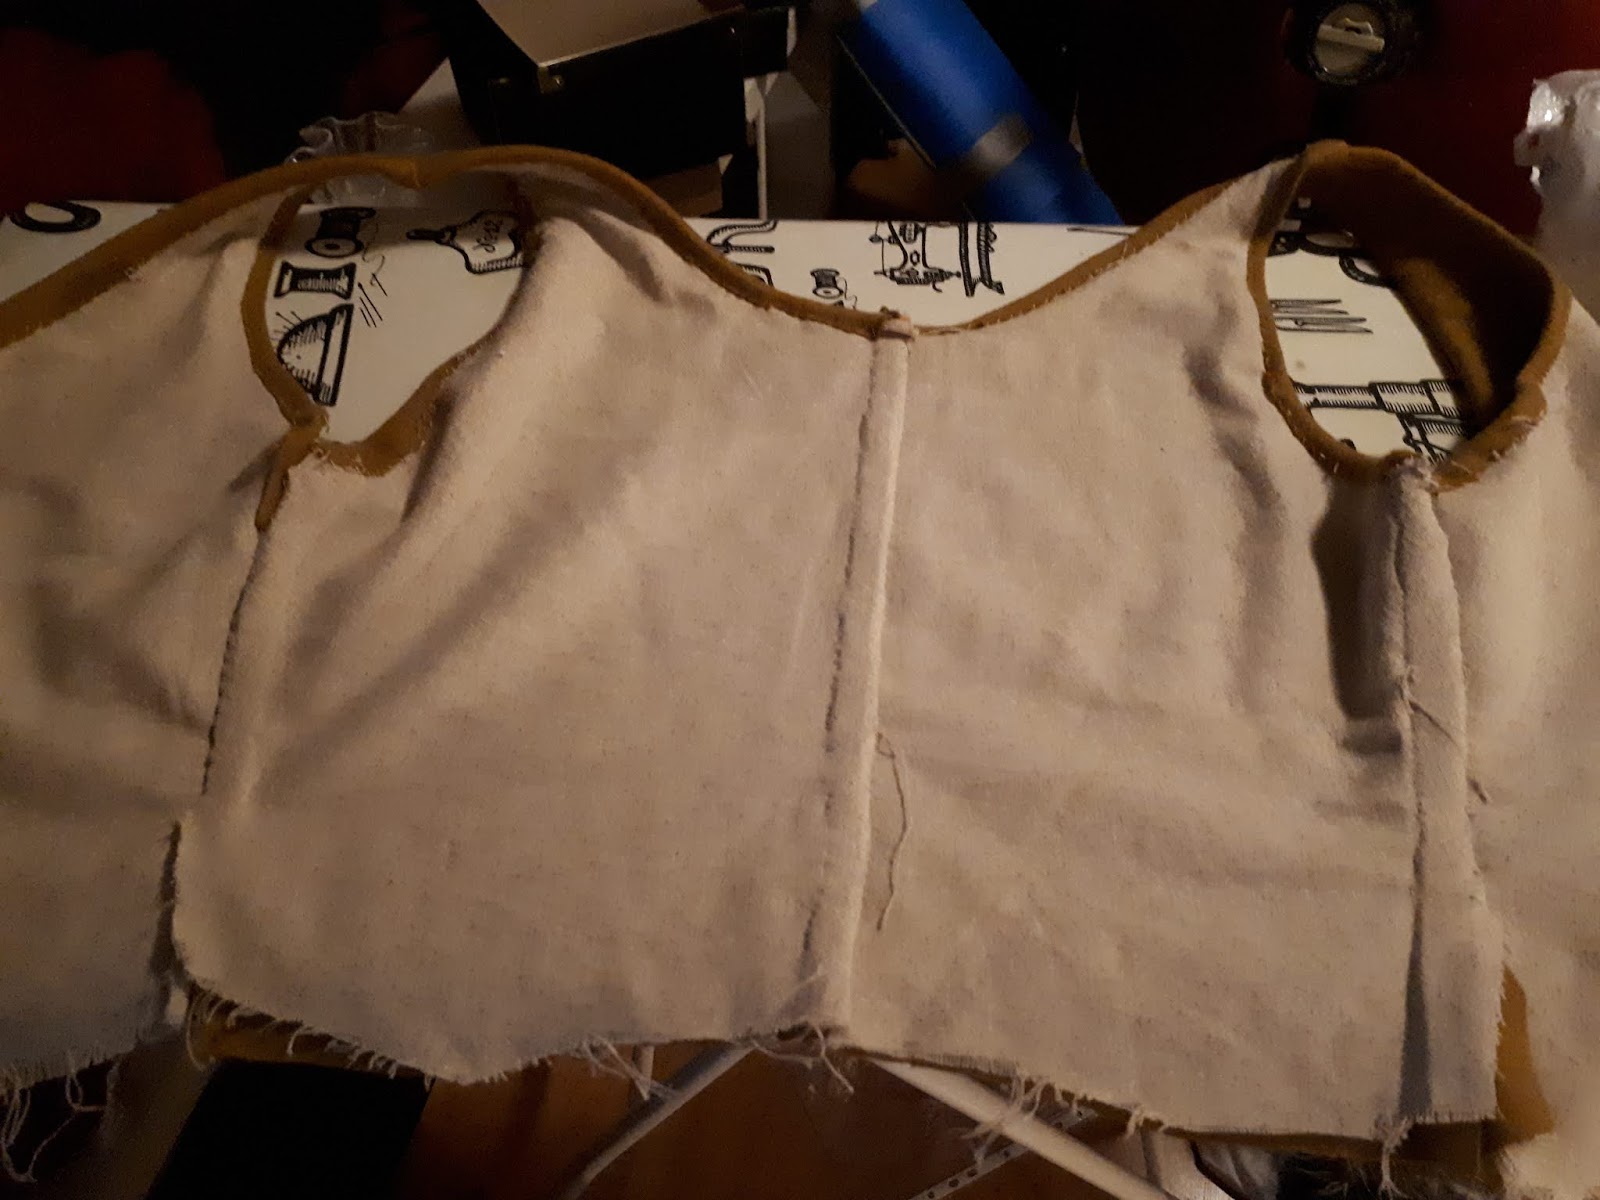
And this is the inside of the bodice. Along the neckline and the armscyes I simply folded the wool tabby over the edge of the linen and secured it with a small hemstitch. I didn't finish the eges of the wool, since it doesn't fray and I felt that a folded edge got too bulky.

So now it's just the skirt left to make it wearable, and then I want to add a pair of sleeves, depending on how much fabric I have left after the skirt. With some luck I might even be able to wear this new kirtle to a semi-local medieval fair in the weekend. I'm going there over Sunday, so it's not a full weekend event with camping, just a quick visit with my mother and aunt.

Saturday, 24 August 2019

Starting a new kirtle

For my big 1520s court gown I will need a new underkirtle. I also want a nice summer dress. I like my teal 1490's gown, but I wanted something of a more accurate wool, and a bit longer skirt. With a good base kirtle it's also possible to use it for several centuries, by switching the jackets/robes on top. I am planning to wear it for my 17th century project as well.

Earlier this year I bought a remnant of a gorgeous, soft wool tabby (kläde) from one of the Swedish webshops specializing in historical textiles. Even if it was a remnant and on sale it was still the so far most expensive fabric that I have bought for my historical costumes. Since it was a remnant I am not sure if it will be enough fabric to make sleeves. My plan is to make sleeveless kirtle, that I will be able to wear as an underkirtle, but then depending on how much fabric I have left I will make a pair of loose sleeves that I can tie or pin on. If I have enough fabric I will make long sleeves, otherwise some kind of short or divided sleeve.

I started with cutting out the linen lining for the bodice. I don't really have a proper base pattern, but I use four pieces, two fronts and two backs. It is closed in the back, but I want a backseam since it gives me a better fit when I can use a backseam to work with and not just two side seams. When I had roughly pinned the lining into a general fit I used it as a pattern for the tabby. I put the lining on top of the outer fabric and treat them as a single fabric, rather than first finishing the lining and then mounting the outer fabric on top of it.


Tacking the lining pieces together to get a general fit

Sewing the pieces together with large seam allowances
I then sewed the back and side seams and shoulder seams and felled them. Now with four layers in each seam the seam allowance gets bulky so it was really necessary to grade the seam allowances. That means that I cut them down in different lengthy so that they are layered together, and not four layers of the same size on top of each other.

Then I realized that I had a big ugly crease on both the back pieces, close to the side seams. I had seen the crease but hoped that it would go away when I tigthened the bodice properly. It didn't go away, and after some irritation I decided to rip up the side seams and redo them.

This time I was a lot more careful and I pinned the layers to each others so that they wouldn't move while I was working on them. A proper seamstress would make big tacking stitches, but I settled for just pinning them together. The creases were probably due to two things. One that they outer fabric and lining had moved and weren't aligned, and that I had sewed the side seam together exactly where I had pinned it together, making for a sharp curve just under my armpit. I ripped up the seam, aligned the fabrics, and then I smoothed out the sharp curve into a much gentler curve from the armpit to the waist.

The new side seam
The arm scyes got a bit bigger in the process, but I don't think that is going to be a problem since I'm not going have set in sleeves for this kirtle.

Here is the front of the bodice. I have marked out where I want to make lacing holes. As of now it's a bit too long, but that is also deliberate. I have a tendency to make my historical gowns too shortwaisted, now I have added some extra lengths and I won't trim it until I have added the skirt. AFter all it's easier to take away and then to add more fabric.

The back
It would be fun if I could finish the kirtle next week, since there is a medieval market just an hour or so away from here, but I need to make 13 lacing holes and the skirt for it to be finished enough, and I'm not going to rush to finish this. The kirtle is my HSM challenge for September though so I will keep on working on it.

Due to the colour of the wool I'm going to call this my mustard kirtle in the tags.


Tuesday, 20 August 2019

Luna Lovegood at ArCon

ArCon is the very small gaming convention in my hometown of Falun. On Saturday I took part in the FFG X-wing tournament, proudly wearing both my I heart SW-dress and X-wing earrings. I got quite a few compliments for both the dress and earrings, and as usual I was sadly the only woman playing. I actually did quite well, considering that I hadn't played more than two games in the whole year, but I had to go after 3 of 4 rounds since I had other plans for the evening.

Then on Sunday it was the cosplay day and of course Cosplay Dalarna was there. I decided to dress up in my full Luna Lovegood costume for the first time. Since AvestaCon I have gotten my Hogwarts robes and a much better wig. The wig is from CosCraft UK and is called Jeri. I bought it in milkmaid blonde. Now that was actually too light of a colour, but I sprayed it with the kind of coloured spray that you use to cover up growth lines in hair, in this case I use L'Oreal's light blonde, and that made it dark enough.

Me and Tom did some costume research. Most of the convention is actually just gaming stations, including both real old school games and VR games. I prefer the old school stuff.

It was the first time when we gathered all of the HP gang from Cosplay Dalarna.

Photo: Madelene Thoms

There was a professional photographer there, but I haven't seen those photos yet. I did get some proper photos of Luna thanks to Tom though.


And at least one not so serious photo, but it's actually the one that shows off the costume the best.


I sent the photos in and I am now an official member of the Nordic Reel Icons, and yes it's been a bit of a goal to become a member of all the organisations that make up the Nordic Legions (that is the 501st legion Nordic Garrison, the Rebel Legion Nordic Base and the Nordic Reel Icons).

I'm going to bring Luna to Stockholm Comic Con, and I'm hoping to be able to style the fringe of the wig a bit better then.

Sunday, 18 August 2019

Renaissance plum pie

With the summer over I'm going to share some of the recipes that I have been working on and cooked. One of my new aquisitions is this book.

The title translated into English is "Renaissance food - recipes and food history from the time of the Vasa monarchs", which basically means food from the 16th and early 17th century. It is a modern cookbook, but it notes where they have exchanged older ingredients for modern equivalents. It also has a lot of fact texts inbetween the recipes. Overalll it's a great and fun book, even if I would have liked some clearer references on where exactly the recipes come from. One of the recipes is a cherry pie, based on an early 17th century recipe from the Brahe family (really the highest nobility in Sweden at the time). The recipe is a cherry pie, and I didn't have any cherries, I also didn't get the pastry to work when I followed the recipe so this is really my interpretation of a renaissance pie.

Plum pie


pie pastry
600 ml of wheat flour
50 g sugar
1 egg
25 g butter
50 ml water

Mix the flour, sugar, egg and butter. I used a food processor. Add the water until the pastry comes together and forms a ball. Let it rest in the fridge for 30 minutes.

Filling
400 g fresh plums
100 g of mixed dried fruits (I used green raisins and zante currants/korinter)
2 slices of white bread
25 g butter
50 g sugar
50 ml sweet wine (I used port wine)
1-2 teaspoons cinnamon
1-2 teaspoons cardamon
1-2 teaspoons lemon juice

Eggwash
1 beaten egg

Take off the crust of the bread ans fry the crumbs in the butter until lightly brown. Chop the plums and fruit into fairly large pieces. Add the sugar, bread, spices and wine and use a big spoon to mush it all together. Make sure the bread soaks up the liquid so that the filling doesn't get too wet.

Take the pie pastry, cut it in half and roll it into two equal sized round discs. Place one in a baking tin with removable sides. Make sure that the pastry goes up a centimeter or two on the sides. Add the filling. Place the pie lid on top and crimp the sides. Make a whole in the lid, to allow steam from the filling to escape during the baking. Brush the top with the eggwash and place it in the oven.

Bake in 200 degrees celsius for 35-40 minutes.

This recipe gives a fairly flat pie. The pie pastry isn't crumbly, but is tougher and more chewy. It makes it easy to hold the pie in the hands when you are eating it.

Thursday, 15 August 2019

#DBW2019 - looping, or rather why I'm not doing it

The theme for Thursday in the #DBW2019 is DIY looping deholygrailed.

Now this is a technical subject, and I would be surprised if anyone reading most of the blog post on the subject, and who aren't living close to diabetes, would understand much of what is being said. Basically with today's technology, in first world countries with good health care systems, you can have access to an insulin pump and a continous glucose meter. Looping is when you combine these two so that the glucose meter senses changes in you glucose level, and the insulin pump reacts accordingly and either gives you more insulin, or stops the insulin for a while. This is called closed loop, when the technology don't need any human input and is probably the closest that you can get to a working pancreas. The thing is today on the market there are no closed loop systems. There are hybrid systems, where the user decides the dosage but the pump can stop or add the insulin if it's needed. DIY looping though is when you hack the hybrid loop system and makes it closed loop.

I'm not doing this, because I don't have a pump. And my costuming hobby is a big reason to why I don't have a pump.

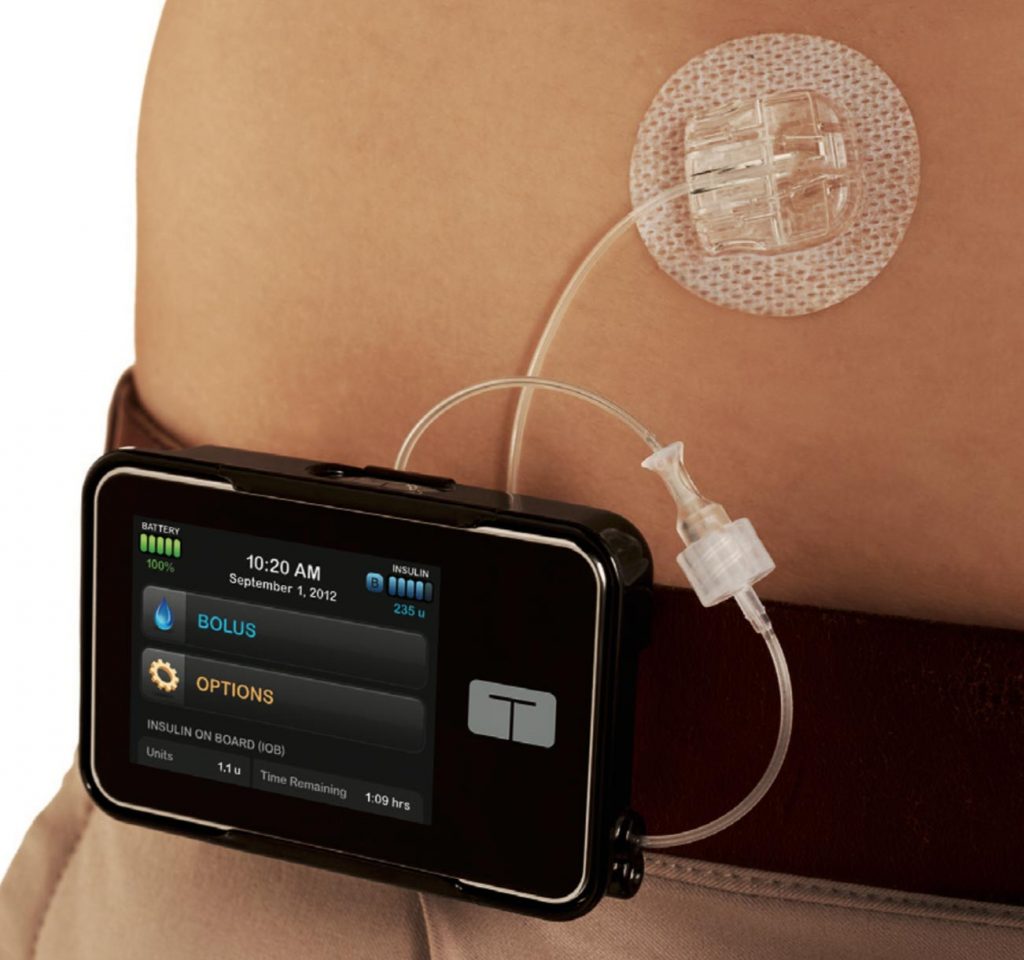
This is an insulin pump. It sends the insulin through an infusion set that you have on you all the time. You need to have the infusion set, and you need to carry the pump with you as well.


Infusion set in my stomach under a pair of stays or a corset? No, I don't think so.


I don't see any space for a belt for the pump or a pocket in this costume either.

I'm sure that closed loop systems are the future of diabetes treatment, but until they are really here I prefer not having to worry about infusion sets or how I need to adjust my costumes to accomodate the pump. So with that I should say I'm not yet willing to work with a pump, but when (not if) I switch I am definitely going to loop but it won't be until there are working closed loop systems so that I don't have to work with DIY looping..

Wednesday, 14 August 2019

#DBW2019 - Diabetes and complications: present or repressed

The theme for Wednesday in the #DBW2019 is about complications. For most non-diabethics, and many diabethics, the main symptoms of diabetes is the emergency situations. When the bloodsugar drops so low or go so high that you need to quickly get it in check before going into a coma. Diabetes is an illness that takes a big toll on the body long term as well. If you have heard about diabethics going blind or having to amputate limbs, that's not something that happens over night. I would say a problem when discussing complications is that it's easy to paint a very dark picture, but it's maybe harder to talk about complications that have yet not become too severe.

I have had diabetes for more than 30 years, it's almost inevitable that you are going to have some complications at this stage. For me it's the eyes. I did not manage my diabetes well when I was a student. I thought I did, but in hindsight I definitely didn't. This is also probably where I would have liked it to be some better guidance for someone who got diabetes as a kid, into adulthood. I simply didn't know how diabetes worked, after all that information had gone to my parents not myself. When I first got the news that I had started to get changes in my eyes I got really scared. I remember to a friend that now I was going to be blind, and that I would loose my ability to see costumes and sew. See as a costumer that was my first thought, I just couldn't imagined a life without working with fabric, seeing wonderful creations and then trying to recreate them myself.

crazy detailed stuff like this needs good eyesight
Now the thing is, I didn't go blind. I have had a lot of laser treatments on my eyes, they were in a bad state, but my sight hasn't been affected. I have also not gotten any new changes due to better control of my bloodsugar.

But what about if I had gotten a bad eyesight, or neurological problems that wouldn't leave me not totally able-bodied. How does the costuming and cosplay community really treat people who are not  able-bodied? This is a discussion that has been on the outside of some other costumers' feeds that I follow and I think it's really important to look at one self in this. How welcome does a costumer really feel when they need to have different supports that you can't hide? Glasses, walking sticks or even wheel chairs are necessities for a lot of people in our society. In historical costuming circles it's also easy to sneer at someone sewing by machine, but one should remember that there are people out there who simply can't sew by hand due to their physical limitations.

I can take off my glasses if I want to, others can't
Drawing a line for what is accepted or not in the name of accuracy is a tricky question, and it is important that it is not just the able-bodied members of the costuming community that decide where that line is. As of now I count myself as able-bodied, but I'm guessing the fact that I am maybe a bit more aware than some people that things might change for me in the future makes me also more aware of this issue, and the importance of listening to the people who are the ones actually experiencing a lot more hurdles in their hobby than I do.

Tuesday, 13 August 2019

#DBW2019 - diabetes and costuming

I happened to stumble upon the fact that this week it is Diabetes Blog Week 2019, and I figured it could be interesting to take part in that. This is a costuming blog though so I am going to filter the topics through my experience as a costumer.

I'm not sure if everyone who reads this blog knows about it but I have had type 1 diabetes since I was four. Like many others there is no specific reason why I got it, no genetics or stuff like that, one day my immune system just decided to kill off my insulin production and nobody knows why. I'm dependant on daily insulin injections that I take with insulin pens, usually it's 5-7 injections a day. I also need to plan my food intake so that I know that my blood sugar won't drop dangerously low. Skipping lunch at a convention or event is not an option for me.

With that introduction here comes my first post of #dbw2019 (I missed Monday)

Tuesday - things I would have liked to know when I was diagnosed

Here is the tricky point. I don't remember what it is like to live without diabetes, I was simply too young when I got it. When I was diagnosed all the information was given to my parents, I simply learnt to live with all the new routines without really thinking about it.

What I would have liked to know more about though as I got into the costuming hobby is how to work with the stress of events. Stress makes it really hard to regulate your blood sugar, and with stress I also include the adrenaline rush of just being at an event with new people, new stuff happening and basically just having fun. Here is a secret though, most people don't notice this, simply because for me stress basically raises my blood sugar, and that doesn't give any dramatic symptoms (unless it goes really bad) just a general nausea, being thirsty and headaches.

The medieval diet is good for diabethics, these were my best days of the whole summer
One thing I definitely would have learnt more about though is to actually talk about diabetes itself. I have never had a problem saying that I have diabetes, or that I need to take my insulin, but it has taken me a really long time to be able to actually tell someone that I'm not feeling ok, that I'm either too low or too high and that I need to take care of it. This is especially true on big conventions or events where you meet a lot of people, but maybe not people that you know very well.