Showing posts with label enfys nest. Show all posts

Tuesday, 2 April 2019

Enfys Nest chestbox

I only have a few evenings left until I need to pack and start my journey to Star Wars Celebration, I'm really into the con crunch to get Enfys into a wearable state. That means that I don't really have time to update. I try to take photos of my work, and hopefully when it's all done I can go back and I have enough photos to be able to post what I've done.

Today I managed one thing that's a big thing for me, I got a working light into the chestbox! Now to say that I did it is a bit of hyperbole. I paid for the things and I did what a friend told me to do. All kind of electronics is a big scary mystery for me. I have never grown up learning how to work with electronics and it wasn't something we learnt in school. I remember some lessons learning about electronic diagrams, but they never actually showed us how to solder a wire to make connections.

Still I thought that I should be able to install a tiny little light in the chestbox. I tried to read up on what I needed to buy and make. I went and bought the light, a battery pack and a battery pack connector. Today was Tuesday and the weekly cosplay meet, and I was going to borrow a soldering tool. I arrived and soon all the other people realized that I had bought way too complicated stuff to just get a little red little light. In the Cosplay Dalarna group we help each other though. Mattias, who is more into electronics than making costumes, went with me to the store where you can buy supplies. We changed the stuff that I had bought for simpler things and went back. I paid while Mattias did all the talking about what we needed.

Then it was time to connect everything together.
 Mattias had a bit of soldering school for me, and simply told me what I should connect. I then managed to wreck the "on-off" switch by heating it up to much. So Mattias had to fix it.

In the end I got a working light though, with lightswitch and all, and I did at least help out with getting it to work. It is not something I would have been able to do by myself tough. I also now have 24 more lights, since the smallest pack that you buy was a 25-pack. So maybe I need to learn how to install them by myself.


Saturday, 23 March 2019

Enfys Nest belt

The belt for Enfys Nest was a lot easier than the shoes. I decided to do it from a scrap piece of white faux leather that I already had, rather than buying new real leather. I think the faux leather is from when I made my classic ANH Leia. I had to be a bit careful, since I don't have a lot of faux leather and it will be used for the chest box assembly as well.


This is the belt in its unweathered state. I had to piece two straps together, both for the main piece and for the thinner middle strap. The joints are hidden under two of the smaller squares. The squares are good since they help stabilize the whole belt. A downside with fake leather is of course that it's a lot thinner and flimsier than proper leather, on the other hand it's a lot easier to sew it on a sewing machine. I had thought about adding a backing layer, but I felt that the belt is probably sturdy enough without the backing, but it won't be able to hold any weights.

The greeblies are 3d printed by friends from the files made by bh1138 and available on Thingiverse. They are clued on with contact glue, but I am thinking about maybe securing the connector beads with some invisible thread as well.

The belt closes with velcro, the stitching for securing the velcro pieces is hidden under the thinner strap.


For the weathering I used acrylic paints in pastel brown and ivory black. I added some paints and then quickly remove them with a paper towel, that also removes all the brush strokes.

Thursday, 21 March 2019

Enfys Nest shoes

My Enfys Nest has really hit a lot of speedbumps. First of all my helmet is not going to arrive before Celebration. It will make it a lot easier to pack, but the helmet is the coolest part of the costume and even if I wear a ginger wig it won't be the same. I ordered the arm fan shields, since I felt that it was a bit out of my league to make a pair that could fold in and out. That package has been stuck at a FedEx facility for the last two weeks with the tracking info only saying "shipment delay beyond our control". Today the tracking has changed to "in transit" and I can only hope that means that it's actually moving. Still getting it across the Atlantic, through Swedish customs and to my adress in two weeks is unlikely. I have a glimmer of hope, due to the change in the shipping status, but I must be realistic. The third thing that hasn't arrived are the hairpin beads for the breastplate decorations. Apparently hairpin beads are very common in the US, but not in Europe. I found a shop in the UK, but they are also delayed. As it is now I'm starting to feel that I will go to Celebration with an unfinished costume and I will have to save the proper presentation for NärCon or  Stockholm ComicCon later in the year.

At least I have finished the shoes and here is my step by step on how I made them.


I started out with a pair of fairly cheap pull on sneakers. The important thing was to get the big chunky sole. I also wanted a pair of pull on, so I wouldn't have to worry about lacing the shoes or making sure that they would stay on my foot in other ways.


I then covered the shoes in pieces of scrap fabric until I felt that they covered the shoe the way I wanted. I'm not showing you what the pattern looked like, since I was not happy with it. If I remake the shoes I would go about it differently.


I used the orange fabric as a guide and cut out the main fabric. To get the quilted back I sandwiched a layer of wadding between the two pieces of fabric and quilted it down. I made a satin stitch border along the quilted piece.
I used a curved needle to sew the outer fabric to the shoe. This really hurt my fingers and it's not a seam that I'm really proud of, but the fabric shell is attached to the shoe well enough.


 The tongue was also quilted, but instead of wadding I used a piece of thin felt. I thougth the wadding would have been too clunky, but in hindsight the felt was too thin and I shoud probably have used the wadding. It was sewn on the the shoe by hand as well.


I covered the edge of the opening with some cotton tape.

 Then it was time to sand and paint the buckles that a friend had helped me to 3D-print. The link to the model is here.

'
I started with painting all the pieces silver. The buckles were then painted with ivory black in thin layers to let the silver shine through a bit. The clasps were painted with grey, but with the same brush that I had used with the ivory black. Above you can see the difference between the silver at the bottom and the dulled down on the top. I'm really happy with the rusty look. I can really recommend working with ivory black if you want something to look old and rusty. It has a lot of brown in it which gives a really dirty and rusty feeling to the colour, compared to pure black.


The leather for the buckle straps came from an old belt that I bought at an op shop. I took away the backing of the belt to make it softer and easier to use.


I played around with placement and look of the straps, and then I attached the rounded front piece, the main piece that goes over the foot and the bottom fabric strap by sewing them permanently to the shoe. I glued the buckle, with the leather strap, on to the bottom fabric strap. I made sure to test that I could take the shoe on and off without having to adjust that strap before I glued the buckle on. I used contact glue.

The top strap needs to be functional, so that I can open it to get my foot into the shoe. I sewed a piece of velcro to the end of the strap that goes on the inside of the foot. Then I glued the buckle and the leather strap on to the fabric strap. The leather strap and buckle have no function at all since I don't want to strain the plastic buckle at all.

I cut off the top of the boots so I got the height that I wanted and painted the rockets. The rockets are also painted with silver, grey and some ivory black. The rockets were found and bought on etsy. Now comes the part that I really like, the weathering.

I started with taking the shoes to work and and wear them for a full day. They are discrete enough when the buckles are hidden under my work trousers. The dirt at work is too brown though to get the kind of weathering that Enfys Nest has. I brushed off most of the dirt, but that helped to make the fabric look a bit worn, and the dirt had also really dampened the bright white of the soles. The dirt marks were also good for guiding me when I started to go over the books with mainly grey acrylic paint. The paint was watered down and dry brushed on.

The finishing touches were to glue on the rockets with contact glue and darken the edges of the leather straps with more ivory black.


The shoes are finished. I am already thinking about redoing them though. There simply are a bit too many details that are a bit off. At te same time I'm really happy with the general look of the shoes, and they were a lot cheaper than buying a pair of Demobaza Moon Rovers, the kind of shoe that was bought and modified for the original costume. They cost €400, while my shoes probably ended up with a total price tag of $80, and most of that was the price of the shoes and rockets.e

Sunday, 3 March 2019

Working with 3D-printed things

All the hard parts for Enfys Nest, except for the helmet and the decorative teeth, are going to be 3D-printed. The Enfys Nest costume community has done a great job in sharing files for basically everything that you need. There is even a file for the helmet, but that would be a huge print. I am glad that I have friends with 3D-printers and they have helped me to print what I need. 

This week the first box arrived. 


The biggest parts are for the electrostaff and the chstbox, then there are a lot of small things and greeblies. I also have a bag of resin teeth from a person in the Enfys Nest community. 

Now even if it's 3D-printed, that doesn't mean that it's just to start assemble it all. The 3D-printer builds up the pieces with a lot of strands, so a lot of the surfaces have rills and grooves. The person who printed this for me has been really nice and printed it a very fine resolution, but tere are still rills that are both visible and possible to feel. During the weekend I have started to sand down the rills so that the surface is really smooth.


The matt side has been sanded, while the shinier is still unfinished. I work with three different sanding papers, from a coarse to a very fine one. The best way to judge if it's smooth enough is to feel with your fingertips, they are a lot better than the eyes for that kind of judgement. I also used the nail, a smooth surface gives another sound than a the rills with going over it lightly. 

It's a good thing that it's been a big TV-sport weekend, so I've been sitting in the sofa watching skiing and sanding, and sandning until my fingers and hands have started to cramp. I have more sanding to do, and then it's time to prime, sand some more and then it's finally time to start putting it all together. 

Thursday, 14 February 2019

Enfys Nest cape

I have finished another piece for Enfys Nest. In my last post about the cape I had made a pattern and cut out the lining. Click here for that part.

After the lining I ordered the outer fabric. I picked a black wool broadcloth. It's one of the cheapest on the Swedish market, and I would definitely not use it for historical costumes. It shed quite a lot of colour, it's piling and I have black fluff from it everywhere. It's perfect for the worn look of a space pirate though. The problem with the pattern though was that it was made for a fabric that was 150 cm wide, and the wool was 135. I solved it by turning the fabric, but it definitely led to some fabric waste.

Below are my main references for the cape.


Once I had cut out the pieces I sewed the outer fabric together and I attached the lining and the outer fabric by sewing them together at the neck. I then pinned the seams together so that the fabric wouldn't shift and I added a facing of the outer fabric to the edges and to the neck.


The facing at the edges is slipstitched to the lining. For the neck I sewed it by machine, it's not going to be visible anyway. After that I hemmed the whole cape. The original cape doesn't have a deep hem or hem facing, so I simply folded the lining and outer fabric towards each other and then slipstitched them in place.


Along the edges there is also a strip of fabric. I think it's suede so I used the same faux suede that I will use for her long tabards.

It's sewn on by machine at the front, since the reference photo has a clear seam line in the middle of the facing. I used light coloured thread for the upper thread and black thread for the underspool.

The other side of the suede strip was folded down and slipstitched in place.

This is the inside of the finished cape.


This is the outside of the finished cape. The suede is a lot darker in real life, it really picks upp the light when I try to photograph it.


This is the cape hanging on my mannequin. A very big advantage with this style of cape, rather than a cape that is just gathered at the neck, is that it hangs naturally from the shoulders. Of course it will be different when I move, but it will make it a lot easier to attach it to the rest of the costume, when the attachment won't have to carry the full weight.


I also just tested to throw my fur on over the cape. The original costume used buffalo hide, from the front of the buffalo. I don't have access to any buffalos so I have bought an icelandic sheepskin with long hair.


Saturday, 9 February 2019

Enfys Nest gloves

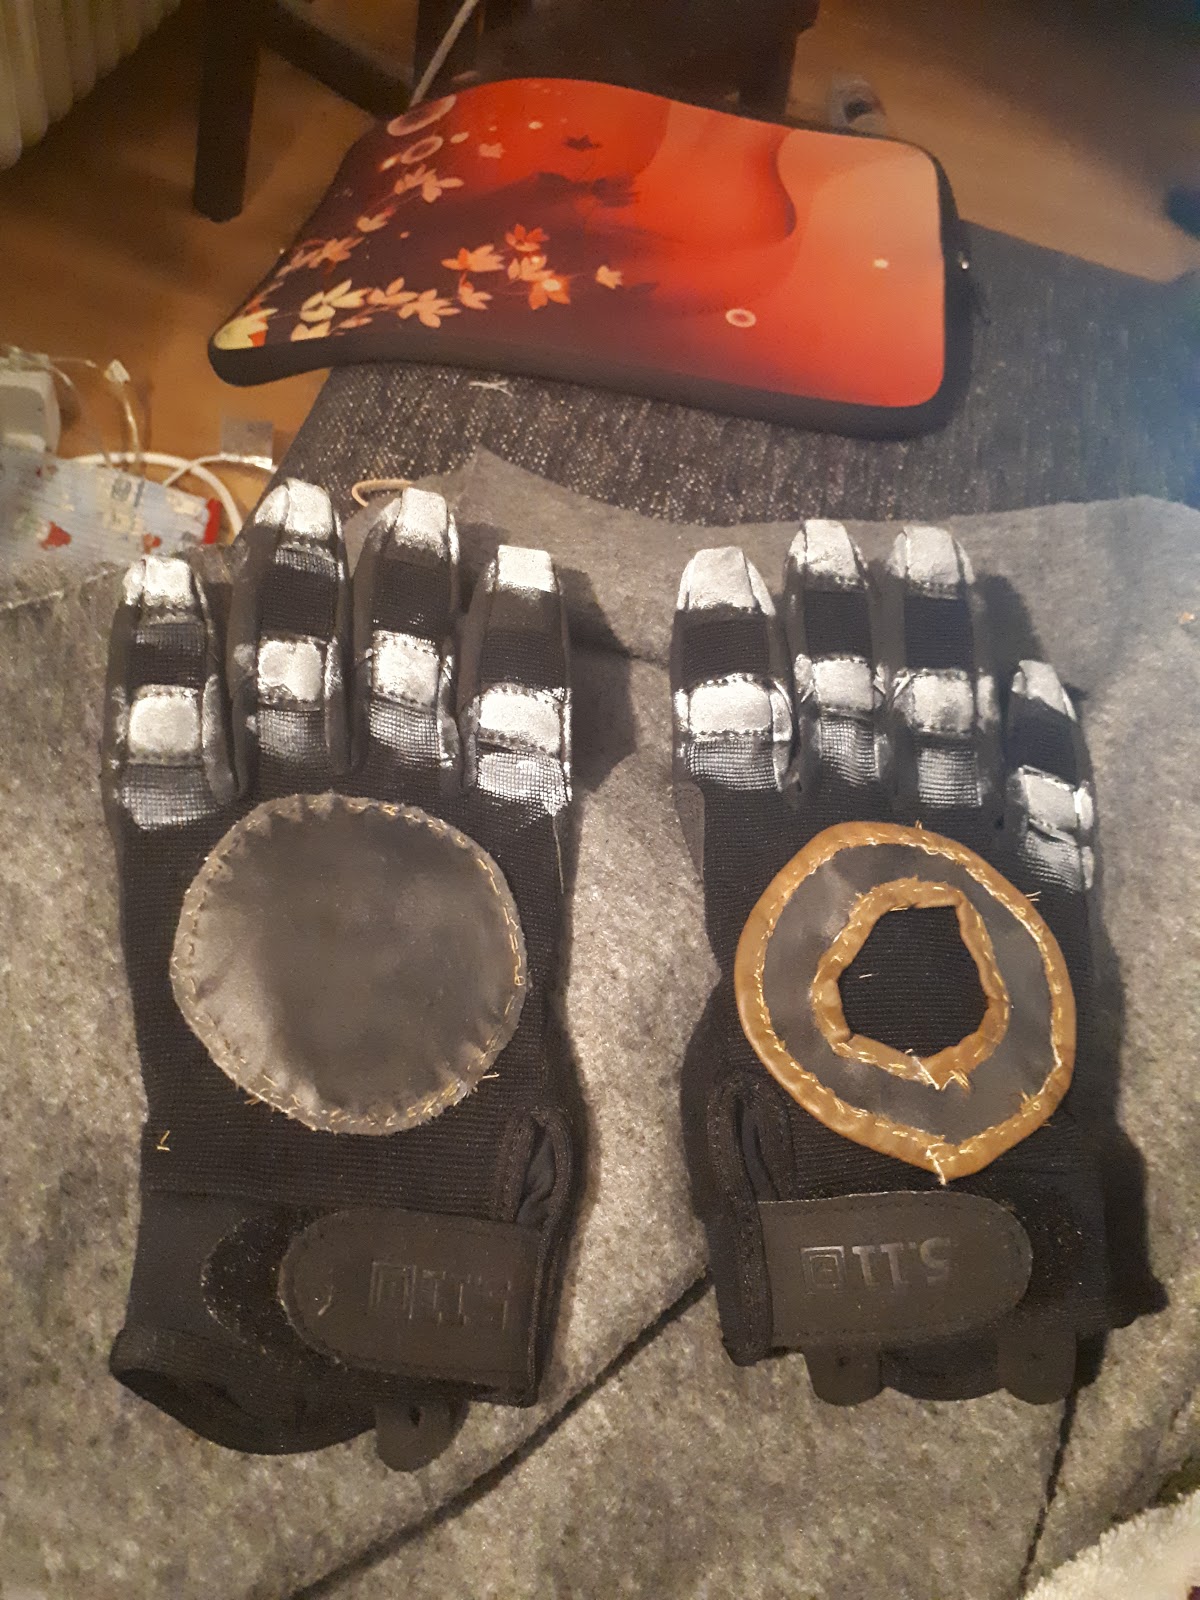
I finally have a finished piece for the costume and it's the gloves.

The base for the gloves is a pair of 5:11 TAC A2 gloves, as used for the film costume.

For the modifications I used this as a reference.

It shows a round black solid circle on the left hand and a black circle, with a cut-out middle, edged in brown. Some people in the Enfy Nest group claim that strap with the 5.11 text is covered in leather and that the grips on the inside are ripped off, but I've kept them. I haven't seen evidence of that myself yet.

This close up from the Enfys Nest standee clearly shows the circle edged in brown.
My circles are made with faux suede that I've painted with acrylic paint, black for the main parts and brown for the edging. It's still soft and it really gives it a leatherlike apperance. I'm really happy with that. The white paint on the fingers is also acrylic paint.

I've handsewn the patches onto the gloves, so I wouldn't have to rip them up.

I will probably try and weather the patches a bit, they look a bit too fresh at the moment, but that will have to wait until I weather the whole costume.


Wednesday, 23 January 2019

Starting Enfys' cape

I'm waiting for my next paycheck to be able to order a lot of the material and pieces that I need for Enfys, still I wanted to get something done. I decided to cut out the lining of the cape, that way I could see that I had a pattern that would work, and how much fabric I will need to order.

On the original costume it's possible to see two seams, so I'm making a cape in three pieces.


I'm planning on using a wool broadcloth, so I don't want too much fabric at the neck, since it's going to be very bulky. I decided to use some kind of version of a circle cut cape, which gives you a lot of width at the hem, some really nice folds, but no gathering at the neck.

This is a great diagram of how to make a cape or cloak in different variaties of a circle. The site where I've found it even calls it the Circle game.


I didn't go for a full or semi-circle cape, I kept the outer sides of piece 1 and 3 on the selvage, so they are straight, just like the fold of piece two. I also cut all the angles at 45 degrees, since it's simple to measure even without tools.

The result is not quite a semi-circle, but it still hangs really nice and has a 3 m hem at the bottom, so it's really swirly.  In totaly I used 2,5 m of 150 cm wide fabric for this pattern.


Monday, 7 January 2019

Enfys Nest jumpsuit part 1

This weekend the Cosplay Dalarna network had a whole day of crafting, and I could start on Enfys Nest for real. The goal for me was to get most of the jumpsuit done, and I did get all the parts that need a lot of floor space cut out.

I started with my standard vintage overall pattern. I knew it was going to be too small, and since I didn't have a lot of muslin fabric to work with I decided to expand it a lot, since it's easier to take it in than the other way around.


Ok, I maybe overdid it and had to take it in a lot. In the end though I had a fairly loose fitting overall, with some shaping at the waist.

The shaping at the waist
I then drew all the seam lines I wanted directly on to the fabric and cut it apart.


I'm using dark brown waxed cotton for the jumpsuit, with black twill for the details. I added the twill tape to the front by hand, since there are no visible seams on the reference photos. I wouldn't be surprised if the original piece has proper seams for the shaping, but I'm cheating and adding the twill tape on the top, there will also be decorative top stitching added later.

Front

Back pieces
The jumpsuit is still big, but the final fitting will be done when I sew it all together.


Monday, 8 October 2018

Introducing Enfys Nest for Star Wars Celebration

It is time to reveal my main project for Star Wars Celebration. This will be a big and expensive project, but I'm hoping to have it all done for Celebration in April.

So who is Enfys Nest? It's a character from the new Solo film, that was released in May. And she's really cool.


This is definitely not my usual kind of costume project, but it will be fun to make something different.

Thankfully by the time I saw the film a lot of people had already researched the costume for months, so there is a lot of information out there, and a lot of files if you want to 3D-print the things needed.

Here is my breakdown, but for a more detailed description I recommend visiting the Rebel Legion forums, or the Enfys Nest facebook group.

Shoes - Demobaza Moon Rovers with added greeblies. The Moon Rovers are expensive (€413 last I checked) so I will start off with modifying a cheaper hight top sneaker. Greeblies can be 3D-printed.

Jumpsuit - brown waxed cotton with inserts of black fabric. There are a lot of complicated seams on the jumpsuit. I will use my standard jumpsuit pattern and modify it, I have ordered the waxed cotton.

Knee pads -

Leg flaps - a long strip of canvas with painted markings, rolled around a dowel.

Belt - with leather with topstitching and some accents in other colours.

Chest piece - the box and "beads" can be 3D-printed, the "beads" are also available as resin casts on Etsy. I will need to make the teeth and bone details.

Cape - a wool cape with a orange-red lining, and some strips of other colours in the lining. The fur is a bison hide, but I will look for suitble fake furs.

Arm shields - also available as 3D files, but they don't look too complicated to cut out from plastic sheets.

Gloves - tac 2 gloves, modified.

Helmet - I have preordered a resin cast of the helmet.

Staff - available as 3D-files.

That's the breakdown. This is going to be an expensive costume, since there are so many parts that I can't do mysef, so I will try and take it slowly and add piece by piece and hopefully I can bring it with me for Celebration, otherwise she will have to wait for NärCon 2019.