Showing posts with label prop. Show all posts

Saturday, 2 May 2020

A mudhorn egg for May the 4th

May the fourth is coming up, and even if there are no troops taking place I felt inspired to do some Star Wars stuff,  I also want to clean up my craft space and I have had the stuff needed for my mudhorn just lieing there and taking up space. Now they can take up space in my costume storage instead.

In the tv-series the Mandalorian is dedicated to the search of a mudhorn egg. Apparently jawas go crazy about the innards of these eggs. Since I have a jawa, but I have never gotten any blaster or other accessory I thought it would be fun to do an egg. The jawas' behaviour around the egg is also pretty funny, so it would be a fun thing to act out on a convention.
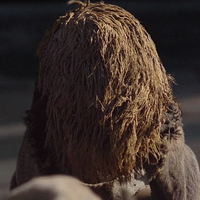
Mudhorn egg in a screensshot.
So basically it's a big furry egg. I was definitely thinking about doing something like that for NärCon, and the last NärCon there has always been very hot, and since the jawa costume has a covered face and a hood it is warm, I started to think about if I could actually make the prop into something more useful, like a water container.


Around Easter I picked up the largest Easter that I could find, thinking that would be a good starting point for my mudhorn egg.


In order to make it into bag/container I cut a hole on the upper side. I didnt want to cut over the opening of the egg, I also kept the plastic wrapping in order to keep the as much of the structural integrity as possible. For some reason my phone didn't save the photos I took of the next steps, and I didn't discover it until it was too late. But I took some packing tape and covered the opening of the hole, and I also put a generous amount of packing tape around the egg as well, to make it as strong as possible.

The next step was to add the fur. I used the scraps of the faux fur that I had bought for my Obelix vest.  If this was just a prop I think it would have looked best to glue down the fur to have it really flush around the egg, but this to double up as a bag, so instead I sewed a dropshaped bag that I could put the egg in.

This is the general shape of the parts for the bag, I used five of thse panels. The important thing to remember is that you can't have the top tighter than the widest part, since you need to be able to push the egg through the top.

This is the inside of the bag.

At the top I added a tape that I could put a drawstring through, in order to open and close the bag.

It was hard to get all the bottom parts under my presserfoot while sewing, this made me weary that I hadn't quite gotten the bottom seams to all meet up. In order to avoid a hole in the bottom, and to generally strengthen it I added an extra piece of fabric around the bottom. The seam is not visible from the outside since there is so much fluffy fur in the way.


I cut away the excess material at the top, and but a ribbon through the drawstring channel. I folded down some of the top and sewed it down by hand, leaving just a big enough hole for my hand to be able to reach into the inside of the egg.


This is the top with the top drawn together.


I then started to paint the egg. I did run out of brown paint, so it's not finished yet. I also need to sew a D-ring or similar to the top and bottom so that I can add a strap to the egg when I want to carry it around more casually. These are just small finishing touches, that will probably wait until it's time to actually use the egg.

My plan is to buy something similar to a camelbak waterbag and have that inside the egg, with just the drinking tube sticking out. For fun I might go with orange juice or something else yellow to mimic the look of an egg yolk.


Sunday, 21 July 2019

Building a menhir part two - carrying a menhir

I left the menhir in the barn over the week, and on Saturday I was back to continue working on it. I started with adding more very fine filler to it it, sanding the worst bumps down and then I painted it grey. After advice from Pilerud's cosplay I used regular indoor wall paint to paint it with. Now it looked like concrete. I also discovered a bit of a chipping issue, once I painted I saw a lot of white and blue flecks on the menhir. I was worried about the filler not sticking to the insulation material, but we think it was more an issue with dust getting into small holes and then falling out when we were moving the menhir about, taking the paint above the dust with it.

Then I sat down to google menhirs when it comes to colours. A rock isn't just a solid colour, it's made up of different minerals and crystals, and I wanted it to look natural. I googled menhir of Bretagne and got a lot of different rocks, but I especially liked one that was mostly dark with ligher and som redbrown intrusions. To get the colours I wanted I made two paint mixes, I used the wall paint as a base and then i added ivory black to one of them and red, and raw umber to the other one. The paint was brushed on and then I went over it with paper towels to remove and brushmarks, and to erasing the borders between the different colours.


Then came the issue of actually being able to carry the menhir. One reason I'm mainly using the live action film as a reference is that he is wearing the menhir in a kind of backpack.

Mathias had found this metal framed backpack/bike bag.


I removed the bag itself and covered all the straps in fake suede.


We added a strap to go around the menhir, a really sturdy one and connected them.

It is heavy, but I can carry it. I need to hold on to the shoulder straps though. When we tightened them more the menhir rode up too high in the back and that was really uncomfortable.


Tuesday, 12 July 2016

A last minute miniature Ice Cream Maker

I'm packing the last things for Celebration, and I even got time to make a last minute prop. As I've mentioned I have a Willrow Hood costume, but there's no way that I could get a proper ice cream maker into my luggage. Since this is a fun costume, I came up with making a miniature version of it.

Willrow wants to run


The ice cream maker basically looks like this, but painted white.

The top part of the lid, that looks like a handle, isn't there though. I decided to look around to see what I had home and if I could make a miniature prop, that will fit in the luggage.

I started off with a plastic can and a travelsize shampoo bottle

I glued the bottle to the middle of the can, and then cut out a piece of worble and put it over the top. There was some slight warping on the bottle from the heat of the worbla, but it worked. I then painted the whole thing with gesso and then with the only whitish paint I had at home. There was no time to sand down the gesso and make it smooth.

Then of course I also needed ice cream.

I took some wadding and poured some blue hobby paint on it.

Then I squeezed and kneaded the wadding to distribute the colour.

I didn't want it to get totally blended, so I stopped at this stage. Doesn't it look like delicions blue milk ice cream?

And here is the final mini ice cream maker!

Now I'm ready for London and Celebration Europe!