Showing posts with label tutorial. Show all posts

Thursday, 21 March 2019

Enfys Nest shoes

My Enfys Nest has really hit a lot of speedbumps. First of all my helmet is not going to arrive before Celebration. It will make it a lot easier to pack, but the helmet is the coolest part of the costume and even if I wear a ginger wig it won't be the same. I ordered the arm fan shields, since I felt that it was a bit out of my league to make a pair that could fold in and out. That package has been stuck at a FedEx facility for the last two weeks with the tracking info only saying "shipment delay beyond our control". Today the tracking has changed to "in transit" and I can only hope that means that it's actually moving. Still getting it across the Atlantic, through Swedish customs and to my adress in two weeks is unlikely. I have a glimmer of hope, due to the change in the shipping status, but I must be realistic. The third thing that hasn't arrived are the hairpin beads for the breastplate decorations. Apparently hairpin beads are very common in the US, but not in Europe. I found a shop in the UK, but they are also delayed. As it is now I'm starting to feel that I will go to Celebration with an unfinished costume and I will have to save the proper presentation for NärCon or  Stockholm ComicCon later in the year.

At least I have finished the shoes and here is my step by step on how I made them.


I started out with a pair of fairly cheap pull on sneakers. The important thing was to get the big chunky sole. I also wanted a pair of pull on, so I wouldn't have to worry about lacing the shoes or making sure that they would stay on my foot in other ways.


I then covered the shoes in pieces of scrap fabric until I felt that they covered the shoe the way I wanted. I'm not showing you what the pattern looked like, since I was not happy with it. If I remake the shoes I would go about it differently.


I used the orange fabric as a guide and cut out the main fabric. To get the quilted back I sandwiched a layer of wadding between the two pieces of fabric and quilted it down. I made a satin stitch border along the quilted piece.
I used a curved needle to sew the outer fabric to the shoe. This really hurt my fingers and it's not a seam that I'm really proud of, but the fabric shell is attached to the shoe well enough.


 The tongue was also quilted, but instead of wadding I used a piece of thin felt. I thougth the wadding would have been too clunky, but in hindsight the felt was too thin and I shoud probably have used the wadding. It was sewn on the the shoe by hand as well.


I covered the edge of the opening with some cotton tape.

 Then it was time to sand and paint the buckles that a friend had helped me to 3D-print. The link to the model is here.

'
I started with painting all the pieces silver. The buckles were then painted with ivory black in thin layers to let the silver shine through a bit. The clasps were painted with grey, but with the same brush that I had used with the ivory black. Above you can see the difference between the silver at the bottom and the dulled down on the top. I'm really happy with the rusty look. I can really recommend working with ivory black if you want something to look old and rusty. It has a lot of brown in it which gives a really dirty and rusty feeling to the colour, compared to pure black.


The leather for the buckle straps came from an old belt that I bought at an op shop. I took away the backing of the belt to make it softer and easier to use.


I played around with placement and look of the straps, and then I attached the rounded front piece, the main piece that goes over the foot and the bottom fabric strap by sewing them permanently to the shoe. I glued the buckle, with the leather strap, on to the bottom fabric strap. I made sure to test that I could take the shoe on and off without having to adjust that strap before I glued the buckle on. I used contact glue.

The top strap needs to be functional, so that I can open it to get my foot into the shoe. I sewed a piece of velcro to the end of the strap that goes on the inside of the foot. Then I glued the buckle and the leather strap on to the fabric strap. The leather strap and buckle have no function at all since I don't want to strain the plastic buckle at all.

I cut off the top of the boots so I got the height that I wanted and painted the rockets. The rockets are also painted with silver, grey and some ivory black. The rockets were found and bought on etsy. Now comes the part that I really like, the weathering.

I started with taking the shoes to work and and wear them for a full day. They are discrete enough when the buckles are hidden under my work trousers. The dirt at work is too brown though to get the kind of weathering that Enfys Nest has. I brushed off most of the dirt, but that helped to make the fabric look a bit worn, and the dirt had also really dampened the bright white of the soles. The dirt marks were also good for guiding me when I started to go over the books with mainly grey acrylic paint. The paint was watered down and dry brushed on.

The finishing touches were to glue on the rockets with contact glue and darken the edges of the leather straps with more ivory black.


The shoes are finished. I am already thinking about redoing them though. There simply are a bit too many details that are a bit off. At te same time I'm really happy with the general look of the shoes, and they were a lot cheaper than buying a pair of Demobaza Moon Rovers, the kind of shoe that was bought and modified for the original costume. They cost €400, while my shoes probably ended up with a total price tag of $80, and most of that was the price of the shoes and rockets.e

Wednesday, 19 December 2018

Building your historical wardrobe

By now I have a lot of historical clothes in my wardrobe, and I usually talk about having what I consider a good 16th century wardrobe and a good 18th century wardrobe. On the way there are some things that I have learnt and here I will try to give you some advice when you plan on doing an historical wardrobe. There are plenty of advice out there on the importance of fabric choices and the right underpinnings, I'm going to talk more about other choices you can make when building your wardrobe.

1. When will you wear your historical clothes?

 Will it be for a fancy party or will be clothes that you need to wear a full day and do chores in?

My 18th century wardrobe grew out of my wish of going to fancy parties. I started off with silk gowns and fancy trims. This also means that I had no problems making tight corsets, or stays, and bumrolls and panniers. Those are underpinnings that I can wear for an evening, but it's nice to get out of them after a couple of hours. It's also the kind of clothes that are a bit complicated to put on, it definitely helps to have access to a fullbody mirror and a friend or two.

On the contrary when I've made my 16th century clothes I know that the events that I am most likely to attend are fairs and markets. At those events I will be in my clothes for a lot longer time, and I will probably do more than just stand around, sit or dance. I have chosen to do clothes that are not quite as tight as my 18th century clothes, and I am staying away from the silks and fancy details, preferring to make clothes that are more working class or lower upper class compared to my 18th century wardrobe.

My instinct for 18th century clothes is still "Oooh, that's pretty I want to wear that", while my 16th century  is more along the lines of  "I need this to be comfortable".

2. Make more shifts and chemises

When starting an historical costume you should always start with the underwear, but once you have done that first layer, you should make another one. If you are just going to an evening event one shift or chemise is enough, but as soon as you start attending events that are longer than that it is so nice to be able to change your shift every day. For Medieval week in Visby I brought four shifts with me, which also made it possible to wash and dry one while I was wearing the others. A basic shift can be worn during many eras as well, the Viking shift that I have made can work up until the 16th century, and my oldest 18th century chemise, with a drawstring around the neck, has doubled as a 16th century shift just as well. In fact both the Viking and 18th century shifts are constructed the same, it is just a matter of different arm lengths and how big the head opening is, and if you have a drawstring you can adjust that size.

Since the shifts are usually under all the other clothes I have no bad conscience when sewing them by machine, and zigzagging the raw edges instead of felling the seams.

3. Mix and match and make separates

I like to vary my wardrobe, and think it's boring to show up at events in the same clothes. Instead of making a full new outfit every time I have now built my wardrobes so that I can mix and match pieces.

For the 18th century this is pretty easy, since the gowns and petticoats are separate. As it is I only have two different skirts, and a white petticoat that can be used as an outer skirt.


 The same skirt is used with both my 1760's pet en l'air and over pocket hoops, but I've also worn it my 1780's anglaise, over a bumroll. Pocket hoops and bumrolls are totally different, but with some creative use of safety pins, and enough width in the skirt, it can be use for both.

Two of us are wearing pinned on sleeves
For earlier centuries, when it was still a matter of full gowns instead of separate gowns and skirt it is
trickier but still possible.  I can transfer my social class to a working woman and just walk around in my undergown, which means that I have two outfits, even if only planned to make one full outfit with both undergown and outer gown.

Loose sleeves that can be pinned onto the gown are great to add variety to your medieval wardrobe. They are easy to make and don't need a lot of fabric.

Sleeves can be seen as an accessory, which brings me to my last point.

4. Accessorize, accessorize, accessorize

Or simply learn how to style your clothes in different ways to create variety. I skipped on the accessories when I made my first costumes, it was the gown that was the main purpose with a costume project. It was thanks to the Historical Sew Monthly that I started to make accessories, and realized that it was fun to switch them around and style outfits differently. For the 18th century wardrobe I have 3-4 different caps, 3-4 hats and two aprons. For my 16th century wardrobe I have two hats, 2 different veils and a wulsthaube, and can play around with them. Here it is also possible to make a few generic accessories that work over several time periods, I'm using my plain linen apron for everything from the 15th century and onwards, while a smocked apron or an apron made of printed cotton is more limited in use. The veils can be used for all things medieval, and even double as an 18th century fichu in a pinch. When it comes to styling different head covers, whether it is a veil or a cap, are great for hiding your hair so you don't have to worry about making a complicated historical hairstyle.

Here is an example on how I have styled my base 1520's wardrobe in three different ways.


My full outfit represent lower nobility and landed gentry. I wear a smocked shift, furtrimmed gollar, a hairnet and the skirt is long. The undergown doesn't show.


I changed from a smocked shift to a lownecked gathered shift. I switched the hairned for a wulsthaube with veil and added a hat on top. I hooked up the skirt of the outer gown so that the undergown is visible. Now I looked more like a trossfrau than a respectable lady.


Finally I took off the outergown and only wore the undergown and shift. I also removed the wulsthaube and just wrapped the veil around my head. Now I look more like a working woman.

 So to summarize here are my advice on building your historical wardrobe.

1. Adjust it to the kind of historical event you will wear it to. This affects how comfortable and sturdy you want to make the clothes.

2. Make more than one shift/chemise. You can never have too many, and if your wardrobe is made for an era where the shift is visible, it is an easy way to change your outfit.

3. Mix and match pieces. If you are making more than one outfit, make the pieces interchangable so you can create combinations of the items that yo have.

4. Add accessories. Different caps, veils, fichus, purses and other accessories are great to bring variety to your wardrobe, and are usually cheaper and more easy to make than a whole new outfit.


Monday, 29 October 2018

A pygmy puff from Harry Potter

As an accesory for my Harry Potter costumes I decided to make a pygmy puff. The pygmy puff is an animal that's basically just there to be cute and fluffy.

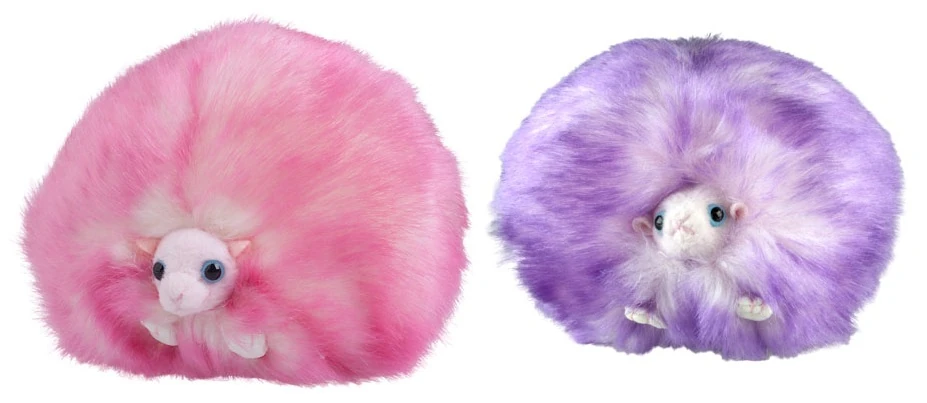
Official HP pygmy puff toys
When I saw a Christmas ornament in a store, for less than $2 I decided that I could probably make it into my own pygmy puff. The ornament was quite small compared to the official toys, so I'm guessing that my pygmy puff counts as a miniature pygmy puff. But it was really pink and fluffy.


I first cut out a circle in fosshape.


I made some gathering stitches in the fosshape and tightened them to make a rounded shape, I then heated the fosshape with a heatgun to harden it. The fosshape shrinks a bit when heated so you need to take that into account.


I used the same method to make a smaller rounded shape. This one was heated and stuck to the bigger shape as a snout, only using the glue that's in the fosshape itself. The ears were small wedges that were sewed on to the fosshape before heating it and the snout to make the whole face hard.


I cut out some small pieces to act as paws and painted it all in pinkish brown. I then sewed the face and the paws on to the main body. This was possible since the ornament was also soft. The thread that I used for sewing is hiddend among all the fluff.


Finally I glued a pair of eyes on to the face, where I had put the stitches that I used to attached the face. So the stitches are hiddend under the eyes. I used hotglue for that, since the surface of the face is quite uneven and I wanted a glue that smoothed that out.

I've kept the ribbon that the ornament hangs on. That way I can keep the ribbon as a strap and hold the pygmy puff in the hand and shake it as i it's moving, without throwing it away.

I've named it "Rosie the pygmy puff". Since "rosa" is the Swedish word for pink.

Sunday, 22 July 2018

Making a hot glue jewel

Melisandre needs a giant jewel for her necklace. The best way of making the jewel would probably be to cast it in resin or something, but I have never done anything like that and I hoped that there was an easier way of creating big jewels. I stumbled upon a mention of making cosplay jewels out of hot glue, and I decided to try it.

This is how I made my jewel. The jewel for Melisandre is an uneven quite organic shape, I do not know how well this method works if you want to use a mold or have it look exactly as something.


Start with pouring the paint that you want to use for your jewel in a disposable container that can stand heat. If you want to you can of course mix colours. In this tutorial you might notice that the jewel changes colour, I will come back to how the choice of paint affects the result at the end.


Cut the hot clue sticks into smaller pieces. For Melisandres jewel I used 1-2 glue sticks.


Heat the glue with a heatgun until it melts, and mix it with the paint. I won't be a runny consistency, but there shouldn't be any lumps of glue.


Pour the blob of glue until a sheet of alumium foil.


You can now use some kind of tool to smooth it out and give the general shape that you want it to be. Make it bigger than it should be, since you are going to trim it down later.


Let the coloured layer cool down and then add a layer of clear glue on top of the jewel.


This is what it looks like when it has cooled down. The clear glue isn't very clear, but rather milky.


Start cutting the jewel into the final shape with a sharp knife. Then start cutting away the top layer of clear clue. The cuts will give the jewel a more faceted surface and make it look more like a jewel than just a blob.

When you are satisfied with the shape of the jewel, heat up the surface again to remove any small hairs of glue or ugly cut marks. Do this quickly, you don't want to destroy the facets that you have just created. When you are finished you can put a clear coat of gloss lacquer on top.


These are the four jewel that I have made, and this is where the choice of colour affects the outcome. The two jewels to the right aren't finished. I used glass paint for them, thinking that it would give the a nice transparent look. The glass paint hasn't bonded with the glue though. When the jewels cooled down they started to separate, leaving clear blobs of glue with wet paint between them.

For the two left jewels I use common acrylic paint. The acrylic made the glue-blob really sticky, compared to the glass paint, so it was trickier to work with but the process of cutting them were so much easier since they behaved like a soft plastic.

As for colour choice, well I failed there. I only had a winered paint, and it's too light and blue. When I mixed it with black it didn't get a lot darker but rather it turned purple, as can be seen with the leftmost jewel. The most red jewel is made with wine red, but I've added in a bit of copper to darken it and a tiny, tiny amount of black.

I will use the most red jewel for NärCon, but I will probably buy some darker red paint and redo the jewel for Comic-Con.

Saturday, 4 November 2017

Luna Lovegood earring tutorial

I was very happy with my first try at beading which turned out to be the Luna Lovegood dirigble plum earrings. Still when I wore them they felt flat, and I had to correct them all the time when they twisted and turned, I had also just put two leaves on each, when it's clear the original has three leaves. I decided to make a new version that's threedimensional and more like the original, and here is how I made them.

It's a bit hard to find good reference photos from the films, sinse they are usually covered by her hair. This photo I Think is from an official jewellery set that isn't available anymore, but since most of the more expensive official Harry Potter products are very accurate I decided to use them as my main reference.

Start with cutting a piece of jewellery wire, it needs to be a wire so that it can hold its own shape, not just a piece of string. I used around a meter, or an armlength of wire.

Start with a putting a single bead at the middle of the string, then loop one of the ends through the bead again.

Pull the wire taught around the bead.

Do the same with a new single bead.

Then take three beads. When you have pulled both ends of the wire taught around the bead they should make a curve, bend this curve to the right.

Repeat this step, but bend the next three beads to the left. You should now have a small circle of beads.

Next time use five beads and bend them to the right, and then five beads and bend them to the left.

Then use six beads, bend them to the right and then bend them to the left. Now you have finished the white bottom part of the dirigible plum.


Then take 8 red beads and bend them to the right, followed by 8 red beads that you bend to the left

The next row is 10 beads to the right, 10 the left.
The next row is 12 beads to the right, 12 to the left
The next row is 11 beads to the right, 11 to the left

The next row is 9 beads to the right and 9 to the left. But now when you have finished each side you push it not just to the side, but also a bit upwards.


This will start closing the top of the plum. 

The last row is 7 beads on each side. If there is still a gap at the top you can do another row of beads with 5 beads on each side.

Do a small twist on the wire to close it.

Then it's time to start with the leave. Use the same technique of pulling both ends of the wire through each row, but this time you make sure that the rows lie flat after each other, instead of bending them into arches.


The rows of the leaves are as follow:
2
3
4
5
5
4
3
2

Now I varied all my leaves a bit, doubling different rows to give them all an individual shape. If you want to be really accurate you should use two different kind of green beads, and alternate them. I only had one colour of green though.

When the leave is finished you tread the wire back through the last rows and cut off the excess.

For the next two leaves you need to cut a new piece of wire for each and thread it through the top of the plum.


And here are my finished dirigible plums

Attach an earring hook, or some other kind of fastening to the top and they are ready to wear.


The number of beads in each row is as follows:

1 - white
1
3
3
5
5
6
6

8 - red
8
10
10
12
12
11
11
9
9
7
7

2 - green
3
4
5
5
4
3
2