Showing posts with label mustard kirtle. Show all posts

Sunday, 26 July 2020

An evening in the woods

In January our group of 1520's enthusiasts had our celebration of Sten Sture's leg. We made so many plans for the spring and summer and what we would do. Well about a month later COVID came and everything got cancelled. Last weekend we met up again though and had a small feast outside in the forest. It was great meeting up again and have fun in 16th century clothing. I like being a viking, but the 16th century is where I feel most at home when it comes to reenacting.


We started off the evening with axe throwing and "parrot shooting", which was traditional when the original S:t Örjen's guild (the local St. George's guild) met for feasts. I like this photo since it actually looks like I have an idea of what I'm doing. I did hit the parrot target, but mainly because it was big, really close and I had three tries. The photo also shows the fit of the bodice really well, it's not usual that I have photos with my arms lifted.


The guild feast was a reason for me to experiment with bread, and I brought it with me. Comments were made about dwarf bread and the possibilty to use the bread as a projectile weapon, but they say it tasted good.


The rest of the food was done on the grills that were set up.


I wore my mustard kirtle with unbleached smocked shift and apron, which I think is the most suitable for a Swedish woman in the region. It got colder so I also wore my gollar and on my head I used my newest wulsthaube, that I just realised that I haven't written about. I love how the colours of the outfit came out in this photo.


Wednesday, 11 September 2019

HSM19 Challenge 9: Everyday Wear - the mustard kirtle

The HSM19 Challenge for September is Everyday wear.

 Everyday: It’s not all special occasion frocks. Make something that would have been worn or used for everyday.

I was happy that  I could use my mustard kirtle for this challenge. Even if I am planning to wear the kirtle as an underkirtle for a more grand project, my plan all along was to make the kirtle as a stand alone item that I could wear for more regular occasions, and portray a more simple woman than I have a tendency to do when I only make pretty, pretty dresses.

For all the posts in this project, follow the tag "mustard kirtle" . It is a basic pattern, two side pieces and two back pieces. The lacing holes are bound by hand, and I'm using a lucet cord for the lacing. The kirtle has loose sleeves, that I can skip when I'm using it as an underkirtle. So far I have pinned them on, but I'm thinking about adding lacing holes so that I can tie them on instead.

I wore it to the Medieval days in Älvkarley August 31-September 1. I noticed that it was a very comfortable kirtle, but I am going to tighten it up a bit before I use it as an underkirtle. The straps are a tiny bit too long to support the bust and I can definitely get it more snug. For now though it is a very comfortable everyday kirtle.


What the item is: An early 16th century kirtle
How it fits the challenge: A kirtle to be wear for every day and portraying a working woman
Material: 4 m of mustard yellow wool tabby
Pattern: My own
Year: First quarter of the 16th century
Notions: Linen thread, a 10 cm strip of wool flanell as a hem guard.
How historically accurate is it? It's all handsewn iwth period materials, I'm putting this in the 90% category
Hours to complete: 2 weeks
First worn: Laxöns Medeltidsdagar August 30
Total cost: $130

Sunday, 1 September 2019

The finished kirtle

After I had done the bodice it was time for the skirt. I simply used two lengths of the fabric and sewed them together with felled seams. I then did four rows of gathering threads and gathered the fabric.


The gathering stitches are not perfectly aligned, it's good enough that I eyeball them. Do not sew the stitches too tightly, it looks ebeter with fewer but larger folds in my point of view. In the photo you can see both the stitches and when I have started to gather the fabric. For a long piece like this I also prefer to divide the sections, so I don't try to fit the whole width into one superlong gathering thread.

Once gathered I pinned the skirt to the bodice and sewed it on. It is important that you catch every fold that is connected to the bodice. Then I folded the linen lining over the other side and attached each fold on that side to the lining. This not how I've seen it done in other tutorials so I don't know how accurate it is, but it works for me.


I finished the skirt by adding a 10 cm hemguard. Using hemguards is my favorite hem technique. The guard protects the edge of the skirt, and if it gets dragged and worn it's easier to just add a new hemguard. The hemguard also gives the skirt edge a bit of structure that helps hold it out  from the legs. Finally for a hemguard you don't have to calcualte a lot of extra length for the hem, which for me means saving a few centimeters on the skirt and that's not bad when the fabric is expensive. For this hemguard I used a strip of orange wool flanell.

I close the kirtle with a lucet cord made of brown wool. I first though that the wool was too elastic, so I tried with linen yarn. It was great, but I couldn't keep it from breaking after 3 cm. I then made a meter of so with a cotton string, but it just didn't feel right. I went back to the wool yarn, and decided that I could live with the elasticity. All lucet cords are a bit elastic anyway, no matter the raw material. To close my bodice I needed around 75 of lucet cord.

I wore my the kirtle for a daytrip to a semi-local medieval fair on Saturday. I had also made a pair of loose sleeves, using my standard S-pattern. The sleeves ended up a bit too long, but otherwise they were nice. I also want to come up with a way of tieing the sleeves on, and not just pin them.


Monday, 26 August 2019

Finishing the bodice of the kirtle

The finishing touches of the bodice was to make lacing holes and finish the edges around the neckline and armscyes. This is going to be mainly an underkirtle, and I want it to be really snug and tight, and then lacing is easier to adjust than hooks and eyes.

To stabilize the lacing I added an extra strip of thick linen between the lining and the outer fabric where the lacing was going to be. I'm hoping this will be enough without having to add any boning. My current kirtle is made of the same fabric as the extra strip, and it doesn't need any boning.


I make the lacing holes with a buttonhole stitch, using double waxed linen thread. I definitely need to practice doing more lacing holes to get them really even, I noticed a clear improvement from my first to the last one.

In order to make the holes I didn't want to punch or cut holes, something that every corset pattern says that you should never do since it weakens the fabric.

To make the holes I started with using an awl to make a small hole. This doesn't cut any fibres in the fabric, it just moves them to the side.

When I had a small hole I pushed a larger knitting needle through. This is the only knitting needle that I own, and I have it becaue it makes perfect holes for 00 grommets when making corsets.

I wanted the holes to be a bit larger though. I had used the knitting needle in my teal 1490's gown, and the lacing holes ended up being very small. I didn't have a larger knitting needle, so I simply used the handle of a paintbrush that I thought had a suitable size.

When I made the lacing holes I had to keep reinsirting the paintbrush quite often, or else the holes both get a lot smaller and they loose their round shape.


This is the finished front of the bodice. It is going to be spiral laced, that is why the lacing holes are uneven and not straight across from each other.


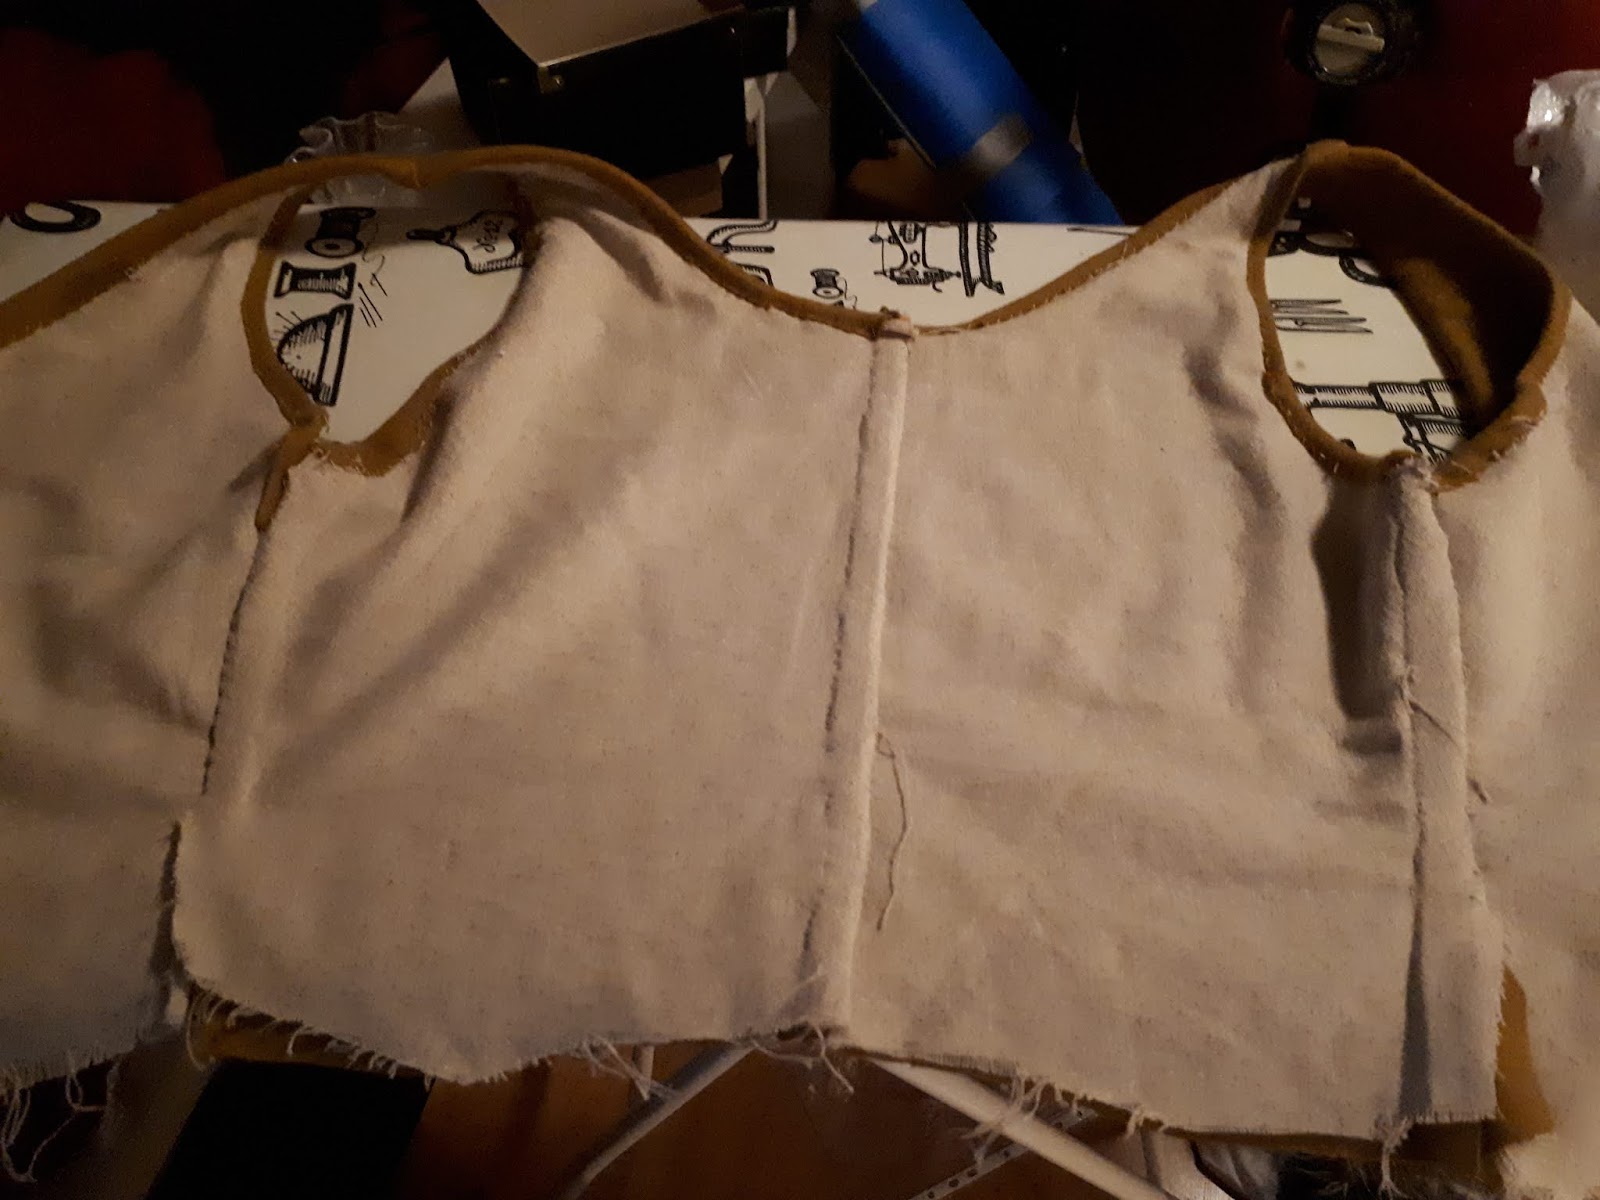
And this is the inside of the bodice. Along the neckline and the armscyes I simply folded the wool tabby over the edge of the linen and secured it with a small hemstitch. I didn't finish the eges of the wool, since it doesn't fray and I felt that a folded edge got too bulky.

So now it's just the skirt left to make it wearable, and then I want to add a pair of sleeves, depending on how much fabric I have left after the skirt. With some luck I might even be able to wear this new kirtle to a semi-local medieval fair in the weekend. I'm going there over Sunday, so it's not a full weekend event with camping, just a quick visit with my mother and aunt.

Saturday, 24 August 2019

Starting a new kirtle

For my big 1520s court gown I will need a new underkirtle. I also want a nice summer dress. I like my teal 1490's gown, but I wanted something of a more accurate wool, and a bit longer skirt. With a good base kirtle it's also possible to use it for several centuries, by switching the jackets/robes on top. I am planning to wear it for my 17th century project as well.

Earlier this year I bought a remnant of a gorgeous, soft wool tabby (kläde) from one of the Swedish webshops specializing in historical textiles. Even if it was a remnant and on sale it was still the so far most expensive fabric that I have bought for my historical costumes. Since it was a remnant I am not sure if it will be enough fabric to make sleeves. My plan is to make sleeveless kirtle, that I will be able to wear as an underkirtle, but then depending on how much fabric I have left I will make a pair of loose sleeves that I can tie or pin on. If I have enough fabric I will make long sleeves, otherwise some kind of short or divided sleeve.

I started with cutting out the linen lining for the bodice. I don't really have a proper base pattern, but I use four pieces, two fronts and two backs. It is closed in the back, but I want a backseam since it gives me a better fit when I can use a backseam to work with and not just two side seams. When I had roughly pinned the lining into a general fit I used it as a pattern for the tabby. I put the lining on top of the outer fabric and treat them as a single fabric, rather than first finishing the lining and then mounting the outer fabric on top of it.


Tacking the lining pieces together to get a general fit

Sewing the pieces together with large seam allowances
I then sewed the back and side seams and shoulder seams and felled them. Now with four layers in each seam the seam allowance gets bulky so it was really necessary to grade the seam allowances. That means that I cut them down in different lengthy so that they are layered together, and not four layers of the same size on top of each other.

Then I realized that I had a big ugly crease on both the back pieces, close to the side seams. I had seen the crease but hoped that it would go away when I tigthened the bodice properly. It didn't go away, and after some irritation I decided to rip up the side seams and redo them.

This time I was a lot more careful and I pinned the layers to each others so that they wouldn't move while I was working on them. A proper seamstress would make big tacking stitches, but I settled for just pinning them together. The creases were probably due to two things. One that they outer fabric and lining had moved and weren't aligned, and that I had sewed the side seam together exactly where I had pinned it together, making for a sharp curve just under my armpit. I ripped up the seam, aligned the fabrics, and then I smoothed out the sharp curve into a much gentler curve from the armpit to the waist.

The new side seam
The arm scyes got a bit bigger in the process, but I don't think that is going to be a problem since I'm not going have set in sleeves for this kirtle.

Here is the front of the bodice. I have marked out where I want to make lacing holes. As of now it's a bit too long, but that is also deliberate. I have a tendency to make my historical gowns too shortwaisted, now I have added some extra lengths and I won't trim it until I have added the skirt. AFter all it's easier to take away and then to add more fabric.

The back
It would be fun if I could finish the kirtle next week, since there is a medieval market just an hour or so away from here, but I need to make 13 lacing holes and the skirt for it to be finished enough, and I'm not going to rush to finish this. The kirtle is my HSM challenge for September though so I will keep on working on it.

Due to the colour of the wool I'm going to call this my mustard kirtle in the tags.