Showing posts with label obelix. Show all posts

Tuesday, 6 August 2019

Obelix belt, arm braces and vest

It is time for the last of the accessories of Obelix. These accessories is what makes my version of Obelix closer to the 1999 film version than the comic. There are several reasons why I chose to go after the film version, but one is that it is a lot easier to recreate something that has actually been made for real and not just tought up by the creator of the comic. The belt is definitely a lot easier.

Gerald Depardieu as Obelix in 1999
For the base of the belt I used cotton canvas. On top of that I used EVA foam, 5 mm. The foam part is in three sections, which helps with the bending of the belt when I wear it. I glued the foam to the canvas, but I didn't trust just the glue so I used cotton string to sew through both the foam and the canvas. I also added some extra stitches that would later be hidden by the ornaments.

The back of the belt, it's closed in the back with velcro
The ornaments are round circles of foam. The middle one is larger than the two side ones. To build up some height I made the circles with one base and then an outer ring in the same foam, the  middle cirlce also has a centre and it's built up a bit extra with foam clay as well, also to give it a more natural and irregular look. 

The front of the belt with the base circles.
The belt was painted with brown flexpaint. It was the first time that I worked with flexpaint and it has both good qualities and some worse qualities. The bad is that it's very thin and the colour that I though I had ordered (brown) was more of a beige. It was ok, but a friend who ordered green flexpaint got a paint that was more of a deep turquoise. It's also very thin, so you need to add many layers before it gets a good coverage, this also makes it hard to hide brush strokes. I didn't mind that my belt ended up a bit uneven, since it's supposed to be leather, but it is a lot harder if you wanta perfect finish. The flex paint also stays sticky, you need to cover it with either a special lacquer (I used that) or something else (there are tutorials out there on the web).


There are a lot of things with flexpaint though. The main thing is that it's flexible. You can bend the foam as much as you like, and it doesn't crack in any way. You can also mix in a lot of other acrylic paints to get the exact colour that you want. In the belt I mixed in a lot of acrylic paints in the colours burnt umber and ivory black. My friend who got the turquoise green was able to get a proper green by adding a lot of yellow paint to it. You also don't need to prepare the foam in anyway or with any kind of primer. The flexpaint is its own primer so it's just to start painting with it.


The centre roundel

The roundels were spraypainted gold and then glued with contact cement to the main belt.

The finished belt
Just two days before Närcon I decided to also do the pair of armbraces. This was a fun project, that in the end only took an evening, and then I was sooooo satisfied with them.

I cut out a general pattern in paper, and then in canvas, and finally in foam. This time I used 2 mm foam. The roundel is made of one layer of foam with an inner circle and a ban of foam that I just glued around the edge. The surface markings of the brace is made by heating the foam with a heatgun and then pressing aluminium foil into it, this gives it much more of a creased leather effect. I had run out of burnt umber, but thankfully the colour of the braces are different to the belt so I managed to get something close to it by mixing some other browns that  had. The roundels in the original also don't have the same metallic apperance as on the belt, and since they would have to be flexible I mixed the brown flexpaint with acrylic gold paint. I loved this result, it definitely looks liked golden leather, and I'm not curious on what other projects I can do to get this colour. I also painted the canvas with the same golden brown colour.

The finished belt and braces, one open andone closed
The last piece of the costume is actually the piece that I finished first, and it's his vest. I used a longhaired fake fur and just cut out a general shape for the back and the fronts. The only seams are at the sides and shoulders. Once it was finished I cut it to the length that I wanted to have. In hindsight I should have kept it longer in the back, to act as a cushion for the metal back pack that I carried the menhir in.


And with that I was finished with the whole Obelix project. It was fun and for me it was the first time that I worked for real in materials like EVA foam and styrofoam, and that was pretty fun as well. I still prefer working with fabric, but I can definitely see me working with more EVA foam in the future if it's needed.

(The flask on my side is filled with water not magic potion.)

Sunday, 4 August 2019

Obelix trousers and shoes

It's time to sum up the finishing parts of my Obelix costume, and in this post I will talk about the trousers and shoes.

I didn't take a lot of photos of the trousers, while I was working on them unfortunately. The first issue with the trousers was to find a striped white and blue fabric. I didn't find anything close to those broad stripes, and I didn't even find a suitable blue fabric at all. I then decided to make my own stripes and to dye my own blue fabric. I worked with a thin cotton satin from Stoff&Stil. I like this fabric because it's thin and easy to work with. It wrinkles a lot though, so if you want to make something more elegant it can be annoying. For a soft summer garment it was perfect though. I bought a lot of natural coloured cotton satin, and then I dyed half of it using the regular textile dye that I can buy in the local paint store. I dyed the fabric by hand, and it did get a bit blotchy, but nothing that is noticable when you cut it up into strips.

I then spent a lot of time ripping the white and blue fabric into strips and sewing it together into a striped fabric. When I had a fabric that I thought was wide enough I took my 1890s bloomer pattern and used that as a guide. Basically I used the crotch area, and then I just took the pattern out to the end of the fabric, I also lengthened it both upwards and downwards. I then sewed it all together, and it was way too tight.

Or rather, I had make a perfect summer jumpsuit. It was flattering and so comfortable to wear, but it wasn't exactly the big trousers that Obelix would wear. I don't think I've heard the term sexy Obelix before, but that was the main comment when I tried them on. I had to rip them apart, and trace the pattern so I still have it for when I want to make summer jumpsuit, and then I added 2 more stripes on each side.

Now the trousers were gigantic at the top and legs though. I simply had to take in all the seams to get it into something more managable. A bonus with this is that you get the tapered look of the stripes that Obelix has in the comic. The finishing touch was to hem the top and the bottom and since I don't want any serious costume malfunctions I added a pair of shoulder straps, that I fasten with velcro. The shoulder straps will be hidden by the vest, and is one reason why I wanted to do the film version with the vest. 

Obelix also needed some kind of shoe. Also since I'm not really tall I wanted to add some height in my shoes, and thankfully it's quite easy to find sandals and shoes with heels. In the end though I went with an old pair of wedge heeled sandals with a thick sole that I had planned to throw out after the summer since they were starting to get way too worn.

I used a fake stretch suede fabric and started with simply tracing the shoe on the fabric.


The fabric is folded in the back, so the only seam is the middle front seam.  I depended a lot on the fabric being stretchy so I didn't have to be very careful.


Then I put the shoecover over the shoe and attached it to the lace of the sandal. It's easier with a curved needle.


I added some hot clue to fix the fabric to the side of the sandal, but the sole is still just the sole of the original shoe. It's not a perfect pair of shoes, but they worked since they are mostly covered by the trousers anyway.


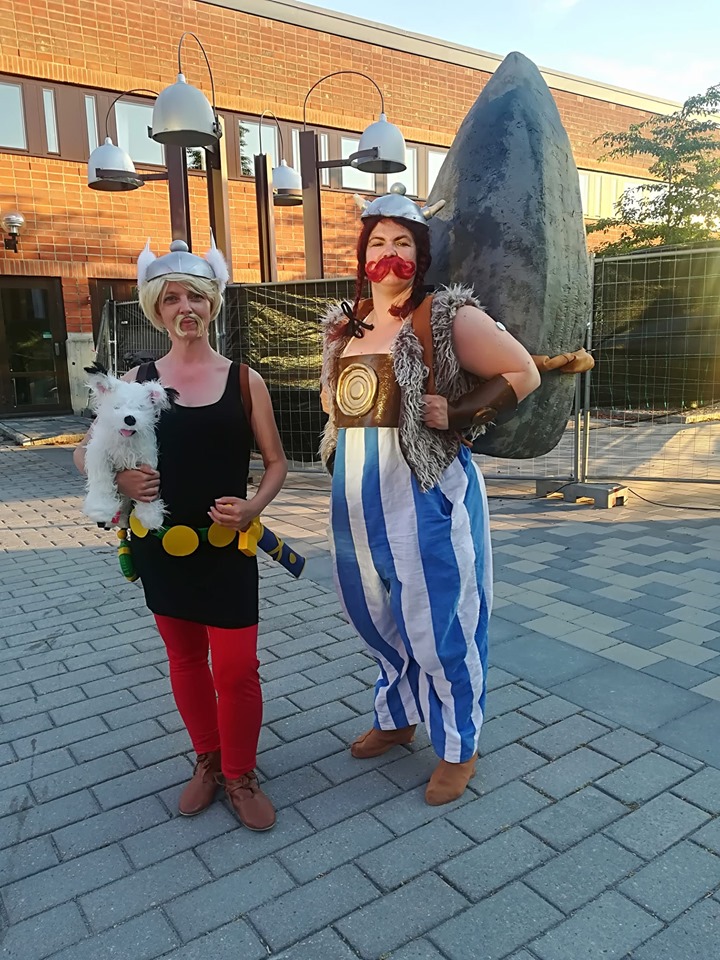
I'm not that much taller than Ann-Sofi, as Asterix, but she's wearing medieval leather shoes that are very flat and I'm wearing my sandals with a bit of heel and that is enough to make a noticable difference between us.

Sunday, 28 July 2019

NärCon 2019 report

I'm back from NärCon with sore feet and a tired body, but loads of happy memories.

NärCon is easiest described as a cosplay, gaming and creativitiy festival, and it's the biggest cosplay event in northern Europe. It is on the campus of Linköping University, and it being outside and spread out is the reason for my sore feet, I clocked around 30 km of walking on asphalt, cobblestones and stone floors over 2,5 days.

This is just an overview of the most central part of the campus. The weather decided to go with the hottest days of summer, with temperatures reaching 30+ in the middle of the days. There are worse heatwaves out there, but it was.

Anyway this is my day by day report:

Tom picked me up at 8 on Thursday. It felt strange but I had actually been able to pack and be finished early in the evening on Wednesday, no stressing last minute fixes to be done. We got down to Linköping, had lunch, checked in and managed to be at Närcon at around 2 pm, which is a new early record for us.  I left my bags in the Nordic Legions' changing rooms and then went to see Mathias and Ann-Sofie, they had driven down with their caravan the night before. With my excellent skills in orienteering I managed to go to the wrong camping and got an extra km or so in the sun. Then it was time for me and Ann-Sofie to suit up as Asterix and Obelix.

They were a big sucess! We couldn't move many meters until people came up and wanted to take photos with us and it was so much fun. The menhir worked fine, but for some metal thingies in the back of the metal frame. This first time they weren't too bad, but every time I wore it I felt more and or that they pressed into my back. I also had a bit of moustache problem. I had glued it on with mastix, but it fell off when I tried to drink or talk too much. It got better later, I'm guessing that I built up a layer of mastix on the moustache that made it easier and easier to stick. We walked around until about 11 pm and then it was back to the hotel for a shower and some sleep. Thankfully this year we were in an hotel with AC.

On Friday we arrived at NärCon at around 11 again. NärCon is a festival and goes on 24/7, but there isn't much activity before lunchtime.
Tom as Luigi on Thursday and Friday
The Nordic Legions decided that it was too hot to troop in the afternoon, and we were going to concentrate on the evening instead. So I changed into Melisandre and walked around in that costume. Unfortunately I got some blisters  from my sneakers, the same sneakers that had taken me through Medieval Week in Visby and Star Wars Celebration in Chicago without a problem, so now I started to get some sore feet.

Most of the Cosplay Dalarna gang with Harry Potter costumes on Friday
There was a Game of Thrones meet-up on Friday afternoon. There were some official photos taken at the meet up, but I only have one on my own phone.


William and his family had really great costumes.


After that Tom had told me that there was going to be something called "garbage" cosplay, I told some other people and we went there. Basically it was a competition where you made up teams, had 5 minutes to decide what you should do and then 35 minutes to build it out of a pile of rubbish that they had placed on the floor. It was a manic wrestle for the rubbish, but our team (which was basically a Cosplay Dalarna team) managed to grap two big rolls of bubble wrap as our main loot.

The result


Linus as "Deal with it Gandalf the White". The judges were impressed that I had managed to make two functional garments, bascially a classic chiton held together with pins made from cardboard and a square cloak, out of the bubble wrap, and that we had so many details (pipe, staff, brooch, sword, ring and tobacco pouch). Yes our team won the whole competition. Go Cosplay Dalarna (and Sergio)! This was probably my favorite event of the whole convention, also bcause it was so unexpected and spontaneous.

There was a Star Wars meet-up in the evening as well, and the Nordic Legions decided to join. We surprised everybody else, who apparently thought that the 501st and Rebel Legion is just all about being serious. They were so wrong. We showed our totally unstructured way of organizing photos, and then there were a bunch of photos and films done. The photographer has promised to post the photos from that in the coming days and I'm really looking forward to it. After that we led the whole bunch of Star Wars costumers in a parade all over the festival area, and it was really cool to be around 30 people, with me and the other officers first, followed by stormtroopers, our rebels and then all the other costumers which were mostly dark and light jedi. The timing was so right with it being dusk so that the lightsabres really showed, but still light enough that people could take good photos.

Admiral Daala leading her troops
Overall the Friday evening was just perfect, with a lot of pure fun cosplay events.

Saturday I woke with some really aching feet. I had slept with them high over the night but it was obvious that this was going to be a tough day. I did get some time to go around the Artists' Alley and I found two prints of Ola Art that I just had to buy, it was tough to choose though. He basically takes cheap paintings that he finds in fleamarkets and changes them and add some funny texts to them.

In the afternoon I was responsible for a presentation of the Nordic Legions. It was a simply presentation about who we are, and then we showcased our costumes and what they are made of, including stripping down a biker scout and a stormtrooper to their black undersuits. After 30 minutes we asked the audience to come down and talk with us directly and ask questions. There were actually quite a few in the audience so I was really pleased with it. Since this was about showing what we do behind the scenes we broke our own Nordic Legions' rule and had both our buckets off, I'm wearing my glasses and we had two of the same face character. The important thing was to show that we are humans and fans and that it's not an impossible goal to become a member.


In the evening I skipped parading with the legions, I simply wasn't sure how far I was going to be able to walk. Instead me and Ann-Sofie did another round of Asterix and Obelix, with a lot of breaks, but in the end my body simply said no. It was a combination of sore feet, the metal thingies from the menhir into the back and the heat. The Obelix trousers are really comfy, but then I wear a big foam belt and a fur vest over them, and the menhir is made out of isolation material that reflects heat. When I took the belt off I could wringe out the trousers underneath. So I packed up my stuff and went civil. We met up with Tom and then it was a slow walk, due to talking with people not due to pain, until we left the area at around midnight.

On Sunday we simply had breakfast and got into the car and drove home. It was even hotter on Sunday than on Saturday, and the AC in the car can't handle those temperatures, so we had to take a lot of breaks just to get some air into the car. Still I was home at around 4 pm, which is the earliest that I've been home from NärCon, and it is nice to come home early in the evening from a con.

On the way back I also come up with a new project for next year's NärCon, with a focus on comfortable shoes and cool clothes, we will see what happens.

And finally here are some other cosplayers that I met and took photos of


Sunday, 21 July 2019

Building a menhir part two - carrying a menhir

I left the menhir in the barn over the week, and on Saturday I was back to continue working on it. I started with adding more very fine filler to it it, sanding the worst bumps down and then I painted it grey. After advice from Pilerud's cosplay I used regular indoor wall paint to paint it with. Now it looked like concrete. I also discovered a bit of a chipping issue, once I painted I saw a lot of white and blue flecks on the menhir. I was worried about the filler not sticking to the insulation material, but we think it was more an issue with dust getting into small holes and then falling out when we were moving the menhir about, taking the paint above the dust with it.

Then I sat down to google menhirs when it comes to colours. A rock isn't just a solid colour, it's made up of different minerals and crystals, and I wanted it to look natural. I googled menhir of Bretagne and got a lot of different rocks, but I especially liked one that was mostly dark with ligher and som redbrown intrusions. To get the colours I wanted I made two paint mixes, I used the wall paint as a base and then i added ivory black to one of them and red, and raw umber to the other one. The paint was brushed on and then I went over it with paper towels to remove and brushmarks, and to erasing the borders between the different colours.


Then came the issue of actually being able to carry the menhir. One reason I'm mainly using the live action film as a reference is that he is wearing the menhir in a kind of backpack.

Mathias had found this metal framed backpack/bike bag.


I removed the bag itself and covered all the straps in fake suede.


We added a strap to go around the menhir, a really sturdy one and connected them.

It is heavy, but I can carry it. I need to hold on to the shoulder straps though. When we tightened them more the menhir rode up too high in the back and that was really uncomfortable.


Sunday, 14 July 2019

Building a menhir part one

This weekend has been a proper build weekend. It was time to start on the biggest part of my Obelix costume - the menhir.

I would never have been able to build this, so the fact that I have something menhir-like is because of my friend Mathias.

It started with him telling me that he had gotten a stack if styrofoam sheets from a friend. I had planned to buy this kind if sheets, but now I had gotten them for free. It's the dense kind of styrofoam used for insulation, not the white stuff that crumbles into small spheres.
A stack of styrofoam
First we had to try and see if I could carry the weight at all. Mathias had found a metalframed backpack that we strapped the styrofoam to.


 It was heavy, but doable. So we decided to make a massive menhir rather than try to hollow it out.

Next thing was to draw the shape of the menhir and cut it out through all the layers.


At thus stage we had tried to glue the sheets into one massive stack, but it fell apart when we (mostly Mathias) was working in it so we took it apart and worked on the sheets individually. We didn't have a heat knife so we worked on it with a knife for cutting insulation.

Now we had something that looked like a menhir from the front and back, but we had to work on the sides. In order to do that Mathias joined the sheets with a metal rod. Then we realized that it would take ages to cut the shape with the knife. So Mathias simply took his chainsaw and freehanded it.


No it's not going to be a fullsized menhir, but it will hopefully still be impressive. Also by now we had moved inside Mathias and Anne-Sofie's barn. A big barn filled with powertools is not something that I have around my apartment.

The chainsaw worked since the styrofoam is so dense. We got a lot of blue fluff, but it didn't just crumble.

We ended the day by glueing all the pieces together with styrofoam glue (cellplastlim)


The next day I I started with the final shaping and evening out the worst surface bumps.

This photo shows the difference between the front that I have worked on and the unworked side.

I then used a heatgun to seal the surface. Now this is plastic you are melting, and there are definitely noxious fumes when you do it. I was in the barn, so basically outside. You definitely need a well ventilated area. I used lightweight filler (lättspackel från biltema) to fill in the cracks. The top and bottom sheets had separated a bit so we used long screws to secure them. I covered the heads of the screws with foam clay.


After two days of work this is where we are. Next weekend is painting, modifying the backpack and attaching the menhir to the backpack.


Friday, 5 July 2019

A helmet for Obelix

Obelix needed a helmet and during our cosplay weekend I managed to almost finish it. This was my first time working with foam in a real build way, and that's why it was good doing at the weekend when I could get help and borrow tools, and not the least get encouragement.


The helmet is made in four parts from a pattern from Templatemaker.nl. I got it from one of our group that had used it to make a sphere, and I simply just used half the pattern pieces to make a half sphere. I had to cut out the points of each bit to make it totally flat in the bottom. The helmet is made in 5 mm high density foam, that I heated with a heat gun and then bent slightly. The dark spots above is where I heated it a bit too much. They are glued together with contact cement.

The helmet was still very angular so I borrowed a dremel and filed off the ridges where the pieces were glued together.

I used foam glay as a filler in the seams, and then I sanded them down with a very fine grit sandpaper. The top globe was freehanded in foam clay, and the horn holders were strips of the same foam that I rolled together. Then I decided to go away a bit from being accurate. I added the strip around the bottom of the helmet, and it looked a lot better even if Obelix helmet doesn't have one. I used googly eyes to mimic small bolts. When all the extra piecs were added I used wood glue, thinned with a little bit of water, to seal the foam and prime the helmet. In total I used four layers of glue.

I painted the helmet with spray paint and it is painted with one layer of grey primer, one layer of silvergrey paint, two layers of metallic and a clear top coat. The last thing I did was to add the horns, which are also made from foam clay and glued with contact cement to the helmet.

I want to weather the helmet a bit, not much, but just enough to take away some of the sheen, I also need to come up with a way of actually attaching it to my head, since it falls off when I move my head as it is right now. I'm thinking that I will add some kind of comb to it.

Tuesday, 2 July 2019

Obelix - the quest for a red moustache

One thing I'm lacking and that I will need to fake for y Obelix costume is facial hair. This is actually the part of the costume that I'm not looking forward to wearing. I simply will have to wear some kind of fake moustache. It turned out that it wasn't easy finding a moustache in red, especially not a red that mimics my own current hair colour.

I ordered a bunch of different cheap moustaches from the party shop Partykungen.se, none of them looked realistic or in the right colour. Thankfully Obelix is a comic figure, so I don't have to worry too much about the realism factor, but I still want it to look good and not just slap some orange fuzz on my face.

In the end I decided to go with the blonde moustache and try to dye it red.

Since it's a matter of a limited amount of hair I simply used sharpies to colour the moustache, the important thing is that the inc is alcohol based. You can see in the picture above where I did a first test.


I started with a sharpie in "poppy" colour. I really like this colour and think it would work great for a version of the comic style Obelix. My own hair has a lot more purple tones in it though, so to make it look more like my hair colour I had to paint it again.


This time I used a sharpie in "magenta" and this is really close to my current hair colour.

Now I can only cross my fingers that I will be able to make the moustache stick to m face when it's a warm summer's day, I've never worked with facial hair before. I have bought proper moustache and hair glue though.