Earlier in the autumn I had a survey on my facebook page if people wanted me to share my historical recipes on my blog, since I have been asked from time to time for them. Enough people wanted me to post them on the blog, so I will do it from time to time. The blog is not going to turn into a food blog, I will just limit it to when I actually do historical cooking.
I like baking, but I prefer soft cakes, cupcakes and things like that. I don't like making cookies, it's boring and to be honest I'm not a big fan of hard dry cookies. Also next weekend at the Christmas fair at Falu Gruva I'm going to be portraying a well to do woman from the late 17th century, and I got inspired to see if I could make some cookies from the time period.
My first cookie that I made was a gingerbread cookie. Gingerbread goes back to medieval times, if you count it as a very spicy cake or cookie. In Swedish the name is still "pepparkaka", meaning pepper cake, giving a hint of one of the spices that was used but has disappeared from modern recipes.
For the spices I used a recipe for "Små pepparkakor" from Cajsa Warg's "Hielpreda i hushållningen för unga fruntimmer" from 1755, which is freely available on Google Books. Her recipe is quite complicated though, and since I didn't feel like recalculating all the old measurments I decided to use the ratios for flour and liquid from the recipe for "Simple Gingerbread" from Townsend and Sons. By mixing the two recipes I ended up with this, I have written the recipe in both English and Swedish:
2 cups of wheat flour/ 2 kkp vetemjöl
½ cup of honey/ ½ kkp honung
1 tsp each of / 1 tsk vardera av
cinnamon/kanel
cardamon/kardemumma
mace/muskotblomma
ginger/ingefära
allspice/kryddpeppar
cloves/nejlika
cest of lime/limeskal (Cajsa Warg calls for the rind of preserved lemon and bitter orange/pomerans, but I didn't have any at home, and the recipe needs some citrus to balance the honey)
50 g butter/smör
1 tsp baking powder/ 1sk bakpulver (Cajsa Warg used potash/pottaska, but I don't have that in my kitchen).
Heat the honey with the spices until it's liquid, add the butter and pour the the liquid into the flour and baking powder. Mix it into a fairly solid dough, add water if needed. Roll it out to 0,5 cm thickness and cut out shapes. Bake in 200 degrees celsius for 8 minutes.
As the honey and butter cools it gets harder to work with the pastry. I don't know if the pastry should rest, like a short pastry, or if one should be quick and work with it while it's still soft. For this batch I tried to be quick, it could well be worth testing to let it cool for an hour the next time. This is the kind of recipe that I would have no hesitation serving at a 16th century or medieval event, if you are rich enough since all the spices and use of wheat flour is basically there to show off wealth. By the 18th century this would have been an old fashioned or traditional recipe.
The other recipe that I made was straight from Cajsa Warg and is a recipe for "fänkålskakor", fennel biscuits. This was a tougher recipe to make since I had to recalculate the measurements, or simply guess when it came to how much flour was needed. My recipe ended up as:
300 g of honey (I actually ran out of honey so I used a mix of honey and light molasses/sirap)
30 g of zante currants/ korinter
7 g of fennel seeds/fänkålsfrö
60 g of butter/smör
300 g of wheat flour
Pound the fennel seeds in a mortar. Mix the butter and wheat flour, add the honey, fennel seeds and currants. Mix into a pastry. Roll it out to around 0,5- 1cm (Cajsa calls for a finger thickness) and cut out shapes. Put it into a 200 degrees Celsius oven for 11 minutes. They turned out very hard, like a biscotti. Next time I would take them out earlier from the oven.
This ended up as a very wet pastry, I was really unsure if I had enough flour or not. Still Cajsa calls for using flour when rolling out the pastry, which is probably a sign that it should be sticky. It ruined my shapes when I tried to lift them to the baking tray though. This also reads like a very old fashioned recipe for the 18th century, and it's last in her cookbook so maybe it's put there because it's traditional, not so much for it being a "modern" taste in the 18th century. I was afraid that it would taste too much like liquorice, but it's actually a nice and clean taste. It's funny I hate honey and liquorice, but this recipe shows that things can change when you bake them.
Finally I made kringles. It's related to the more known German pretzel, but in Sweden it's a sweet pastry. Kringles are knows since the Middle Ages, but it's hard to know what they tasted since the name has more to do with the shape than the taste. The way it's cooked, where it's first boiled in water and then dried in the oven makes them very longlasting. Up until the 19th century they were made for special occasions. For my version I used a 19th century recipe from Arboga. The 19th century is evident in that it's using yeast and sugar. To age the recipe into something more like what was done in the Middle Ages I would use a sourdough, or at least exchange some of the wheat flour for rye. I didn't get this recipe to work though and it was way too fiddly. I'm glad that I halfed the recipe so that I only had to make 10 kringles. It's from Charles Emil Hagdahl's "Kokkonsten" from 1879, and it's said to be a traditional recipe from Arboga.
100 g butter
40 g sugar
30 g yeast
50 ml milk
1 tsp cardamon
ca 400 g Wheat flour
The recipe only calls for the yeast to be dissolved in lukewarm milk and then to work the ingredients into a fairly hard dough. I decided to melt the butter, maybe that was my mistake. After the dough has proven for 30 minutes make kringles, prove for another 30 minutes. Boil a big pot of water, put the kringles into it one by one, when they rise up to the top of the water take them up and let them dry. Finish in a 200 degrees Celsius oven for 15 minutes. (I didn't get my dough to rise)
My Christmas kitchen quartet (as I call my favorite decorations) inspects the result. The kringle is at the top, the gingerbrea is the round one (I tried to stamp it but the pastry was too stiff to be able to make a nice pattern) and the fennel biscuit is the square one.
Showing posts with label 19th century. Show all posts
Sunday, 2 December 2018
Tuesday, 29 December 2015
HSM Challenge 12 - Redo: Part two the blueberry cape
Yesterday when I had finished the cap I felt so in the mood, so I decided to make another thing for the challenge.
Back when I did the blueberry muff, for Challenge 2 - blue, I had plans to make a little cape to go with it from the rest of the fabric, a blue cotton velvet, I was unsure if there was enough fabric to make a cape, and also I ran out of time so I didn't. Then I used some of the same blue fabric to make the tricorne for the War and Peace challenge, and then I thought I had really used up too much fabric to be able to make something of the scrap that was left.
Yesterday I took the scrap out of my stash, and after I had cut off all the uneven bits I had a piece of 110 cm x 80 cm. That turned out to be just about right to get a small cape out of it. I checked the Costume Close up cape for inspiration, but it was clear that I couldn't make a hood or that elegant snibs on it. In the end I just cut an elongated semi-circle out of the fabric, giving me just enough fabric on the side left to make a small collar.
I lined it with a piece of gray cotton satin. I had bought it to make a petticoat one day, but I think I can still make a petticoat from it, just without ruffles. In order to close it I had used some silver/gray poly satin ribbon that I had at home.
The cape is handsewn, but more because I have my sewing area packed away over Christmas than wanting to be really accurate. I also don't really have a set time period for it, since this kind of capes were worn both in the 18th and 19th centuries.
The challenges that are redone with this one are: Blue - due to the colour, stash-busting - it all comes from my stash, accessorize - a cape is great add on to any costume in the colder months and sewing secrets.
The sewing secret with this one is that blue and silver/grey are the colours of the student nation that I belonged to at university. Blue stands for the county of Dalarna and silver/grey for the county of Västmanland. If you give the blue colour more prominence than the silver/grey, what is usually called (the blue side up) you show that feel closer to Dalarna. And of course I live in Dalarna and has always worn the blue side up. The student nations have been around since the 17th century, but I'm not sure how old this colour code is, it might even be a modern thing, but it is still a code.
What the item is: An 18th/19th century cape/mantelet
The Challenge: 12 - Re-do
What Challange/s are you re-doing?: Blue, stashbusting, accessorize, sewing secrets
Fabric: 80 cm blue cotton velvet, 80 cm grey cotton satin
Pattern: Inspired by the cape in Costume Close up
Year: 18th/19th century
Notions: regular sewing thread, 1 m poly satin ribbon
How historically accurate is it? It's probably around 40%. The poly satin ribbon drags it down, and even if cotton was around at the time proper velvet and linen would have been more probable fabrics. At least it's handsewn.
Hours to complete: 5
First worn: Not yet, it's was a spur of the moment thing to make it so we'll see when I get the chance to wear it.
Total cost: All from the stash, but the fabric is around $11/meter if I would buy it all new, so around $5.
Back when I did the blueberry muff, for Challenge 2 - blue, I had plans to make a little cape to go with it from the rest of the fabric, a blue cotton velvet, I was unsure if there was enough fabric to make a cape, and also I ran out of time so I didn't. Then I used some of the same blue fabric to make the tricorne for the War and Peace challenge, and then I thought I had really used up too much fabric to be able to make something of the scrap that was left.
Yesterday I took the scrap out of my stash, and after I had cut off all the uneven bits I had a piece of 110 cm x 80 cm. That turned out to be just about right to get a small cape out of it. I checked the Costume Close up cape for inspiration, but it was clear that I couldn't make a hood or that elegant snibs on it. In the end I just cut an elongated semi-circle out of the fabric, giving me just enough fabric on the side left to make a small collar.
I lined it with a piece of gray cotton satin. I had bought it to make a petticoat one day, but I think I can still make a petticoat from it, just without ruffles. In order to close it I had used some silver/gray poly satin ribbon that I had at home.
The cape is handsewn, but more because I have my sewing area packed away over Christmas than wanting to be really accurate. I also don't really have a set time period for it, since this kind of capes were worn both in the 18th and 19th centuries.
The challenges that are redone with this one are: Blue - due to the colour, stash-busting - it all comes from my stash, accessorize - a cape is great add on to any costume in the colder months and sewing secrets.
The sewing secret with this one is that blue and silver/grey are the colours of the student nation that I belonged to at university. Blue stands for the county of Dalarna and silver/grey for the county of Västmanland. If you give the blue colour more prominence than the silver/grey, what is usually called (the blue side up) you show that feel closer to Dalarna. And of course I live in Dalarna and has always worn the blue side up. The student nations have been around since the 17th century, but I'm not sure how old this colour code is, it might even be a modern thing, but it is still a code.
What the item is: An 18th/19th century cape/mantelet
The Challenge: 12 - Re-do
What Challange/s are you re-doing?: Blue, stashbusting, accessorize, sewing secrets
Fabric: 80 cm blue cotton velvet, 80 cm grey cotton satin
Pattern: Inspired by the cape in Costume Close up
Year: 18th/19th century
Notions: regular sewing thread, 1 m poly satin ribbon
How historically accurate is it? It's probably around 40%. The poly satin ribbon drags it down, and even if cotton was around at the time proper velvet and linen would have been more probable fabrics. At least it's handsewn.
Hours to complete: 5
First worn: Not yet, it's was a spur of the moment thing to make it so we'll see when I get the chance to wear it.
Total cost: All from the stash, but the fabric is around $11/meter if I would buy it all new, so around $5.
Thursday, 13 November 2014
The black, crispy ballskirt
I have made progress, and enough progress that I don't feel too stressed about finishing the ballskirt for the ball next weekend.
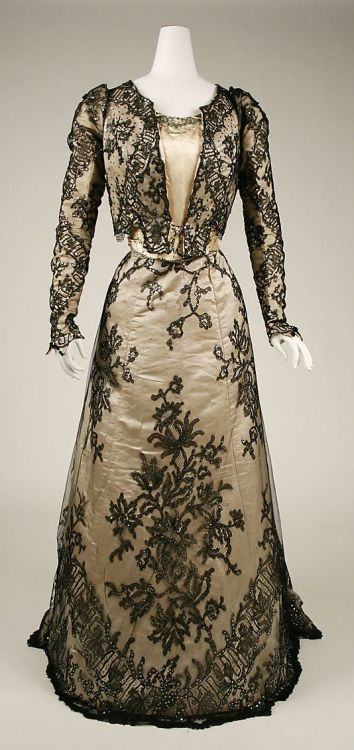
Now with my big petticoat I needed something to match it, and I figured why not make an accurate late 19th century skirt to go with it. This is not an era that I'm terribly fond of, or have studied a lot, so my first step was to go out and find some inspiration. I was definitely drawn towards the late 1890s when it came to skirt. I put some of the pictures that I found on my pinterest board. Two of the dresses that I fell for immediately were thes
I liked the fairly simple front, and then you have all the fabric cascading in the back. For a pattern I went to this free pattern for an 1895 skirt. I didn't try to scale it up, I rather used it as a guiding line for making my own pattern.
It turned out I definitely had enough fabric of my fancy fabric, but I could just find bits and pieces of dark fabric I could use as an underlining, I didn't want to use light fabric under the black taffeta. That made me do some changes to the pattern, most of all I didn't do the two back pieces, instead I've cut out one rectangular piece that I'm going to pleat in the back. In that way it's more like the back of an 18th century gown. The skirt consists of one front piece, cut on fold, two side pieces, two side back pieces and one back piece. The front piece has two darts and all the others, except for the back, has one dart to give shape to the skirt.
My process so far has been to first flatline all the pieces. Then I made a placket between the left side and side back piece, according to these instructions It's the first time I've made a placket, and except for making it a bit too narrow it wasn't hard at all Then I sewed all the darts and then I finally attached all the panels to each other.
I've started to play around with the pleating in the back, nothing really serious but I haven't decided about using knife pleats or box pleats yet. I need to wait with that until I have fixed the front though.
.The front is way too big. I can't pull it tighter, then it gets too tight over the thighs and knees, so I will have to make the darts much bigger, and possibly take in the side seams as well.
Now with my big petticoat I needed something to match it, and I figured why not make an accurate late 19th century skirt to go with it. This is not an era that I'm terribly fond of, or have studied a lot, so my first step was to go out and find some inspiration. I was definitely drawn towards the late 1890s when it came to skirt. I put some of the pictures that I found on my pinterest board. Two of the dresses that I fell for immediately were thes
| Portrait of a Lady in Black", c. 1895, by William Merritt Chase (American, 1849-1916). |
| Evening Dress 1898-1899, Metropolitan Museum |
It turned out I definitely had enough fabric of my fancy fabric, but I could just find bits and pieces of dark fabric I could use as an underlining, I didn't want to use light fabric under the black taffeta. That made me do some changes to the pattern, most of all I didn't do the two back pieces, instead I've cut out one rectangular piece that I'm going to pleat in the back. In that way it's more like the back of an 18th century gown. The skirt consists of one front piece, cut on fold, two side pieces, two side back pieces and one back piece. The front piece has two darts and all the others, except for the back, has one dart to give shape to the skirt.
My process so far has been to first flatline all the pieces. Then I made a placket between the left side and side back piece, according to these instructions It's the first time I've made a placket, and except for making it a bit too narrow it wasn't hard at all Then I sewed all the darts and then I finally attached all the panels to each other.
I've started to play around with the pleating in the back, nothing really serious but I haven't decided about using knife pleats or box pleats yet. I need to wait with that until I have fixed the front though.
.The front is way too big. I can't pull it tighter, then it gets too tight over the thighs and knees, so I will have to make the darts much bigger, and possibly take in the side seams as well.
Monday, 10 November 2014
HSF Challenge: 21 redo, or attack of the Edwardian snow monster
Some times things just happen. In two weeks I'm going to an anniversary ball. At first I hadn't thought about making a new ballgown, but rather reuse one of my old ones or actually go in one of my 18th century gowns. Then I made the really fancy corset for my sister's wedding, and I want to use it again, so I decided to wear it for the ball. Only thing is that I needed a long skirt to wear with it. In New York I picked up some black silk taffeta and this weekend my plan was to sew the skirt. I had planned, and bought fabric enough, for something similar to this Truly Victorian pattern, without the train.
As the good costumer I am I realized that before making a skirt I need a petticoat to go with it, so on Sunday I started to cut out a simple petticoat. I didn't want to have seam at the centre front, so it consisted of three trapezoid pieces, 80 cm at the bottom and 40 at the top.
The front piece was stretched fairly tight, with just two small pleats to give some room over the hips, and the two back pieces were pleated to give some fullness there.
It's a actually a bit too tight over the hips, so there is some wrinkling, but that's a good lesson for when I want to make an outer skirt.
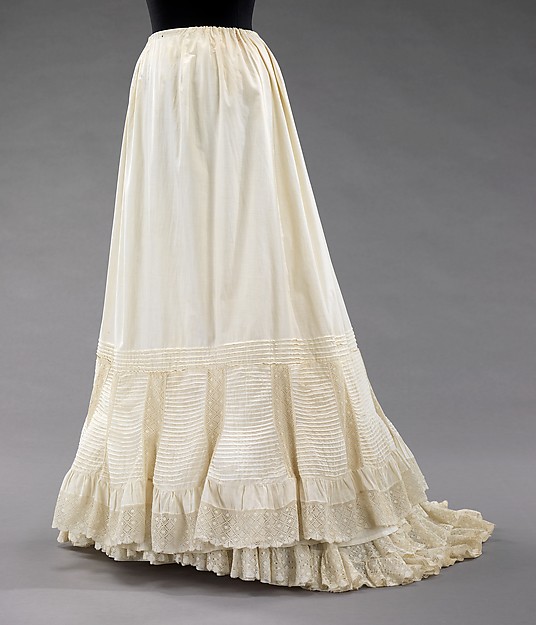
Then I went online to look get some inspiration to add a ruffle or two. I especially fell in love with this petticoat from 1895
And then it spiralled. I started with adding a quite wide ruffle of the same material as the petticoat. The ruffle is about five times longer than the circumference of the petticoat hem. In order to make the hem sturdier, and also because I thought it looked good, I reinforced it by making four rows of stitch lines on it.
Now unlike the originals I didn't have a lot of lovely and soft lace to go on with, but I had around three meters of cotton voile. I cut it up into strips, and gathered them as another layer of ruffles. When I started sewing them on it started to feel more like a battle with a snowmonster than a sewing project.
The added layer of voile ruffles made a lot to make the petticoat more airey and floaty.
I even had a bit of cotton voile left, so I cut that up as well and added a small extra ruffle on the back, there wasn't enough for it to go all the way round.
Then I wanted to add another ruffle, that was a bit sturdier than the voile ruffle. I once again used the same fabric as the main skirt. To decorate that fabric my plan was to add several rows of pintucks at the bottom of the ruffle. I used my pintuck presserfoot and twin needle, only to discover that I didn't have sewing thread that was good enough. This is a lesson learnt, the sewing thread that I had kept getting fuzzy and breaking when it was treaded to the twin needle. I had a tiny remnant of offwhite Güterman thread and with that one I could just sew on and on and on, but it only lasted for half a row of pintucks. With the bad thread I had to retread the machine after around 20 cm, and after three rows of pintucks I gave up. By now it was around 22, and I had been sewing since 9 in the morning. I added the ruffle on to the petticoat, without as many pintucks as I wanted.
Up until the problem with the pintucks this is one of the most stressfree projects I've made in a really long time. Only problem is that the petticoat is now bigger than my original plan for ballskirt, so I have to think about it. I've just flung the black fabric on my dressform, and it definitely speaks to me, but that will involve more complicated pattern making and construction that I had planned, and what I have time for since I only have a couple of weeknights to work with to get the skirt done.
Just the facts
The Challenge: 21 Redo
Challenges re-done: #4 Under it all
Fabric: 5 m cotton (now the store called it cretonne, but it is simply a cotton plainweave) 2,5 m cotton voile
Pattern: My own,
Year: 1890s
Notions: regular sewing thread, hook and eye
How historically accurate is it? The fabric and style is correct. I did use modern presserfeet to help with sewing the ruffles and the pintucks, so I would say around 80%.
Hours to complete: 12 hours
First worn: Not yet
Total cost: $30
What I learnt with this projcet
Only use good quality thread
Future plans
This will be the foundation for a ballskirt, I'm already thinking about how I can use that skirt to make some kind of 1890s ensemble or steampunk outfit some time in the future.
As the good costumer I am I realized that before making a skirt I need a petticoat to go with it, so on Sunday I started to cut out a simple petticoat. I didn't want to have seam at the centre front, so it consisted of three trapezoid pieces, 80 cm at the bottom and 40 at the top.
The front piece was stretched fairly tight, with just two small pleats to give some room over the hips, and the two back pieces were pleated to give some fullness there.
It's a actually a bit too tight over the hips, so there is some wrinkling, but that's a good lesson for when I want to make an outer skirt.
Then I went online to look get some inspiration to add a ruffle or two. I especially fell in love with this petticoat from 1895
| Metropolitan Museum |
Now unlike the originals I didn't have a lot of lovely and soft lace to go on with, but I had around three meters of cotton voile. I cut it up into strips, and gathered them as another layer of ruffles. When I started sewing them on it started to feel more like a battle with a snowmonster than a sewing project.
The added layer of voile ruffles made a lot to make the petticoat more airey and floaty.
I even had a bit of cotton voile left, so I cut that up as well and added a small extra ruffle on the back, there wasn't enough for it to go all the way round.
Then I wanted to add another ruffle, that was a bit sturdier than the voile ruffle. I once again used the same fabric as the main skirt. To decorate that fabric my plan was to add several rows of pintucks at the bottom of the ruffle. I used my pintuck presserfoot and twin needle, only to discover that I didn't have sewing thread that was good enough. This is a lesson learnt, the sewing thread that I had kept getting fuzzy and breaking when it was treaded to the twin needle. I had a tiny remnant of offwhite Güterman thread and with that one I could just sew on and on and on, but it only lasted for half a row of pintucks. With the bad thread I had to retread the machine after around 20 cm, and after three rows of pintucks I gave up. By now it was around 22, and I had been sewing since 9 in the morning. I added the ruffle on to the petticoat, without as many pintucks as I wanted.
Up until the problem with the pintucks this is one of the most stressfree projects I've made in a really long time. Only problem is that the petticoat is now bigger than my original plan for ballskirt, so I have to think about it. I've just flung the black fabric on my dressform, and it definitely speaks to me, but that will involve more complicated pattern making and construction that I had planned, and what I have time for since I only have a couple of weeknights to work with to get the skirt done.
Just the facts
The Challenge: 21 Redo
Challenges re-done: #4 Under it all
Fabric: 5 m cotton (now the store called it cretonne, but it is simply a cotton plainweave) 2,5 m cotton voile
Pattern: My own,
Year: 1890s
Notions: regular sewing thread, hook and eye
How historically accurate is it? The fabric and style is correct. I did use modern presserfeet to help with sewing the ruffles and the pintucks, so I would say around 80%.
Hours to complete: 12 hours
First worn: Not yet
Total cost: $30
What I learnt with this projcet
Only use good quality thread
Future plans
This will be the foundation for a ballskirt, I'm already thinking about how I can use that skirt to make some kind of 1890s ensemble or steampunk outfit some time in the future.
Monday, 20 October 2014
HSF Challenge 19: Inspiration
So it's been a while, but I've now completed a project that goes within the HSF again.
First a bit of background to this. In my regular work I am responsible for the educational programs, and school holiday programs, at a local museum, that also happens to be an underground mine. For the autumn school holiday it was time to come up with something new, and I decided to make a sort of Time Travel, back into the early 19th century. More information about the activities can be found here (in Swedish) Now me being me, I suggested that instead of just using the clothes we have in the basement, and goes into the "general old fashioned, but no particular time period"-kind of costume, I would make an early 19th century costume for me and the other person doing the program.
I wanted to make a woman's outfit, rather than pretending to be a crossdresser or impersonating a man. I found it easier to come up with a reason why a woman would be in the mine, even if she wasn't working there. Since this isn't a personal costume for me there were some things I needed to take into consideration. First of all it needed to be easily adjustable for all kinds of sizes. For the first usage me and the other person are quite similar in size, but who knows what the future holds. Since the program is taking place underground it also needs to be machine washable, it's going to get really dirty quite quick.
Now for the HSF challenge: Inspiration. I would like to use the whole of HSF as an inspiration, until I followed that I had hardly thought about doing everyday kind of clothing, costuming for me was all about fancy and droolworthy dresses. Through the HSF I have seen so many wonderful examples of clothes worn by the lower and middle classes that I've started to enjoy them more and more. If there is one specific inspiration for this it will be Sarah W, of amostpeculiarmademoiselle. Her research and recreating of the clothes of ordinary people has been a lot of help and inspiration for me, she has also helped when I have asked questions about this in the Swedish fb-group "Skapa historiska kläder och gör något kul" I can also point to her early 19th century shortgown as a direct inspiration for what I wanted to do.
Now a shortgown would have been easy, but I would still have needed to make a petticoat, in the end I decided that I wanted to make a roundgown, and to make it adjustable for several sizes I would make it big enough to pull on over the head and use a drawstring at the waist. To have a pattern to start from I pulled out my pattern for the revolutionary gaulle, which at least is late 18th century. I then made each piece wider, and shortened the waist.
Here is the new pieces, with the original laid on top. To be honest in hindsight I enlarged them too much. If I'm going to do this kind of dress again I would not enlarge the side piece, only the front and back pieces, and I would shorten the waist even more. I've always felt that the gaulle is quite high, so I thought just using the original sewing line as a cutting line, without the seam allowance, would be enough.
The bodice was made up in two layers, and I used 18th century construction methods, eventhough I sewed the main seams on the machine. All the visible stitches on the lining are handsewn though. I then cut two panels of fabric, sewed them together and gathered them to make a skirt. I added a drawstring around the waist. Now the waist being lower than a proper regency waist, and with a skirt that was a lot wider than it should have been, after all 19th century fabric was not 150 cm wide, the whole dress started to gravitate towards a later date than the early 19th century. This was accentuated when I looked at the length of the gown. On me it was OK, but I have very short legs, on anyone taller it would have been too short, so I had to add a bit of length to it, and now for me it just reaches the floor.
Then there were the sleeves. With the enlarging of the pattern, the armscye had also turned out very big. I took out my sleeve pattern I drafted for the shrug I wore to my sister's wedding, and just added to it. The result made the sleeves very full, and quite puffy as well.
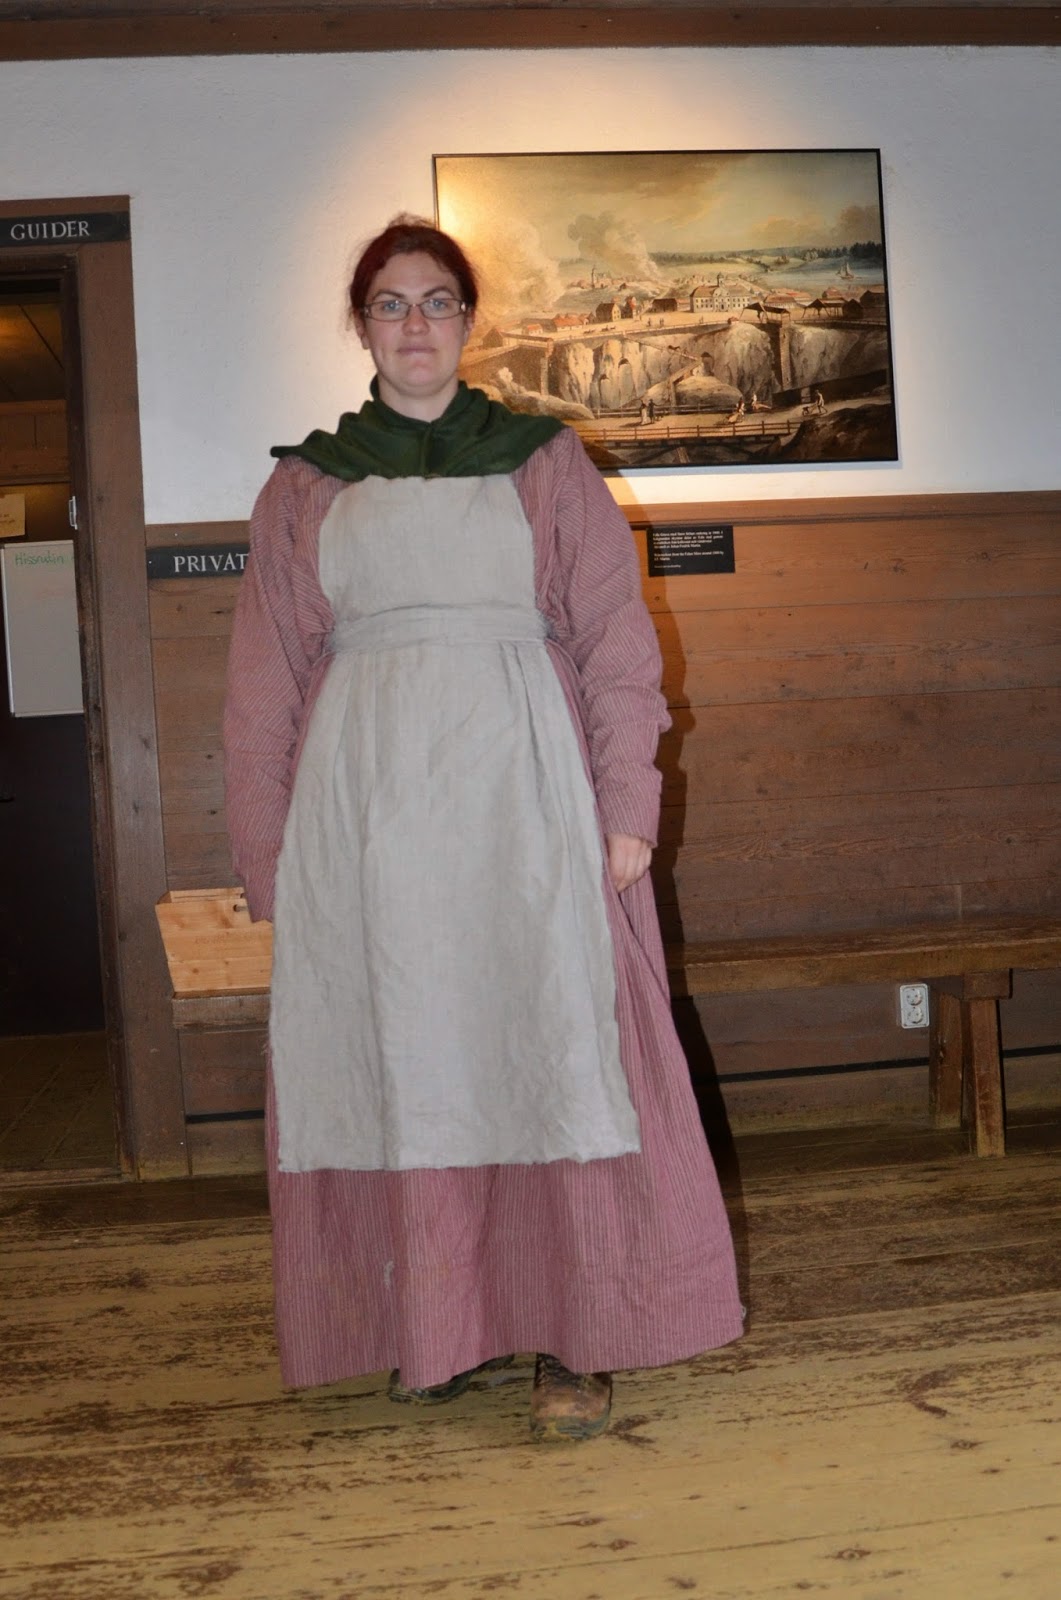
Here is the final gown, and I would say that to me it looks more 1830s than 1810s, but this woman I'm going to portray might either have been very fashion forward, or a bit backwards, wishing back to the waists and skirts of the 18th century. As it is I think it's a bit similar to this extant Swedish gown, dated to 1830-1840.
I wore the dress today for the dressrehearsal for the holiday program.
I had managed to scrape together an apron as well from the last pieces of linen I used for the lining. The apron doesn't go into the HSF challenge it's quite a nasty thing, all machinesewn and I just zigzaged over the edges. If I ever take the time I will take the apron home and hem it properly. The neckerchief was also just something I found at work. I'm hoping to get the time to do a cap to wear, I know that I have made two 18th century caps for work previously but I just couldn't find any of them. For the dress rehearsal it was alright to go without the cap though.
The Challenge: 19 Inspiration
Fabric: 4 m of cotton/linen blend and 1 m of linen
Pattern: My own, drafted from instructions in Creathing Historical Clothes
Year: 1830s
Notions: regular sewing thread, cotton tape
How historically accurate is it? The fabric is correct, even if cotton was more likely to be used for finer clothing, the major seams were done by machine but all visible seams are finished by hand. I'd say 80%
Hours to complete: 16 hours
First worn: Monday 20th of October, for a dress rehearsal
Total cost: $75
What I learnt with this projcet
More fabric isn't always the better, sometimes it just gets bulky, also add a bit more to the skirt length than you think. Also you need less circumference than you think to be able to pull it over your head.
Future plans
I enjoyed making this dress but it's not an era I really enjoy or have occasion to wear though. I do feel a bit sad that I won't keep the dress in my own wardrobe, so maybe I will make a consolation dress for myself. In that case I would like to do it a more proper regency dress, so higher waist and not quite as much fabric in the skirt.
First a bit of background to this. In my regular work I am responsible for the educational programs, and school holiday programs, at a local museum, that also happens to be an underground mine. For the autumn school holiday it was time to come up with something new, and I decided to make a sort of Time Travel, back into the early 19th century. More information about the activities can be found here (in Swedish) Now me being me, I suggested that instead of just using the clothes we have in the basement, and goes into the "general old fashioned, but no particular time period"-kind of costume, I would make an early 19th century costume for me and the other person doing the program.
I wanted to make a woman's outfit, rather than pretending to be a crossdresser or impersonating a man. I found it easier to come up with a reason why a woman would be in the mine, even if she wasn't working there. Since this isn't a personal costume for me there were some things I needed to take into consideration. First of all it needed to be easily adjustable for all kinds of sizes. For the first usage me and the other person are quite similar in size, but who knows what the future holds. Since the program is taking place underground it also needs to be machine washable, it's going to get really dirty quite quick.
Now for the HSF challenge: Inspiration. I would like to use the whole of HSF as an inspiration, until I followed that I had hardly thought about doing everyday kind of clothing, costuming for me was all about fancy and droolworthy dresses. Through the HSF I have seen so many wonderful examples of clothes worn by the lower and middle classes that I've started to enjoy them more and more. If there is one specific inspiration for this it will be Sarah W, of amostpeculiarmademoiselle. Her research and recreating of the clothes of ordinary people has been a lot of help and inspiration for me, she has also helped when I have asked questions about this in the Swedish fb-group "Skapa historiska kläder och gör något kul" I can also point to her early 19th century shortgown as a direct inspiration for what I wanted to do.
Now a shortgown would have been easy, but I would still have needed to make a petticoat, in the end I decided that I wanted to make a roundgown, and to make it adjustable for several sizes I would make it big enough to pull on over the head and use a drawstring at the waist. To have a pattern to start from I pulled out my pattern for the revolutionary gaulle, which at least is late 18th century. I then made each piece wider, and shortened the waist.
Here is the new pieces, with the original laid on top. To be honest in hindsight I enlarged them too much. If I'm going to do this kind of dress again I would not enlarge the side piece, only the front and back pieces, and I would shorten the waist even more. I've always felt that the gaulle is quite high, so I thought just using the original sewing line as a cutting line, without the seam allowance, would be enough.
The bodice was made up in two layers, and I used 18th century construction methods, eventhough I sewed the main seams on the machine. All the visible stitches on the lining are handsewn though. I then cut two panels of fabric, sewed them together and gathered them to make a skirt. I added a drawstring around the waist. Now the waist being lower than a proper regency waist, and with a skirt that was a lot wider than it should have been, after all 19th century fabric was not 150 cm wide, the whole dress started to gravitate towards a later date than the early 19th century. This was accentuated when I looked at the length of the gown. On me it was OK, but I have very short legs, on anyone taller it would have been too short, so I had to add a bit of length to it, and now for me it just reaches the floor.
Then there were the sleeves. With the enlarging of the pattern, the armscye had also turned out very big. I took out my sleeve pattern I drafted for the shrug I wore to my sister's wedding, and just added to it. The result made the sleeves very full, and quite puffy as well.
Here is the final gown, and I would say that to me it looks more 1830s than 1810s, but this woman I'm going to portray might either have been very fashion forward, or a bit backwards, wishing back to the waists and skirts of the 18th century. As it is I think it's a bit similar to this extant Swedish gown, dated to 1830-1840.
I wore the dress today for the dressrehearsal for the holiday program.
I had managed to scrape together an apron as well from the last pieces of linen I used for the lining. The apron doesn't go into the HSF challenge it's quite a nasty thing, all machinesewn and I just zigzaged over the edges. If I ever take the time I will take the apron home and hem it properly. The neckerchief was also just something I found at work. I'm hoping to get the time to do a cap to wear, I know that I have made two 18th century caps for work previously but I just couldn't find any of them. For the dress rehearsal it was alright to go without the cap though.
The Challenge: 19 Inspiration
Fabric: 4 m of cotton/linen blend and 1 m of linen
Pattern: My own, drafted from instructions in Creathing Historical Clothes
Year: 1830s
Notions: regular sewing thread, cotton tape
How historically accurate is it? The fabric is correct, even if cotton was more likely to be used for finer clothing, the major seams were done by machine but all visible seams are finished by hand. I'd say 80%
Hours to complete: 16 hours
First worn: Monday 20th of October, for a dress rehearsal
Total cost: $75
What I learnt with this projcet
More fabric isn't always the better, sometimes it just gets bulky, also add a bit more to the skirt length than you think. Also you need less circumference than you think to be able to pull it over your head.
Future plans
I enjoyed making this dress but it's not an era I really enjoy or have occasion to wear though. I do feel a bit sad that I won't keep the dress in my own wardrobe, so maybe I will make a consolation dress for myself. In that case I would like to do it a more proper regency dress, so higher waist and not quite as much fabric in the skirt.
Wednesday, 26 February 2014
American Duchess: Nankeen regency boots giveaway
American Duchess has just announced her new regency style boot "Nankeen", and there's a giveaway.
Click here for your chance to enter
These are my most favorite boots from her so far, and in fact I'm more interested in using them for everyday wear than for regency recreations, since that's not a style I'm really interested, or feel comfortable in.
I'm almost done for the HSF challenge 4, it's a new pair of stays. The only thing left is the binding, but it's killing my hands as usual, and I also happen to work around 16 hours/day this week. That's what you get for not taking a holiday and instead trying to combine your everyday work with volunteering for the organizing of a world cup competition in ski jumping.
Click here for your chance to enter
These are my most favorite boots from her so far, and in fact I'm more interested in using them for everyday wear than for regency recreations, since that's not a style I'm really interested, or feel comfortable in.
I'm almost done for the HSF challenge 4, it's a new pair of stays. The only thing left is the binding, but it's killing my hands as usual, and I also happen to work around 16 hours/day this week. That's what you get for not taking a holiday and instead trying to combine your everyday work with volunteering for the organizing of a world cup competition in ski jumping.
Subscribe to:
Posts (Atom)