Sunday, 26 November 2023

HSM Challenge 5: Hair apparel - the finished renaissance flat cap

So in order to finish the flat cap that I started here I wanted to line it to make it warmer. I have a stash of fur pieces left, from when I made my pink furlined cape. It's old fur from a vintage furcoat that I bought several years ago on an auction. 

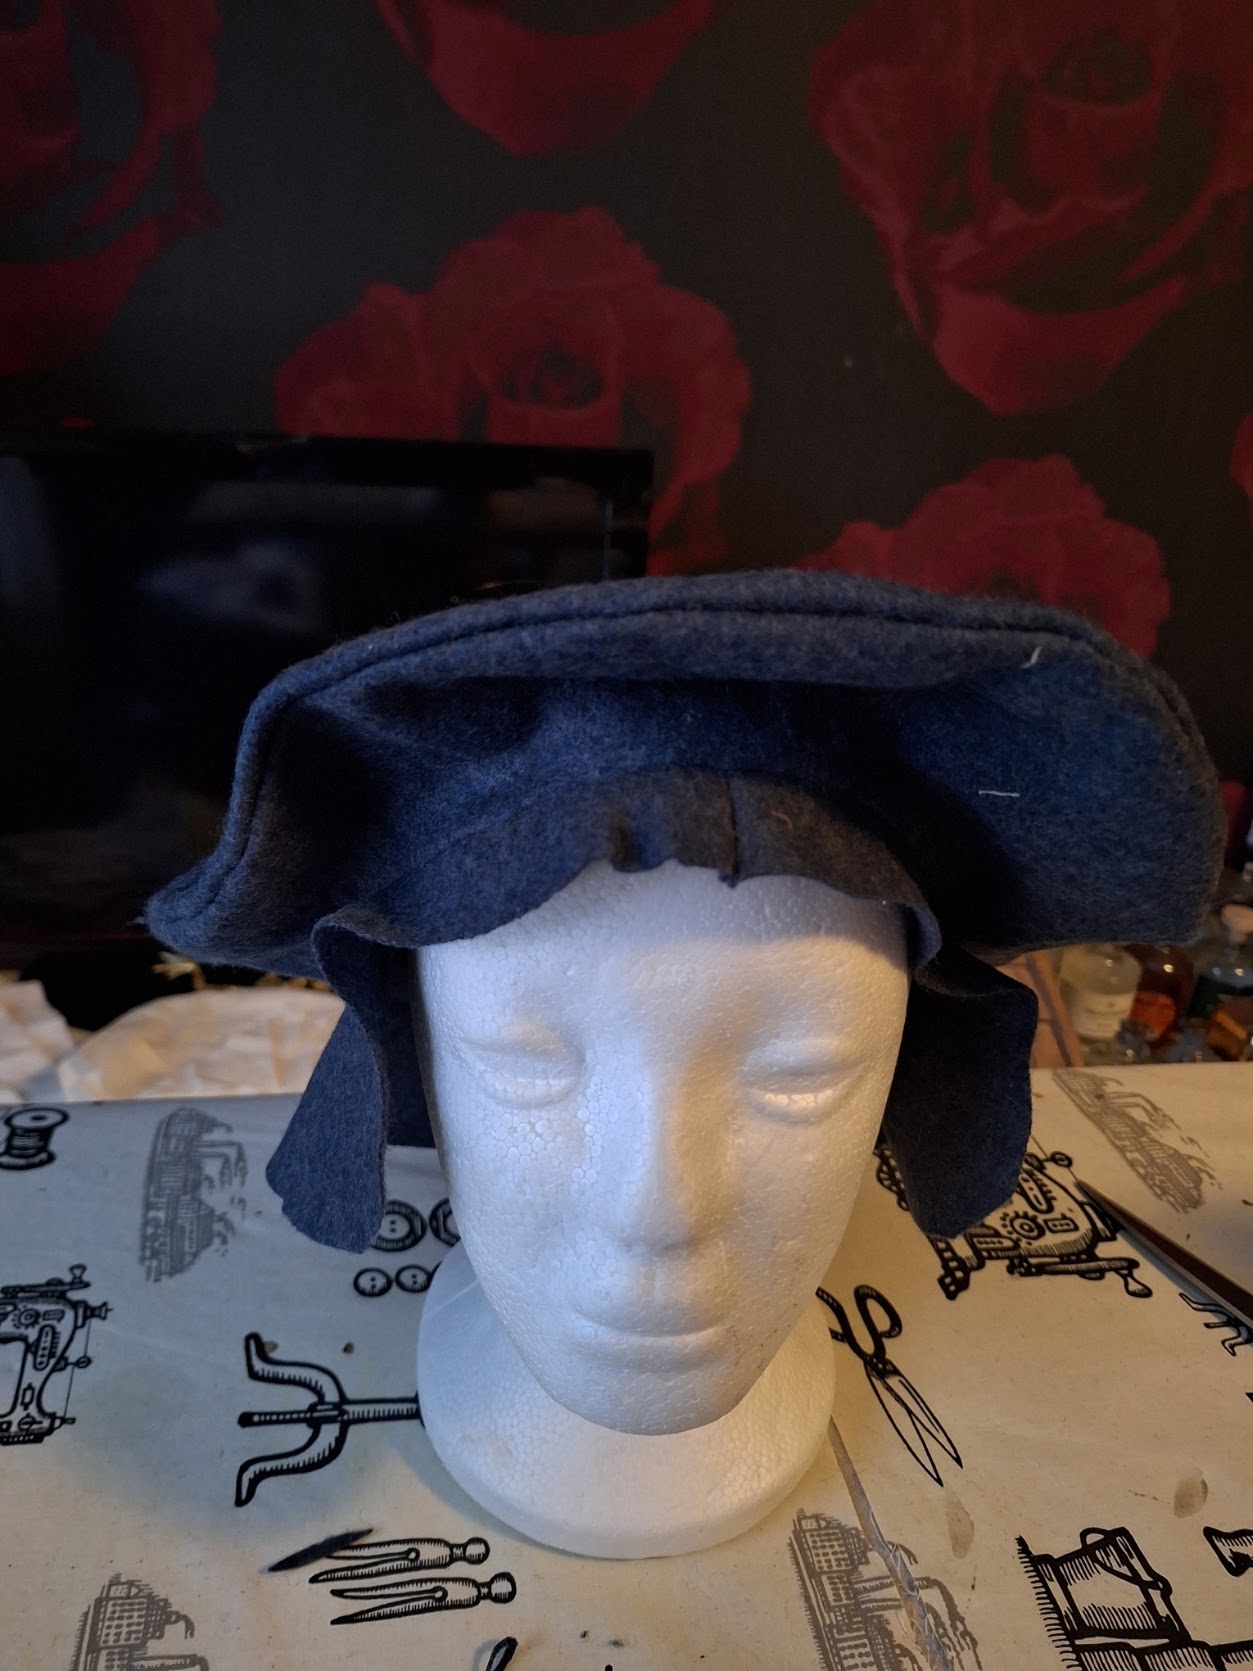
Just when I had finished that cape, or schaube, I learnt that the fur was usually attached to a separate layer, and I wanted to do this. This will also allow me to remove the fur if it is too warm, say in the summer. For the layer that I attached the fur to I used the pair of hose that I had made for David, but that had really split and are not repairable anymore. The fabric is really thin, but still wool so it doesn't unravel.


The fur was sewn with fairly large stitches to the interlayer and then the lining was whipstitched to the seam allowance on the inside of the cap, and sewn to the edge of the cap with prickstitches. 

We took the cap out to try it in the winter weather.


According to the wearer it's really nice and comfy, and he has enough space to put a modern thin cap under it as well if it gets really cold. 

Challenge 5, May 2023: Hair Apparel Make something worn in the hair or on the head.

Be sure to tell us the following:

What the item is: a renaissance winter flat cap
How it fits the challenge: it is worn on the head
Material: 1 m of wool, scraps but something like 0,3 m of fur
Pattern: inspired by internet tutorials for Tudor flat caps
Year: 1520s
Notions: sewing thread
How historically accurate is it? 60% - it seems as if the caps were mainly black, but I didn't have any black fabric, the main cap is also sewn on the machine while the lining is made by hand
Hours to complete: 3
First worn: not yet
Total cost: a stash project, but probably $30 if I had bought the material new

Wednesday, 22 November 2023

renaissance flat cap

 So it's now been 1,5 weeks since my gastric bypass. Everything went fine. I could go home the day after and I could stop with painkillers after just a few days. I am very tired though, and I do fall asleep after every meal. I can definitely feel that my body is changing, and that together with the fact that being on sick leave means that I am on just 80% of my wages until I am back means that I have put a halt on new costume projects for myself, and from buying new supplies. I do have a costume project that I have started on and as soon as I feel that I can go back to the cosplay meetings, then I will continue with that, since it's size doesn't matter for it.

Anyway in the meantime my husband needs some early 16th century winter clothes and I started with making him a cap, out of fabric that  I had at home.

When you search for men's hats for the period the most common tutorial or pattern you come across is for what is called the Tudor flat cap.

This is an early form of the cap, in a Holbein portrait from 1541. Later on the brim of the cap would become stiffer and a bit smaller. Still I want my husband and I to go for a 1520's look, when the caps were floppier.

This is a portrait dated to around 1520, and here you can see a wider and softer hat, and there is no brim rather a piece of fabric that goes down a bit on the head. Since I am making a winter cap I wanted the fabric to go down over the ears for warmth.


the colour of the caps seems to 90% blac, but I only had this grey wool, or a very bright green to choose from. I used one of the tutorials for a Tudor flat cap that you can google, but I made it bigger. In the end the diameter is 38 cm and the inner diameter, that fits my husband's large head, is 20 cm. The brim was the same size as the crown of the hat, but that was too floppy and too long. I reduced the floppyness by adding two darts, just by the ear, and I cut down the length of it freehanded, until it fit my husband.


Like most of my husband's costumes this one is sewn on the machine, in total it took me less than 1 hour to get the cap together. 

I didn't have enough fabric to double the brim and it's unlined so it feels a bit naked as it is. Since this is going to be a winter cap I will go and see if I have some scraps of fur so that I can make a fur lining for the brim and add a lining to the crown as well.


Monday, 16 October 2023

Things are about to change

 So there isn't a lot of activity here anymore, and one big reason is that I haven't had a lot of passion for making new costumes. A big reason has been that I have not been happy with what has been going on with my body. I have always been a big and curvy girl, but over the last years I have noticed that my weight is just creeping upwards and I can't get it to stop. There seems to be correlation in that I can either control my weight, or have good control over my autoimmune disease (type 1 diabetes). I am now weighing more than I have ever done before, and no matter if there are medical reasons I don't feel that I fit into any costumes anymore.

After some time of investigating my weight issues, and it was so nice to hear that I do keep a healthy enough lifestyle and that it's not a simple issue of "eat less, excercise more" I have decided to do a gastric by-pass operation. I want to do it now before I gain even more weight. A gastric by-pass isn't just about not being able to eat, a lot of the effects come from the reprogramming of that metabolic systems that occurs with the operation. I also have no idea what will happen with my body, the great majority of course looses weight but it's very individual on how much you loose. For me the important thing is also to stop gaining weight, even if I of course hope that I will get back to a size I had a couple of years ago. It will also take quite some time before the weight stabilizes after the operation (first you usually drop weight, then you gain some again, and then it stabilizes).

That being said this weekend was the last chance for me to be out wearing costumes and nice clothes before the operation, that will take place on November 10th.

First my mother was invited to a ceremonial dinner at her old student nation, so it was time to bring out a ballgown when I came with her. This is actually a gown that I have bought, not made, since I have outgrown all my old gowns and I bought it last year when me and my husband went to a ball the weekend after our wedding. I was busy enough making my wedding gown, so it was out of the question to make a ballgown as well.


Then I missed the first day of the local convention AvestaCon, since I was driving me and my mother home from the dinner that day. But on Sunday I was trooping with Swedish Garrison and Nordic Base there, and since one of the great things with AvestaCon is that they have professional photographer Johan Falkenström there, and you get one free photo for every costume, I got some nice photos of first my jedi.

He doesn't take photos with the light on for the lightsabre, and I haven't had time to ask someone to fix it for me. 

My favorite photo was with my jawa, and a borrowed tusken rifle


AvestaCon is held in a wonderful old iron foundry that has been turned into an art museum, and I found a table with a lot of old rusty machinery and stuff, so more photos were taken with the jawa in its true element, and I hope I can share them soon.


Sunday, 30 July 2023

Beach 2023 (or 1523)

 As I am heading off for Medieval Week in Visby again I realized that I needed something for bathing. The beach in Visby is honestly not a bathing beach, but it's the water and it's nice to go down and wash off. It's very public, so something to wear is essential. Last year I simply had a bikini, and when going down and up I pulled one of my regular shift over it to cover up, and look a bit more historical. 

Bathing shift were a thing in the Middle Ages, it's easy to google and find a lot of examples of them. Now most of them looks to be fairly tight around the bust, and from quite a sheer fabric. I decided to draw inspiration from them, but make a modern version.

I wanted to be able to pull the shift both down and up, so for that reason the shift is quite loose around the top, so I can pull it down over my bottom and hips. The straps have snaps, so when I want to get changed to what I'm going to wear I can undo the straps, pull the regular shift over me, and then remove the bathing shift by pulling it down. 

It's also quite a bit shorter than the images of the medieval bathing shifts, they were shorter, but not that short. I would say this is not historically accurate, but I can move around in the camp in it, and I can leave it to dry when we have the camp open for visitors. It is also totally machine sewn, since it wasn't a plan to make it historically accurate.

The top has a draw string as well as straps.


The straps are fastened with very modern snaps.


The pattern is really just a tube of fabric, and I have added a front and back gore to make it wider over the hips. 


Sunday, 25 June 2023

Celebrating 500 years of Swedish independence

 For the last 2  years I have been in involved in recreating the victory parade of Gustav Vasa in 1523. Originally it was held on Midsummers Day, and a group of volunteers set off to make huge spectacular event of it. A lot of us were disappointed in the lack of official celebrations, so the project's leader and heart simply decided that he would fix it himself. It is always possible to discuss the history and how much of a milestone it really was, but since that day Sweden and Stockholm have never been occupied by a foreign force.

Said and done yesterday 300 people in early 16th century clothes marched into the Old Town of Stockholm, up to the castle where we got to march up to the king and queen, followed by a march to the main square where me and my husbanded presided of 4 hours of lectures, music and dance to celebrate the event. It all ended with a glorious feast in the medieval restaurant "Sjätte Tunnan", that even spilled out onto the street outside to the amusement of us and the tourists that passed by.


Dancing in the street 1523-style

I wore my 1520's court gown, that I had to enlarge to fit but I still had scraps of the original fabric that I could use. It is now deeply brown black at the hem, but it was worth it.

The only photos I've seen so far of me on stage as MC


I had been more busy fixing clothes to my husband and our friend Björn. My husband wore his repaired pair of joined hose with vest (that is going to be a doublet some time when I make the sleeves) and his older 16th century gown. Our friend had the farmers' trousers a shirt and coif that I had made, and then I had borrowed the blue jacket and a helmet for him. He was very proud that he got to be the flag bearer for the farmer soldiers, he had made the flag himself.

Gathering before the parade

First group of the parade


The second group of soldiers walking into the inner court yard (that is usually restricted and private)

Me and the group I was walking with

Ann-Sofie and Monica are ready for the finishing parade

And here is a video of the first and main parade 

And this is the finishing parade, which was smaller because there were no horses and they walked through the streets of Old Town. I wasn't in the finishing parade since I had been standing on stage for four hours and simply wouldn't have been able to walk any more.


Sunday, 14 May 2023

HSM2023 - challenge: reality is unrealistic

 I don't have much time for sewing anymore, but with a huge event coming up in the end of June 2023, where I'm in the planning committee for recreating the 500th annversary of Gustav Vasa's victory celebration in Stockholm together with 250 reenactors I am now up to my neck in projects. I have promised to make a peasant outfit for a good friend, my husband needs to get a doublet and hat, and fix the last things of his joined hose, and I want to finish my pink gown and add a new shift, partlet and hood for myself.

For this challenge I go to the peasant outfit for a friend. He doesn't live where I can do any fittings, so I needed something that was easy, and not  depending on exact fit. For this challenge I will turn against the view of peasants from other reenactors. When going to reenacting events you only see tight hose for the men, and there is a strong backlash against "LARP pants" which are usually baggier and more like pyjama trousers. Now there are actually a lot of evidence for peasants wearing trousers that are very much like those. Instead of pretending that it is my own research I will guide you to this post by Marlein made it - Swedish 16th century trousers

For the pattern I used the pattern that Marlein has made, and then given out to some other friends. It is made from 3 m of fine wool.

Now I didn't know what size the pattern was in, and the person I borrowed the pattern from said that she had had to enlarge it to fit the person she made it for. So I added a generous seam allowance. I then sewed it together by machine. The person I am making this for just want to use them for one event, so I don't go for perfect historical accuracy here.

Having sewn them together I realized that they were huge. So I sewed a couple of seams further and further in.

This way when the person gets the trousers. If they are too tight, he can unpick the tightest seam and use the next, and when he is happy he can just cut away the seam allowance, since the wool doesn't unravel and doesn't need to be finished.

To keep the trousers up I made a lining and two handmade eyelets that he can tread a ribbon through. If the lining is too big he can also pull a ribbon through it like a drawstring.

What the item is: A pair of peasant's trousers
How it fits the challenge: Medieval reenactors think that all peasants were tight hose, but in the end of the Middle Ages there were baggy trousers as well
Material: 3 m wool
Pattern: Made by Marlein made it
Year: Early 16th century
Notions: sewing thread and linen thread for the eyelets
How historically accurate is it? 60%, correct fabric and pattern but I sewed the seams with a sewing machine
Hours to complete: 4
First worn: not yet
Total cost: $80 (good wool is expensive)


Friday, 10 February 2023

Sewing the joined 16th century hose

So I had a pattern, and now it was time to cut into the main fabric. It's a olive wool twill and I cut them out on the bias. When cutting the pattern I realised that it must be way larger than I though. My husband is generally medium sized, and I still couldn't get the pattern to totally fit on the 3 m of fabric that I had.

I didn't document this process a lot, but I pinned the hose together, and then I repinned them until they were tight. In total I could cut away around 10 cm of fabric before they were snug. I don't really have an ambition to make totally historically accurate hose, so I then used the machine to tack them together. And that was good, because when we fitted the tacked together hose they were actually too tight. So I made a new seam and unripped the old one.

Before making the final seam I had the husband squat down and do a lot of movements to make sure that they were snug, but not too snug. I did make the final seam by hand. A handsewn seam made with linen is weaker than a machine sewn seam with modern sewing thread, and I wanted the seam and not the fabric to rip if it turned out that they were too tight.

For the waistband I sewed a folded piece of the wool to the top of the hose, but I also strengthened the waistband with a piece of heavy cotton. The hose were held together with a piece of tape that is threaded through the waistband.


By now I was a bit stressed to finish the hose, but I made a codpiece according to this tutorial


The tutorial said that it should be stuffed really well, but lets just say that my husband laughed a lot when I pinned it on. I didn't have time to attach it permanently, so I sewed it on at the bottom and used safety pins for the top. I will definitely remake this, because the flaps that attach to the hose are too small, and yes it might be a bit too large in other dimensions as well.

In hindsight it was a good thing that it wasn't permanently attached when we went to the feast. Because when my husband sat down, the hose ripped. At first I thought it was only the seams around the codpiece and crotch area, and I was glad that I had chosen to handsew them, but it also turned out that the fabric had ripped as well. Apparently they must have been too tight, even if we had tried them on so many times.