Tuesday, 19 December 2023

HSM challenge 1 - back to the beginnings

 January: Back to the Beginning: Re-make one of your very first projects. Or make something that is the beginning of an entirely new outfit.

Back when I started my 16th century costuming I of course started with a shift. It was challenge 2 in the HSM 2016 challenge. It's been my favorite shift, because it's so comfy, but this summer I couldn't bring it to Visby because the facings of the neckline and cuffs had totally disintegrated.


This cuff was held on with a few stitches. So I decided to do what I should have done ages ago and repair it. I've reattched all the facings and I also replaced the safety pins that cloaed the cuffs with new cloth buttons. 


Now I am ready to use this shift again.

How it fits the challenge: I went bak to the very first 16th century shift I made and repaired it by replacing all the facings around the neckline and cuffs that had come loose. I also added cloth buttons to cloae thw cuffs instead of the safety pins I've used the last years.
Material: scraps of linen and cotton
Pattern: none
Year: ca 1520
Notions: sewing thread,ä
How historically accurate is it? Patching and repairing is correct so 90%
Hours to complete: 1 hour
First worn: Not yet 
Total cost: A stash project, but bought new around $1


Monday, 11 December 2023

HSM Challenge 8: All tied up - a wool partlet

 When it's cold it's nice to have something extra on your upper body. Over the years I have mainly used my red gollar, and for really cold times my pink cape. Now it's hard to wear both the collar and the cape at the same time, so for this years Christmas market I wanted to make a partlet instead.

Partlets are visible in the art at the time period I'm mostly interested in, so 1520-1540. It seems to have been mostly popular in southern Germany and the Low Countries, which is a bit outside of my interested of Northern Germany/Scandinavia. Still there exist some examples of partlets from further north as well, not the least the famous wall painting from Åbo/Turku castle where the woman is wearing a vestlike garment. I was a bit stressed when making the partlet, so I don't have any progress photos, but I will try to describe it.

The partlet consists of three pieces, one back piece and two front pieces. I kept the armhole and front edges raw, but folded the bottom hem to create a drawstring channel.
Backside, wrong side out

Side, wrong side out
The partlet goes out over my shoulderds for width, and the fabric under the armhole is just a few cm wide.

The fur was first added to a piece of thin wool fabric and then that fabric was sewn to the partlet. I also add ribbons to close the parlet.

Front, wrong side out


I didn't have enough fur to line the whole piece, so it's just around the opening and the neck in the front. I used the strings so that I can chose to wear the partlet with the fur on the outside or the inside.


Jere I am wearing the partlet, and it was really nice and it worked fine under the pink cape as well.

How it fits the challenge: A parlet closed with ribbons
Material: wool fabric, fur
Pattern: Draped by me
Year: ca 1530
Notions: sewing thread, ribbons
How historically accurate is it? The ribbons are synthethic, but the rest is proper materials, around 80%
Hours to complete: 1 week
First worn: At a Christmas market December 10th 2023
Total cost: A stash project, but bought new around $30

Sunday, 10 December 2023

HSM23 Challenge 12 - paired to perfection - a pair of medieval mittens

 With some time at home and some scrap wool I decided that I would do a pair of medieval mittens, since that would also help me complete one of the HSM challenges.

A lot of image sources for medieval mittens can be found here and Margaret Roe Designs also has a write-up and pattern for medieval mittens. Me being me I also decided that just a simple  mitten would be too boring and easy, so I decided to make a three-fingered set of mittens. Also since I know from my modern winterwear that I really like the three-fingered design a lot, more nimble than a simple mitten but still warmer than gloves with individual fingers.

I started out with simply drawing an outline of my hand on white scrap fabric. (it's the table cloths from my wedding that I've kept as scrap fabric for making patterns and muslins.)

I have extremely short fingers, after all I forced my violin teacher to teach me differently since my reach was so much smaller than most people. At this time I also thought that I was going to make the mittens for my husband so I added quite a lot of extra length.

I made a thumb piece and a slit in the palm to add it. As you can see this first version of the thumb didn't work. It was so narrow that I could hardly get my thumb into it, and you have the big wrinkle going from the split of the two fingers and towards the thumb, there was obviously a lot strain there.

The new version of the thumb was a lot wider, and I moved the slit in towards more of the palm of the hand. With this version  I was ready to cut out the proper fabric. The fabric that I used is a very green wool, I think the colour is too bright to really feel historical and it is kind of a stiff fabric, so I treat it as my "worst" wool fabric, but good for this kind of small experimental projects.


Each mitten consists of four pieces, a front and back main piece and two thumbpieces. The thumb was made more narrow from the pattern. All pieces were joined together with whip stitches, and I started with the thumb before sewing the main pieces together.


Along the way I kept adjusting the size, so I kept taking the fingers in and make them shorter.


Here are the scrap that I cut off from the mittens while working on them.


I added two fabric loops on each mitten so that I could pull a string through to tighten the gloves. I had made them fairly wide so that I could pull them outside of my cuffs on my clothes, but I wanted them to be tight around the wrist so that they fall off too easily. 


And this is me wearing the mittens, while holding a cup of hot, spiced beer

What the item is: A pair of medieval mittens
How it fits the challenge: it is a pair of mittens
Material: Wool fabric
Pattern: My own
Year: Late Middle Ages
Notions: thread, cotton string
How historically accurate is it? Accurate pattern, but the material is decent but not totally accurate so somewhere around 50%
Hours to complete: 4 hours ( I am a slow handsewer)
First worn: At a Christmas market on December 10th
Total cost: All made from stash, but bought new around $10.


Sunday, 26 November 2023

HSM Challenge 5: Hair apparel - the finished renaissance flat cap

So in order to finish the flat cap that I started here I wanted to line it to make it warmer. I have a stash of fur pieces left, from when I made my pink furlined cape. It's old fur from a vintage furcoat that I bought several years ago on an auction. 

Just when I had finished that cape, or schaube, I learnt that the fur was usually attached to a separate layer, and I wanted to do this. This will also allow me to remove the fur if it is too warm, say in the summer. For the layer that I attached the fur to I used the pair of hose that I had made for David, but that had really split and are not repairable anymore. The fabric is really thin, but still wool so it doesn't unravel.


The fur was sewn with fairly large stitches to the interlayer and then the lining was whipstitched to the seam allowance on the inside of the cap, and sewn to the edge of the cap with prickstitches. 

We took the cap out to try it in the winter weather.


According to the wearer it's really nice and comfy, and he has enough space to put a modern thin cap under it as well if it gets really cold. 

Challenge 5, May 2023: Hair Apparel Make something worn in the hair or on the head.

Be sure to tell us the following:

What the item is: a renaissance winter flat cap
How it fits the challenge: it is worn on the head
Material: 1 m of wool, scraps but something like 0,3 m of fur
Pattern: inspired by internet tutorials for Tudor flat caps
Year: 1520s
Notions: sewing thread
How historically accurate is it? 60% - it seems as if the caps were mainly black, but I didn't have any black fabric, the main cap is also sewn on the machine while the lining is made by hand
Hours to complete: 3
First worn: not yet
Total cost: a stash project, but probably $30 if I had bought the material new

Wednesday, 22 November 2023

renaissance flat cap

 So it's now been 1,5 weeks since my gastric bypass. Everything went fine. I could go home the day after and I could stop with painkillers after just a few days. I am very tired though, and I do fall asleep after every meal. I can definitely feel that my body is changing, and that together with the fact that being on sick leave means that I am on just 80% of my wages until I am back means that I have put a halt on new costume projects for myself, and from buying new supplies. I do have a costume project that I have started on and as soon as I feel that I can go back to the cosplay meetings, then I will continue with that, since it's size doesn't matter for it.

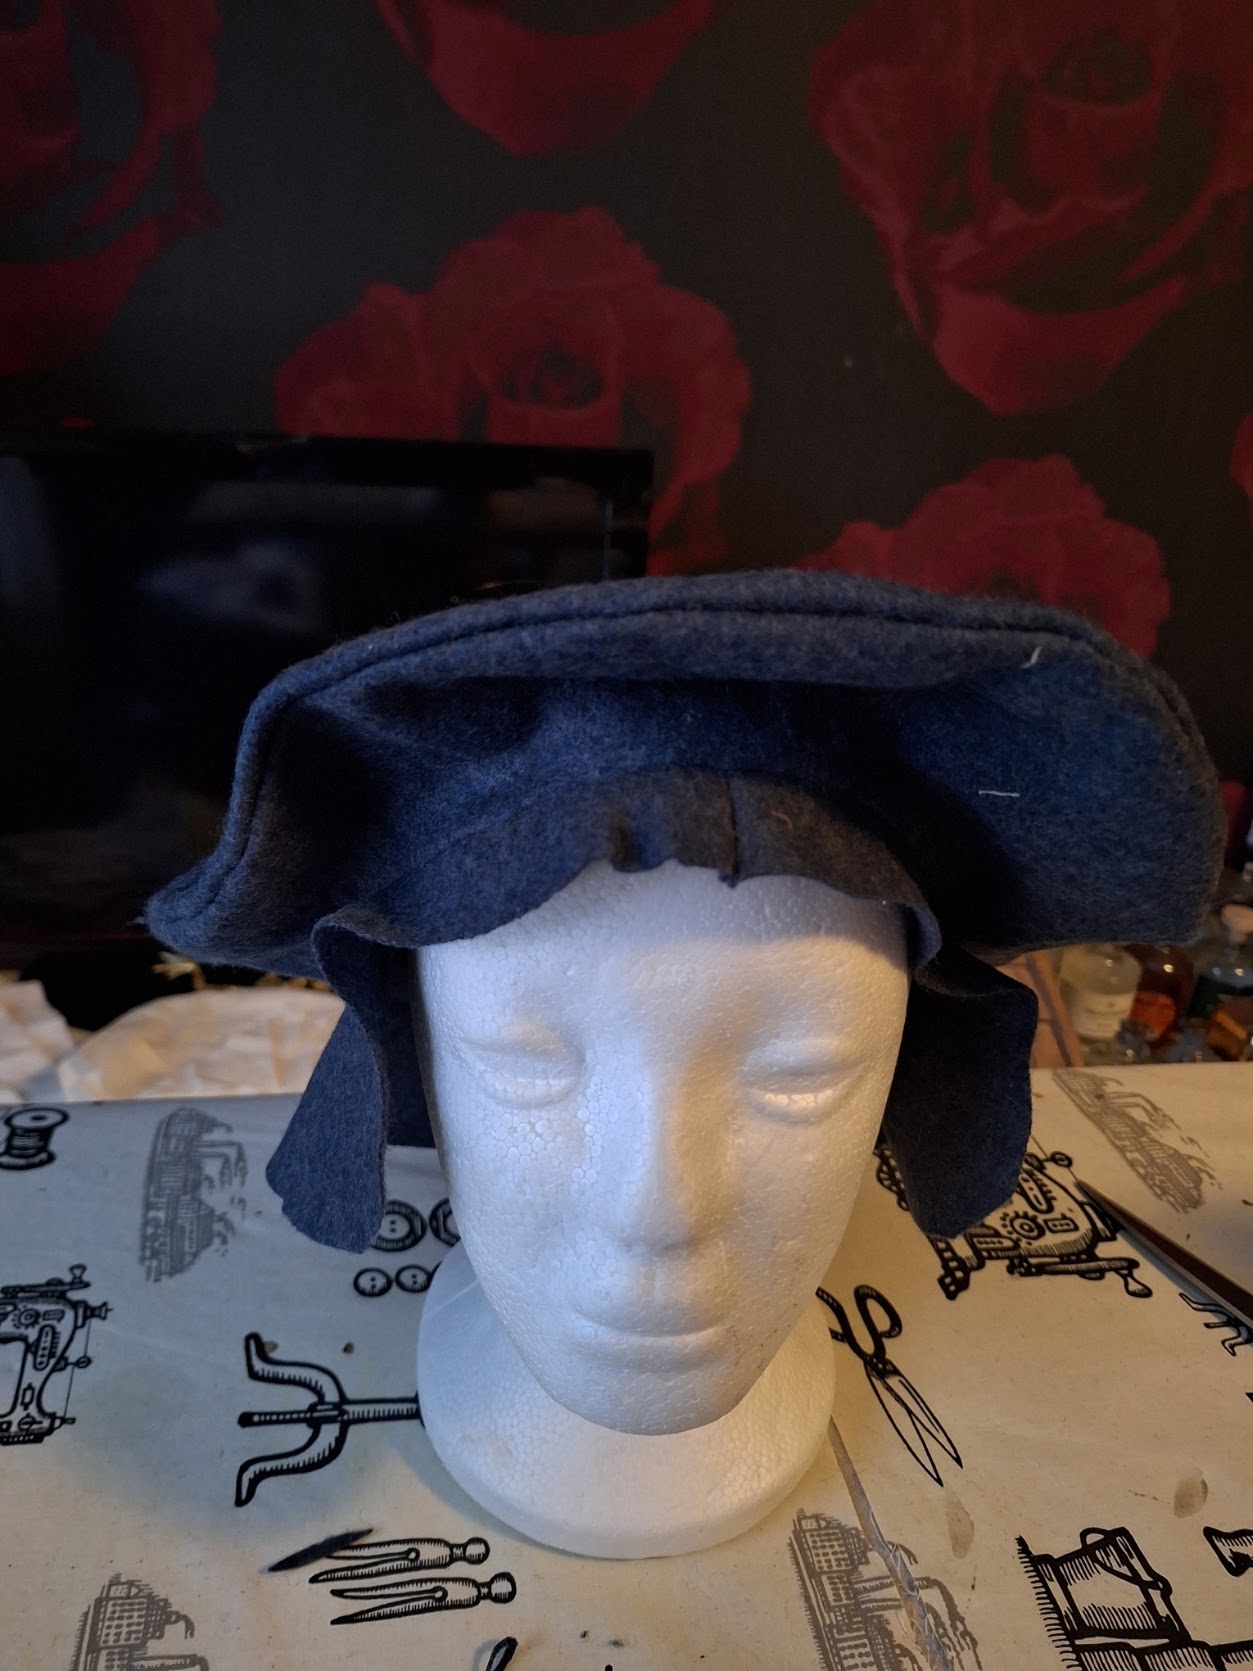
Anyway in the meantime my husband needs some early 16th century winter clothes and I started with making him a cap, out of fabric that  I had at home.

When you search for men's hats for the period the most common tutorial or pattern you come across is for what is called the Tudor flat cap.

This is an early form of the cap, in a Holbein portrait from 1541. Later on the brim of the cap would become stiffer and a bit smaller. Still I want my husband and I to go for a 1520's look, when the caps were floppier.

This is a portrait dated to around 1520, and here you can see a wider and softer hat, and there is no brim rather a piece of fabric that goes down a bit on the head. Since I am making a winter cap I wanted the fabric to go down over the ears for warmth.


the colour of the caps seems to 90% blac, but I only had this grey wool, or a very bright green to choose from. I used one of the tutorials for a Tudor flat cap that you can google, but I made it bigger. In the end the diameter is 38 cm and the inner diameter, that fits my husband's large head, is 20 cm. The brim was the same size as the crown of the hat, but that was too floppy and too long. I reduced the floppyness by adding two darts, just by the ear, and I cut down the length of it freehanded, until it fit my husband.


Like most of my husband's costumes this one is sewn on the machine, in total it took me less than 1 hour to get the cap together. 

I didn't have enough fabric to double the brim and it's unlined so it feels a bit naked as it is. Since this is going to be a winter cap I will go and see if I have some scraps of fur so that I can make a fur lining for the brim and add a lining to the crown as well.


Monday, 16 October 2023

Things are about to change

 So there isn't a lot of activity here anymore, and one big reason is that I haven't had a lot of passion for making new costumes. A big reason has been that I have not been happy with what has been going on with my body. I have always been a big and curvy girl, but over the last years I have noticed that my weight is just creeping upwards and I can't get it to stop. There seems to be correlation in that I can either control my weight, or have good control over my autoimmune disease (type 1 diabetes). I am now weighing more than I have ever done before, and no matter if there are medical reasons I don't feel that I fit into any costumes anymore.

After some time of investigating my weight issues, and it was so nice to hear that I do keep a healthy enough lifestyle and that it's not a simple issue of "eat less, excercise more" I have decided to do a gastric by-pass operation. I want to do it now before I gain even more weight. A gastric by-pass isn't just about not being able to eat, a lot of the effects come from the reprogramming of that metabolic systems that occurs with the operation. I also have no idea what will happen with my body, the great majority of course looses weight but it's very individual on how much you loose. For me the important thing is also to stop gaining weight, even if I of course hope that I will get back to a size I had a couple of years ago. It will also take quite some time before the weight stabilizes after the operation (first you usually drop weight, then you gain some again, and then it stabilizes).

That being said this weekend was the last chance for me to be out wearing costumes and nice clothes before the operation, that will take place on November 10th.

First my mother was invited to a ceremonial dinner at her old student nation, so it was time to bring out a ballgown when I came with her. This is actually a gown that I have bought, not made, since I have outgrown all my old gowns and I bought it last year when me and my husband went to a ball the weekend after our wedding. I was busy enough making my wedding gown, so it was out of the question to make a ballgown as well.


Then I missed the first day of the local convention AvestaCon, since I was driving me and my mother home from the dinner that day. But on Sunday I was trooping with Swedish Garrison and Nordic Base there, and since one of the great things with AvestaCon is that they have professional photographer Johan Falkenström there, and you get one free photo for every costume, I got some nice photos of first my jedi.

He doesn't take photos with the light on for the lightsabre, and I haven't had time to ask someone to fix it for me. 

My favorite photo was with my jawa, and a borrowed tusken rifle


AvestaCon is held in a wonderful old iron foundry that has been turned into an art museum, and I found a table with a lot of old rusty machinery and stuff, so more photos were taken with the jawa in its true element, and I hope I can share them soon.


Sunday, 30 July 2023

Beach 2023 (or 1523)

 As I am heading off for Medieval Week in Visby again I realized that I needed something for bathing. The beach in Visby is honestly not a bathing beach, but it's the water and it's nice to go down and wash off. It's very public, so something to wear is essential. Last year I simply had a bikini, and when going down and up I pulled one of my regular shift over it to cover up, and look a bit more historical. 

Bathing shift were a thing in the Middle Ages, it's easy to google and find a lot of examples of them. Now most of them looks to be fairly tight around the bust, and from quite a sheer fabric. I decided to draw inspiration from them, but make a modern version.

I wanted to be able to pull the shift both down and up, so for that reason the shift is quite loose around the top, so I can pull it down over my bottom and hips. The straps have snaps, so when I want to get changed to what I'm going to wear I can undo the straps, pull the regular shift over me, and then remove the bathing shift by pulling it down. 

It's also quite a bit shorter than the images of the medieval bathing shifts, they were shorter, but not that short. I would say this is not historically accurate, but I can move around in the camp in it, and I can leave it to dry when we have the camp open for visitors. It is also totally machine sewn, since it wasn't a plan to make it historically accurate.

The top has a draw string as well as straps.


The straps are fastened with very modern snaps.


The pattern is really just a tube of fabric, and I have added a front and back gore to make it wider over the hips.