Saturday, 23 February 2019

Unboxing my Husqvarna 145c

Ooops, I bought a new sewing machine this week. I blame my sister who took me to the Husqvarna store and pointed out that my old sewing machine was 19 years old, and maybe it was time to think about a new one. Of course once I had tried a new machine I couldn't resist buying it.

My choice of machine is the Husqvarna Viking 145c.

I chose Husqvarna because we have a proper store in town, and the owner is great with repairing, maintaining and generally helping out with machines. For an investment like this it feels a lot better to buy it, and support, a physical specialist store compared to a webshop. I've had my old Husqvarna for 14 years so I feel comfortable with them, and I know that Husqvarna is a high quality brand.  I also like that I my old special presserfeet are compatible, even if they are not ideal, with the new machine.

Now the Tribute itself is a limited edition. It was made for Husqvarna's 145th anniversary, hence the name. It is basically a Husqvarna Opal 670, with a different design on the outside. Great for me since the colour scheme for the Tribute goes really well with my sewing area, while the Opal would have clashed.

The opening of the box


The machine is packed with both plastic and styrofam, and there's a cardbox package with some of the smaller things.


The cardboard box contained the cords, the button hole maker, tools like a seamripper, screwdriver, brush and so on, underthread spools and an extra package of presser feet (I will come to them)

The sewing machine comes with a hard protective case. It definitely felt heavier than my old machine when I lifted it up to from the box.


There was more styrofoam and the foot pedal inside the hard case.


Here is the machine with everything unpacked. 


It has the full instruction booklet, but also a small quick guide to threading the maching. The presser fee included are A,B,C,D,E,J and a mini heirloom kit with a gathering foot, a clear piping foot and a braiding foot. I am really excited about these three presser feet, the gathering and piping feet has been on my wish list for a long time. I think they will be really fun to work with when I make 19th and early 20th century clothes.

The box for the accessories is big and roomy, but it is only one compartment. My old machine had two, a top one for the presser feet and everything else was in the bottom. Now it feels like everything gets thrown and it will be harder to find the presser feet when you need to change.

This is a digital machine with a big display. The display feels quite intuitive to find your way around. All the symbols above tells you what you need to do when sewing. You have to choose your material and technique, and then it recommends needles, presserfeet preassure, choice of presserfoot and the square about the HA means that I should use some kind of interfacing.

I had to try one of the many decorative stitches, and tried to program it to write my name.

Except for me not using an interfacing and managing to write the name backwards it was heasy an the seam looked nice. I definitely have to work more with this to finetune it.

Overall I am excited about this machine even if I expect there to be a learning curve to really finetune it.

Thursday, 14 February 2019

Enfys Nest cape

I have finished another piece for Enfys Nest. In my last post about the cape I had made a pattern and cut out the lining. Click here for that part.

After the lining I ordered the outer fabric. I picked a black wool broadcloth. It's one of the cheapest on the Swedish market, and I would definitely not use it for historical costumes. It shed quite a lot of colour, it's piling and I have black fluff from it everywhere. It's perfect for the worn look of a space pirate though. The problem with the pattern though was that it was made for a fabric that was 150 cm wide, and the wool was 135. I solved it by turning the fabric, but it definitely led to some fabric waste.

Below are my main references for the cape.


Once I had cut out the pieces I sewed the outer fabric together and I attached the lining and the outer fabric by sewing them together at the neck. I then pinned the seams together so that the fabric wouldn't shift and I added a facing of the outer fabric to the edges and to the neck.


The facing at the edges is slipstitched to the lining. For the neck I sewed it by machine, it's not going to be visible anyway. After that I hemmed the whole cape. The original cape doesn't have a deep hem or hem facing, so I simply folded the lining and outer fabric towards each other and then slipstitched them in place.


Along the edges there is also a strip of fabric. I think it's suede so I used the same faux suede that I will use for her long tabards.

It's sewn on by machine at the front, since the reference photo has a clear seam line in the middle of the facing. I used light coloured thread for the upper thread and black thread for the underspool.

The other side of the suede strip was folded down and slipstitched in place.

This is the inside of the finished cape.


This is the outside of the finished cape. The suede is a lot darker in real life, it really picks upp the light when I try to photograph it.


This is the cape hanging on my mannequin. A very big advantage with this style of cape, rather than a cape that is just gathered at the neck, is that it hangs naturally from the shoulders. Of course it will be different when I move, but it will make it a lot easier to attach it to the rest of the costume, when the attachment won't have to carry the full weight.


I also just tested to throw my fur on over the cape. The original costume used buffalo hide, from the front of the buffalo. I don't have access to any buffalos so I have bought an icelandic sheepskin with long hair.


Saturday, 9 February 2019

Enfys Nest gloves

I finally have a finished piece for the costume and it's the gloves.

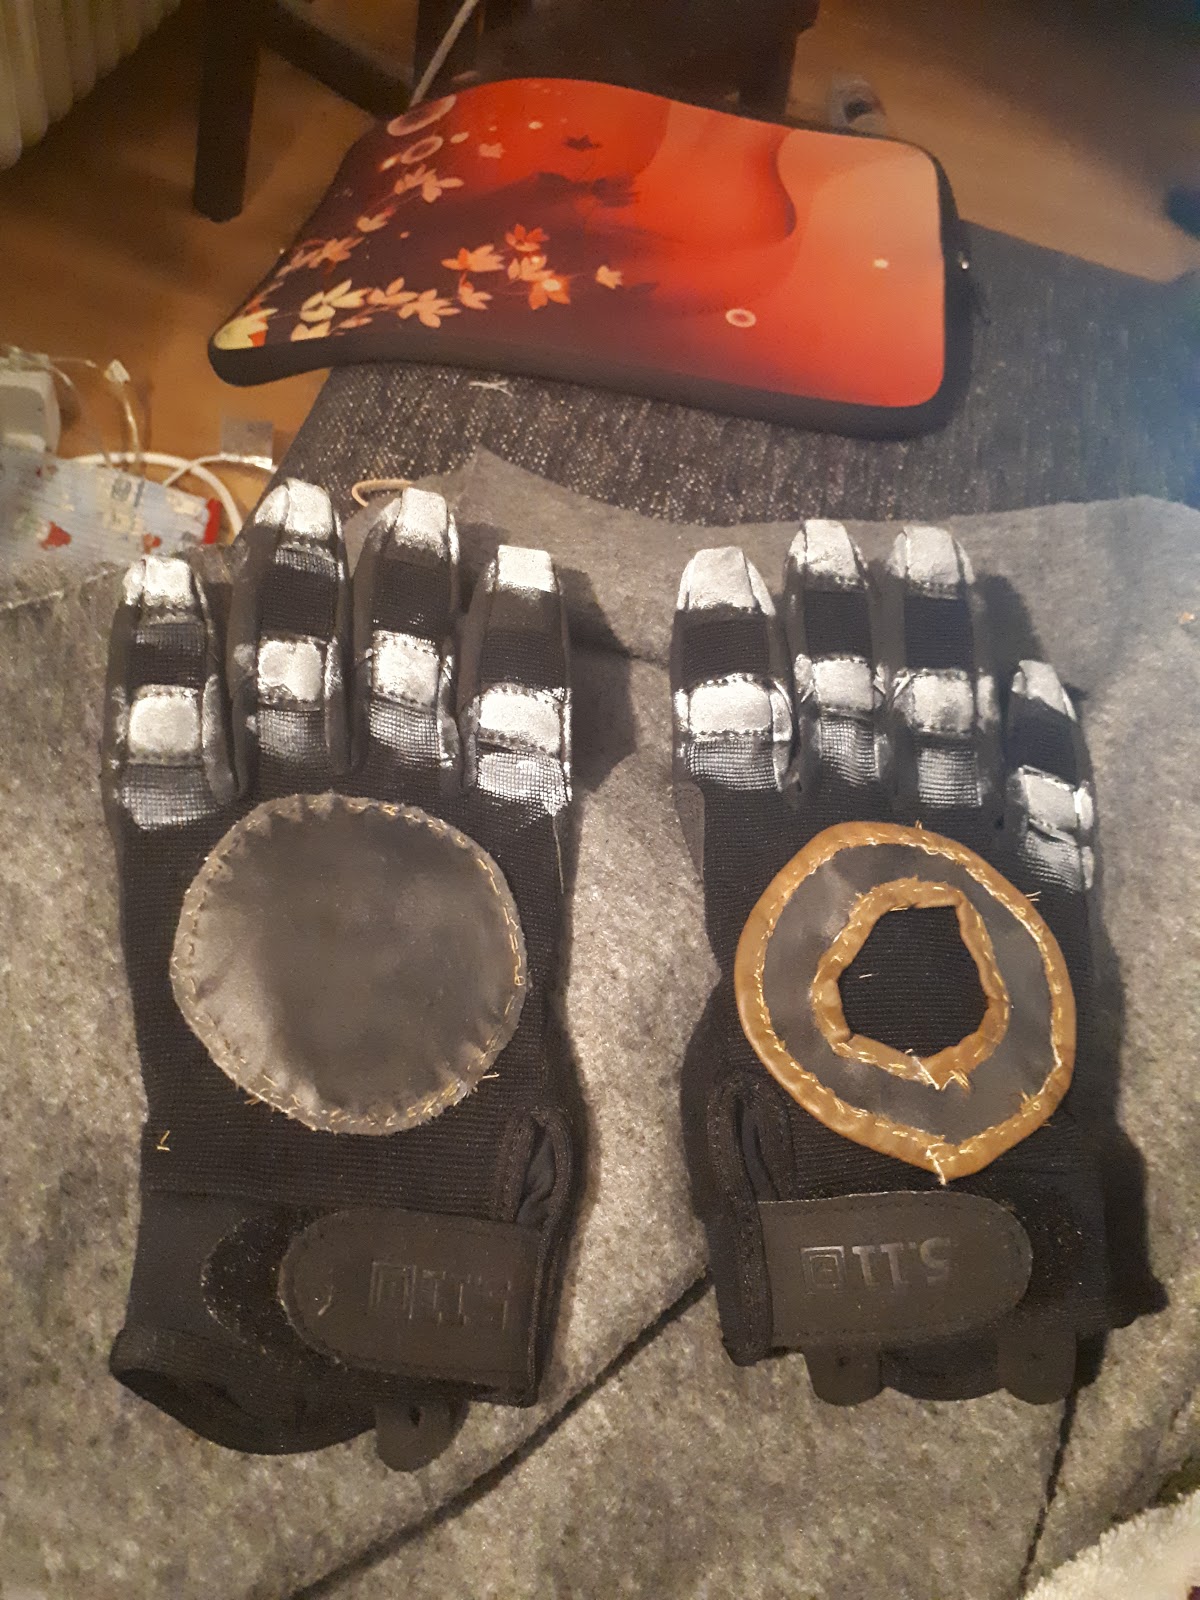
The base for the gloves is a pair of 5:11 TAC A2 gloves, as used for the film costume.

For the modifications I used this as a reference.

It shows a round black solid circle on the left hand and a black circle, with a cut-out middle, edged in brown. Some people in the Enfy Nest group claim that strap with the 5.11 text is covered in leather and that the grips on the inside are ripped off, but I've kept them. I haven't seen evidence of that myself yet.

This close up from the Enfys Nest standee clearly shows the circle edged in brown.
My circles are made with faux suede that I've painted with acrylic paint, black for the main parts and brown for the edging. It's still soft and it really gives it a leatherlike apperance. I'm really happy with that. The white paint on the fingers is also acrylic paint.

I've handsewn the patches onto the gloves, so I wouldn't have to rip them up.

I will probably try and weather the patches a bit, they look a bit too fresh at the moment, but that will have to wait until I weather the whole costume.


Wednesday, 23 January 2019

Starting Enfys' cape

I'm waiting for my next paycheck to be able to order a lot of the material and pieces that I need for Enfys, still I wanted to get something done. I decided to cut out the lining of the cape, that way I could see that I had a pattern that would work, and how much fabric I will need to order.

On the original costume it's possible to see two seams, so I'm making a cape in three pieces.


I'm planning on using a wool broadcloth, so I don't want too much fabric at the neck, since it's going to be very bulky. I decided to use some kind of version of a circle cut cape, which gives you a lot of width at the hem, some really nice folds, but no gathering at the neck.

This is a great diagram of how to make a cape or cloak in different variaties of a circle. The site where I've found it even calls it the Circle game.


I didn't go for a full or semi-circle cape, I kept the outer sides of piece 1 and 3 on the selvage, so they are straight, just like the fold of piece two. I also cut all the angles at 45 degrees, since it's simple to measure even without tools.

The result is not quite a semi-circle, but it still hangs really nice and has a 3 m hem at the bottom, so it's really swirly.  In totaly I used 2,5 m of 150 cm wide fabric for this pattern.


Saturday, 19 January 2019

#10-year challenge costume edition

The 10-year challenge is going around on Facebook, where you post either your first profile pic or a profile pic from 10 years ago side by side with your current one. I figured I could do one for my costumes and see what I came up with.

In 2008 I made the first version of my A-wing pilot.

2008
Compare that to my current pilot costume, which is the X-wing pilot.

2018

I hadn't really started with serious historical costuming in 2008, I have some costumes from 2009 though.

From the16th century there was this ballgown inspired by Maria von Habsburgs wedding gown. It's all machine sewn and made in a poly brocade from a modern princess-seamed dress. Still the quality of the sewing isn't too bad and I actually have this gown around when I need something shiny and more fairytale-like than historical.

2009
It's quite far off from my handmade wool outfit that I finished last year though.

2018

In 2009 I made one of the worst costumes I've ever made, my 1860s ballgown. It shows that I could follow pattern directions, but I couldn't adjust a pattern to actually make it look good on me.

2009
Compare that to my pet en l'air that I draped and combined different patterns with to get a good fit. I'm also a lot more careful with hair, makeup and accessories compared to 2009.

2018
Fun fact though. The grey skirt that I'm wearing was my first 18th century skirt, and it was made to be worn with a jacket that was made from the skirt fabric of the 1860's ballgown.

Looking back I definitely see how my skills have improved. It's not so much the skills themselves though, but the fact that I try to take time and be more careful, and not just throw fabric together and hoping that it should end up as something wearable. It's my eye and inner quality consultant that have developed in these 10 years more than anything else. I would also say that I look more comfortable wearing my costumes than I did 10 years ago. It shows that body language is something that can really transform a costume, and body language is something to learn. It didn't come natural for me when I started, but now I feel much more relaxed in costume and it shows.


Wednesday, 16 January 2019

Some research for 16th century Sweden

I'm currently more involved in a non-costuming project than I am in my costuming, so there isn't much crafting going on. I'm slowly working away on the Enfys Nest jumpsuit and waiting for my hard parts to arrive for her.

Research is something I can do in the breaks for the other project though, and I have continued my quest to recreate early Swedish 16th century, or to be even more precise the dress in the Bergslagen region.

The problem is that there are few images and sources, the earliest portraits and paintings are from the 1530s and show the royal family and high nobility. And even if it's clear that a lot of the fashion was imported from Germany I don't want to just imitate Germany fashion and hope that it will be correct.

Over the weekend I decided to once again go through images of church art. For that I used "Medeltidens bildvärld" - which is a site from the Swedish History Museum with collections of church art. The great thing is that it's divided up by county and parish, so you can go through quite exact geographical areas. For this I chose to go through the counties of Dalarna, Västmanland, Uppland, Södermandland and Närke, or basically the wider geographical area of Svealand. I also limited my search to pieces that were dated to the first quarter of the 16th century.

When it comes to church art there are two main kinds of arts; paintings and sculptures, usually large altar pieces. The altar pieces contains a lot of figures, but they are usually imported. In the early 16th century most of the altar pieces came from the Low Countries, meaning that they do not necessarily reflect the local fashion.

Altarpiece in Västerås cathedral, made in Antwerp

You do get some lovely costumes on the altar pieces though. I absolutely love the quilted baseball cap on the woman to the right, or the woman to the left that is wearing what to me mostly looks like Padmé's pilot helmet from Attack of the Clones. I have a pinterest board with some of my favorite fashion from altarpieces made in he Low Countries here.

The church paintings are different though. They had to be painted on site, and even if the artist might have been an expert craftmen from somewhere else he is more likely to paint what the people around him was wearing. Looking at church art in general it's also important to look at what they are portraying. Some saints and other holy figures have almost like a uniform that is differerent from the current fashion. You are more likely to find representations of local fashion in scenes depicting groups of people.

A popular scene to illustrate is the parable of the ten virgins, showing the bridesmaids in all their finery.

Söderby-Karl, Uppland

There are also paintings showing biblical feasts.

Dannemora, Uppland

Here is the whole family with Herod, his wife and Salome with the head of John the Baptist.

From time to time images of more ordinary women crop up as well, like these two fighting.

Dannemora, Uppland


or this woman churning butter with the devil

Dannemora, Uppland

I have a pinterest board with church paintings from Svealand here. I will definitely use it as inspiration for my 16th century projects.

Monday, 7 January 2019

Enfys Nest jumpsuit part 1

This weekend the Cosplay Dalarna network had a whole day of crafting, and I could start on Enfys Nest for real. The goal for me was to get most of the jumpsuit done, and I did get all the parts that need a lot of floor space cut out.

I started with my standard vintage overall pattern. I knew it was going to be too small, and since I didn't have a lot of muslin fabric to work with I decided to expand it a lot, since it's easier to take it in than the other way around.


Ok, I maybe overdid it and had to take it in a lot. In the end though I had a fairly loose fitting overall, with some shaping at the waist.

The shaping at the waist
I then drew all the seam lines I wanted directly on to the fabric and cut it apart.


I'm using dark brown waxed cotton for the jumpsuit, with black twill for the details. I added the twill tape to the front by hand, since there are no visible seams on the reference photos. I wouldn't be surprised if the original piece has proper seams for the shaping, but I'm cheating and adding the twill tape on the top, there will also be decorative top stitching added later.

Front

Back pieces
The jumpsuit is still big, but the final fitting will be done when I sew it all together.