Saturday, 4 July 2020

HSM Challenge June: It's only natural

As I mentioned in my previous post I had decided to make my new wulsthaube from only natural materials. Today me, Annzoo, Monica and Ingeli met up to try and make wulsthauben for all of us. Me and Ingeli had made ones before, but Annzoo and Monica were new to them.

For my wulsthaube I  mostly followed the instruction from Marion McNealy, that you wan watch here.


To make a structure for the wulst I used cane, if it hadn't been for this challenge I would probably have used wire, but the cane and wool padding is what made this fit into the challenge, and it stretched me outside of my comfort zone when it comes materials.


Just by holding that first ring up towards my head it was obvious it was too big, so I made it smaller. The ring is held together with small scraps linen fabric that I have just tied into knots.


The wool felt was cut into strips that I wrapped around the cane frame and held into place with wool thread.


I then wrapped the whole ring in strips of linen.


I then sewed a second strip of linin around the whole ring. I wanted to have two layers of fabric between the wool and the hood itself, since the wool still contains quite wool fat and I don't want it to seep into the hood. This also helped to cover all the raw edges of the first linen wrap. 


I then hemmed a piece of linen, that was wide enough that it would cover the padded ring. To make it fit around my head I had to make it smaller on one side, so adjusted the length with some knife pleats.


Here is Ingeli helping Annzoo with her wulsthaube. We had met up so that we could take turns and fit our wulsts on each other.


For me it was a matter of taking excess fabric and serucing it to the wulst. This is the inside


And this is the back.


I really like the look of my new wulsthaube. It really reminds me of the headdress that can be seen in this painting of emperor Maximilian and his family.

Painting by Bernhard Striegel, Kunsthistorishes Museum, Wien.
That being said though, the wool has made this wulst a lot heavier compared to my older wulsthaube, I'm doubting that it would be comfortable t wear it for a whole day. The size and shape is also a bit wrong, and earlier, than what I'm aiming for my 1520s court gown. I think I need to make another wulsthaube for that project.

This was a project that I really did out of curiosity, what would it be like to work with wool and cane instead of cotton or poly batting. The cane structure was also different, since my old wulsthaube was basically just a soft cushion. I think that for 1520s wulsthaube I would like to combine the two and use the cane structure, but don't make it into a full circle, I also want to use lighter padding.


The Challenge: June - It's only natural

Material: 1 kg raw wool, 40 cm cane, 70 cm white linen fabric

Pattern: I mostly followed the instrucions of Marion McNealy.

Year:  1500-1515

Notions: white linen thread, wool thread, was

How historically accurate is it? This is on top of my ability to make something accurate, and with all accurate material. There are no preserved wulsthaube that shows exactly how they were done, but I would say around 90%.

Hours to complete: The wool padding took several days to wash and felt, but the wulsthaube itself was made in 6 hours.

First worn: Not yet

Total cost: The raw wool that I used was a gift from a colleague, the rest ends up at around $25.

Friday, 3 July 2020

Wool padding

The theme for one of the HSM challenges is:
"It’s Only Natural: Make something inspired by nature, or use natural fibres and materials in a way that stretches your usual practice (e.g. natural dyeing, using cane instead of plastic whalebone for corsets/stays etc.)"
 At first I had no idea what I was going to do, but since I'm going to make a new wulsthaube for my 1520s gown I decided to go all natural on it, unlike my old one that had synthetic padding. Cotton padding could have been used in the 16th century in Germany, but up here in Sweden any padding would have had to be wool.

Now one of my co-workers have a small flock of sheep, and I asked if she could give me some wool from them.


She came with a bag of raw wool rowings. They only use the wool as cover in the gardens so it was dirty and filled with small sticks and other stuff that had gotten caught in the fleece.


The first step was to simply by hand sorting the rowings and removing the dirt that I could pick by hand. After that I let the wool soak in several baths of cold water. The water in the first bath turned brown, so I changed water more or less directly. For the other baths I let the wool lie there for several hours, the last bath was overnight. By now the water coming off the wool was clear.


The best thing would have been to hang the wool out to dry in the garden, but I had to make do with my bathroom. I placed the mass of wool on a rack, so the air could circulate undet it as well. Then I just let it sit in my bathrrom until it was totally dry, which took a couple of days.

Then it was time for the fun part - felting the wool. I haven't felted wool since I did a thing with a kindergarten group and we made balls. Also I don't own a set to card the wool, but I had read a couple of descriptions where people felted uncarded wool.

Felting wool is wet and sloppy, I did it in my apartment building's communal washing area. Basically I placed the wool rowings on a board, stacked several on top of each other and then I drenched it in water mixed with green soft soap (grönsåpa) and while it was wet I rubbed the fibers against each other. As soone as they started to dry up I added more soap-water. It took me around 30 minutes to get a felted mat. It has holes in it and is uneven, but since I'm just going to use it for padding, that's ok. It would not hold up for any heavy wear.

When I was happy I rinsed the mat thorougly and in the last rinse I added a bit of spirit vinegar (ättika).


I placed the mat on the rack again and let it dry completely, which once again took quite some time. The washing and felting with soap has really turned all the brown-grey rowings into beautiful shades of grey.

Monday, 22 June 2020

Repairing Lady Poe for work

Sometimes I think about how I started as a costumer, and how important it was for me to not start another project before I had finished the one I was working on. That's not exactly the case anymore. I would also say that with more historical wardrobes I have found more opportunities to wear them and that means that I keep doing smaller projects while working on my main one. So I have finished the lacng holes for the sleeves of my court gown, but this weekend instead of finishing the sleeves I brought my Lady Poe down from storage.

You might remember how all the trim frayed liked crazy and I felt it was a bit of a disaster when I wore it for the ball last June.

This was the state of the trim, and I was spreading silk everywhere. Now I went over all the edges with my pinking shears again, but this time I painted all the edges with heavy starch. I made it from 1 tablespoon of potatoe starch and 400 ml of water. It was a gooey mess, but I painted it on with a brush, and the day after I pressed it.

This is the new trim edges. They do still fray a little bit, but it's not a disaster. I probably need to go over all the edges when I'm going to wear it and make sure that there are no loose threads that can start to unravel. The trim feels very papery, but there are no stains from the starch on the silk.

For fun I diluted the heavy start in more water and also starched my smallest cap, a petticoat and linen veil with it, just to see what would happen. I love the feeling of the starched petticoat, so I think I need to go over all my petticoats and starch them from now on

Why did I do all this? Well at work we needed to do a fun thing for social media about the middle of the 18th century, and of course I volunteered to dress up apropriately for the time period. It was also a chance for me to get photos where I'm standing in a place that's normally closed off.


For my hair I took the time to sleep on pin curls for the front of the head, but the back was just allowed to dry naturally. I then used cold cream and hair powder and made a tete de mouton hairstyle. The back hair was just braided in two braids that were looped up, and all the hairpins are hidden under the cap.


The social media thing will go online in the end of June.

Monday, 15 June 2020

Shopping/wish list for the 1520s gown

I'm working really slow right now. I always have trouble really finishing something, because as I near the end I'm worried that I will screw it all up and destroy all the work I've done and end up with something I'm not satisfied with. A thing that gets me motiated to finish though is that I want to go on to the next part of the project.

And the next part of the project is to make a new wulsthaube, so that I can make a new hood that I can embroider. I also want to decorate one of my belts with a lot of mounts, and then comes the cape. I also need a new shift, but I will push that one back to last.

I will need to buy quite a lot of hardware, and even if every individual item isn't too expensive in the end it all ads up, so this is a post where I try to just make a wish list so that I can plan my budget. This is definitely a wishlist, and I will probably have to cut down on it.

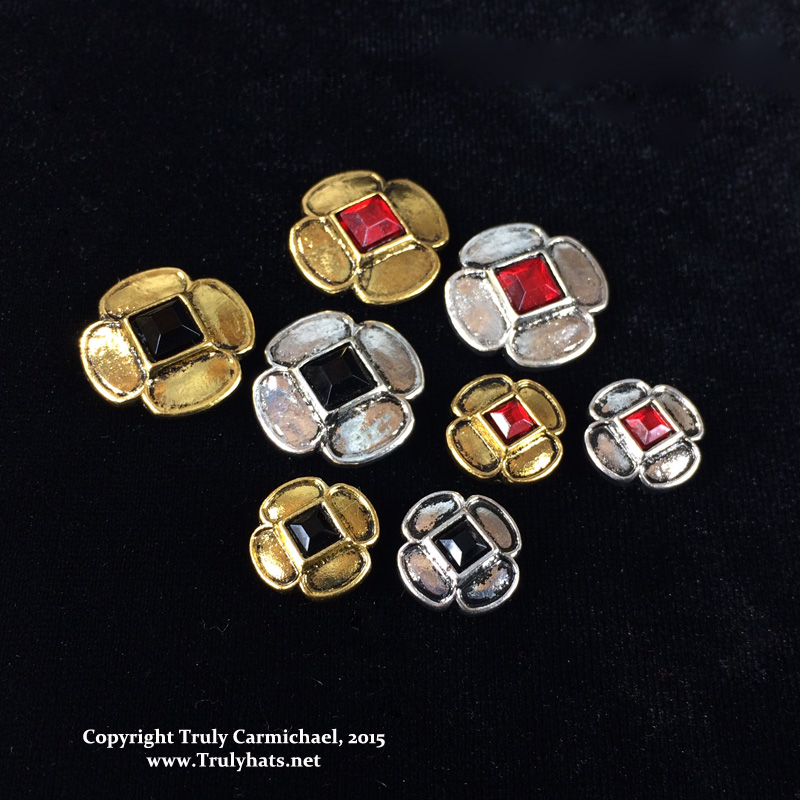
For the goldwork hood I will order my supplies from Golden-Hinde.UK, but there are a few things I need from other places. On the hood that I'm using as inspiration there are a lot of stones in settings. They look very much like these


Trulyhats.Net is an American site though, and with the current state of the world I'm not sure that I can trust that they would come here within a decent time.


Gothic-Cast has these buttons, dated to 1400-1500 in their inventory. They are more rounded that then other option, but on the other hand the stones are made from enamel and are not faceted which is more correct than the first choice. A bonus is also that these buttons are made from a Swedish find, so they would definitely be correct for my Swedish court gown. They are available with red, dark blue and green stones and with a gilded or silver finish. They cost around €4 each with a gilded finish, and I need a bunch of them, so probably around 500 SEK just for the buttons.

Gothic-Cast also has these other things I would like

A pendant for 1470-1520 €45
A molten chain 14th-17th century around €50
A clasp to close the cape 1400-1500, €22.50
Already there I'm into quite a lot of money and that is before I have started to look at mounts to decorate the belt. Still it's fun drooling over all the beautiful jewellery.

Sunday, 7 June 2020

A viking day

With all big events of the summer cancelled, you have to create your own opportunities to wear costumes and have fun. Up in Rättvik two women, who had planned to spend the summer on tour to different viking markets and events to sell their goods, have instead put up a viking camp that you can visit and experience the viking life. This weekend they had a bit of soft opening, meaning that everything is ready but they won't welcome visitors until next weekend. Even if the viking age isn't a focus area for me, I do have my quick viking and of couse I jumped at the chance to cook historical food on open fire again.

The weather on the morning was dreadful, with really heavy rain, but I trusted the weather forecast that said that it would get better, and after lunch it cleared up and I set off to Vikarbyn outside Rättvik. Ok, technically it's Öja, on the outskirts of Vikarbyn, outside Rättvik.

Me in front of their big, main tent that act as a viking hall. 
Together with my viking outfit I'm wearing some accessories that are good examples of why it's good to have a few "time-travelling" garments that you can use for almost anything. I'm using my standard unsmocked, linen apron, last used for an 1897 photo shoot,  for shoes I'm using a very neutral pair of black slip on shoes in fake leather. They are so non-descript that I can use them for all eras where I don't have proper shoes. On my head I'm wearing my 16th century veil that I usually tie around my wulsthaube, but now I just tied in the back of my head. Viking women didn't have to cover their hair out of modesty, but I think it's a nice and practical way to keep the hair out of the way. Im also very happy with my new glasses that I have bought to be less visible when I'm costume. The frames are so thin that they are hardly visible in photos, compared to my standard thick, red frames. Later when it got a bit chilly I also wore my Skjöldehamn hood.


The camp is situated with a lovely view over Lake Siljan The only thing marring the historical feeling is the blue plastic balls for straw that the neighbouring farmer has set up, and they can't be totally covered by the wooden fence. They also have sheep, with very newborn lambs, goats and hens around.

The center of the camp is the open hearth. In the background you can also see several smaller tents.

After having a look around the camp and just sitting and talking around the fire it was time to get cooking, with historical food on open fire there is no such thing as a quick meal.

Basting the steak with the marinade
For the food recipes I haven't used any primary sources, instead relying on the recipes from Ribe Viking Center in Denmark, available in both Danish, English and German, and Fotevikens museum, available in Swedish and English.

The main dish was an alemarinated pork steak. The Ribe recipe called for regular lager, but I switched it for an ale instead. The pork had marinated for 24 hours, and it took almost 3 hours to cook over the fire. When it was ready it was delicious, you could really feel the ale flavour through the meat, and the pork was just done so it was tender but not so much that it fell into pieces. It could probably be on for even longer if you want it more tender.

Some were more eager to eat than others
With the steak we had buttermilk flatbreads. Basically buttermilk, coarse ryeflour and some salt mixed together to form a firm dough. I made the dough in the morning, and then we baked it in the evening. The idea is to let the buttermilk and rye interact and turn sour and create a natural leavening. The effect was small, but it was there. Since you can't buy buttermilk in Sweden I had to make my own butter in order to get buttermilk. For the butter I used 700 ml of cream and whisked it until I got butter, I used my very modern stand mixer for the whisking. The butter was then flavoured with salt and a teaspoon or so with honey, while I used the buttermilk for the bread.

I also had some turnips that we put in the embers. They tasted good, but it was a bit hard to remove the charred outer skins from the turnips. Finally on the way to Rättvik I had passed my mother and picked up a big, bunch of nettles, so we made nettle soup. The nettle soup didn't have any recipe but it was nettles, some small yellow onions and a small parsnip, cooked until tender in stock (we used a modern stock cube).


All in all it was a real viking age feast, and a great escape from 2020. I will probably go up and visit more times in the summer. If you want to visit the camp it is open weekends the whole summer, but you need to prebook your visit, in order to be able to maintain social distancing they can't have too many visitors at once. Learn more at Ingvara.se, the site is in both Swedish and English.

Friday, 29 May 2020

Maids of honour - 16th century inspired tarts

The latest season of The Great British Bake Off had a technical challenge to make "Maids of Honur" which was said to have been a favorite of Henry VIII. Of course I had to try and do this 16th century-inspired recipe.

Since it's not my own recipe I will just provide the link to Prue Leith's Maids of Honour.

So yummy!
The recipe takes some time but was fairly easy. The result is delicious, among the best things I've baked in a long time. For people more into fantasy and cosplay than history this is definitely how I imagine the Lemon cakes that Sansa Stark in Game of Thrones loves so much.

There are some issues with this when it comes to historical accuracy. The major thing is that the recipe uses lemon curd, and from a quick google the earliest reference to lemon curd that I can find is fro 1844. There is an older version called "lemon cheese", and that is when you use lemon juice instead of vinegar (like in Prue's recipe) to curdle the cheese. I couldn't find references to this that were older than the 18th century though, but this was just a  quick check in my regular historical cooking references and google. I'm also hesitant about the use of a rough puff pastry. It's not impossible for the 16th century, the earliest recipes for regular puff pastry dates back to early 17th century and rough puff is just an easier version of it. In my experience it's more common with short crusts or even hot water crusts for tarts in the time period though.

I'm going to make these kind of cakes more, but I'm also curious about experimenting to see if I can find something more close to what they would have been like in the 16th century. First of course I need to check through the historical online recipe books, but I also have some ideas.

I would like to try a version where I use another kind of crust, and instead of lemon curd I could do the cheese curdle mix and add in preserved lemons or bitter oranges (pomerans). After all there are not many lemon trees growing in northern Europe, and we know that preserved citrus fruits were a favorite at the Swedish court in the time period. For spices I would definitely add in saffron and mace to start, but cinnamon, cloves and nutmeg are always good combinations as well. Some of the sugar can be replaced with honey as well, but this cake with its imported fruits and spices would only have been eaten at the court and they would have had access to sugar and not just honey.


Wednesday, 27 May 2020

Queen's Peril excitement

In June Queen's Peril by E.K Johnston will be released it's a Star Wars novel focused on Padmé and her handmaidens. When her book Queen's Shadow was released it was a moment that a lot of fangirls had waited for, finally there was a book with Padmé as the main character, and with her handmaidens as fully fleshed out characters as well, it only took 20 years after The Phantom Menace to make it happen. A couple of weeks I was asked by a friend of mine if I wanted to be part of a video to celebrate the release, and of course I wanted to. As a proud member of the Royal Handmaiden Society I of course chose to take part in my Gold Handmaiden costume.

Today the video was released when E.K Johnston posted it on her social media platforms.

You have to click the link


My segment was filmed in my kitchen, with Tom as my cinematographer. And here are some bonus segments from our filming.