Sunday 29 April 2018

Daala flightsuit details

Yesterday I finished the flighstut, I also started on the belt properly and that's all I have left now. I have even dyed my hair to get rid of my pink streaks and have a more even red colour, even if it's still darker than Daala's.

Here are a runthrough of how I made the details

First off were the patches and decorations on the sleeves. I added all the details on the sleeves before I sewed them together and onto the main flighsuit, so that I could work on a flat surface.

Daala is wearing two patches. For the first larger patch I first printed the look of it and transfered it to a scrap piece of yellow fabric. I had also added fusible interfacing to the back of the fabric to make it more sturdy. I then outlined the shapes in black embroidery thread, and after that I filled the patch with small satin stitches in yellow. I did not make the two black bars of the patch.


I then cut out the patch 

 The patch was sewn on to the sleeve with a button hole stitch, using double strands of black embroidery thread, and after that I added the two black bars by hand.


 The other smaller patch I embroidered free hand direct onto the fabric

The strips of fabric are bias tape in turquoise and black that I sewed on by machine. Since the fabric is really stretchy I used a fairly large stitch to sew the tape on, so that it can more easily follow the stretching of the fabric.


The last thing to add were the pockets on the legs.


Each pocket and flap are just rectangular pieces of fabric. I've sewed them on with double seams to make them a bit more sturdy. I did add a length of cotton tape both at the opening of the pocket and at the hem of the flap to make it sturdier. 


The larger greeblie is attached to the pocket, and I will be able to pull the strap through it to keep the pocket closed. 

In order to get a big enough surface to glue to the fabric I added some smaller lumps of worbla until I got two attachment points on each greeblie.

The greeblie was then glued on to the pocket with E6000 glue.

The top greeblie is glued to the strap. I'm pretty sure that it meant to be a clasp that you can pull the strap through, but it was easier to glue it to the strap itself. At the bottom of the strap I have also glued a piece of worbla to make it stiff and easy to pull through the large greeblie.

The last detail is Daala's admiral rank bar. It was made for me by a friend in the Nordic Garrison.


Now it's only to finish the belt and then I'm ready to send in application photos to the 501st Legion.

Thursday 19 April 2018

Admiral Daala flighsuit

When I had the pattern I cut it out in my fabric. It's an olive green stretch twill. After I had cut it out I started to work on the piping. I had bought an olive green piping, but it was too light, so I put it in a teabath to see if I could darken it. Not much happened, but then on a whim I decided to test a scrap of my flightsuit fabric in the teabath, and it did change colour. Not much but it definitely added a darker tone and took away some of the green sheen of the fabric. Even if it's not good to do something like that after you have cut out the pieces I threw them in a giant teabath anyway. It did fray the edges and probably distort the pieces a bit, but it was worth it for the colour change. 

As for the piping. Well that was a failure. I put the olive green piping in a brown dye bath, and I got a perfect dark olive green, but it totally destroyed the edges of the piping. I've never seen anything fray that bad. I tried to save it by sewing several rows of zigzag- stitches on what was left, but in the end I simply didn't have any edge that I could sew on. Well then I decided to do the same thing, but with an olive green bias tape that I had bought from the same store. Unlike the piping the bias tape must have been polyester though, because it hardly took the dye at all. After that it was just to throw out around 30 m of piping and bias tape and I decided to go for black piping instead.

This was the first time I worked with piping, and except for the lines over the clavicles it was fairly easy to sew it on, by sandwiching it between the piping and then using my zipper foot so that I could get really close to the cord of the piping.

The clavicle pattern was a bit of a night mare though.


I just couldn't get it symmetric. After I had sewn it and ripped up one of the sides three times I decided to sew it on by hand. By doing that I could simply shape the piping where I wanted it to be, and then I sewed the fabric to the shape of the piping, instead of letting the fabric decide where it should go. I couldn't get it totally symmetrical, but at least it was better. This is one point where I think that the pieces had been a bit distorted by the dye bath so that the left and right sides weren't totally alike.


This is the main part of the flightsuit. I now need to add the sleeves, the collar and the pockets. The inseam is pinned together so that I will be able to add the pockets before sewing it all together.

One thing I'm really happy with is my silhouette. I have a stomach sticking out in one direction, and then my butt is a bit lower, this easily makes me look even bigger when wearing tight clothes. For the flightsuit I made sure that tehre was extra fabric uner the biggest part of my stomach, so that the fabric continued straight down instead of following the body. It might seem a bit contradictory, but by making the waist-hip area bigger it actually looks slimmer. 

Monday 9 April 2018

Admiral Daala flightsuit pattern

For the flightsuit I started off with my vintage Butterick 4524 pattern. It is two sizes too small for me so I always need to make a mock-up for it anyway. The main changes this time was that the neck opening was too big, so I added a flap of fabric there, before cutting out the final pattern.

Another tricky part is that the reference images don't show any sideseam, instead the flightsuit has piping going down from under the sleeve to the pocket. When cutting out the pieces I kept the side seam intact, and instead I cut out a separate side peace.

As of now the pattern is a bit on the baggy side, but I rather do it that way and adjust it down when it comes to the actual fabric. It will be a bit trickier of course to do that with the piping but hopefully it will work out fine.

The sleeve pattern I'm using without any modifications.

I have also painted the greeblies with a acrylic brass paint.


While doing the greeblies I also made a pair of earrings for TLJ Leia, but I made them in black worbla instead of regular worbla.

It's interesting to see the difference. They have both been treated about the same when it comes to stretching and forming the material, then I have used three layers of woodglue with water as a basebefore painting it. As you can see the earring in black worbla is a lot smoother and look more metallic than the Daala greeblie in regular worbla.

Saturday 7 April 2018

Admiral Daala greeblies

I will try to take a break from my 16th century outfit and concentrate on Star Wars for a month or so. In early May I'm going to the convention Nordsken in Skellefteå and even if I have signed up to troop with my X-wing pilot my goal is to have one new Star Wars costume. My choice is between TLJ Leia or Admiral Daala, the thing is I can't really choose. I keep doing small things one of the costumes, and then small things on the other, so we will see what happens.

This is the Admiral Daala costume that I'm making.

I have now started to make the small greeblies on her leg pockets, and of course I'm using worbla.

For the square on the pocket flap I simply cut out a piece of worbla in the shape I wanted, sligtly trapezoidal, and bent the edges inwards.

There is also a small groove at the top, and I got to that one by cutting a top layer of worbla that didn't quite go to the top, and then I added a separate strip of worbla at the top, so all in all the greeblie is in two layers.

For the long piece at the bottom of the flap I definitely thought it looked rounded, but with bevelled edges. I cut out three straight pieces of worbla in different lengths and layered them on top of each other. Then I cut the ends to make them more rounded, and finally I molded them over a big wooden spoon. Using baking sheets to make sure that the worbla didn't stick to the wood.

Three layers of worbla, with rounded ends

Shape them over the spoon

Finished shape of the greeblies

Wednesday 4 April 2018

HSM Challenge 4: A gollar edged with fur

As mentioned in my post about thread covered buttons I decided to make a gollar for the HSM April challenge. I think this is a reason why I really like the HSM, it pushes me to make accessories and learn new things. A gollar is a very common part of the 16th century German wardrobe, but I wasn't really thinking about doing one, instead just concentrating on the shift and the gown. Well here was a challenge I had to come up with something to do, and on the way I also learned a new technique, and I foresee more buttonmaking in the future.

The gollar is a garmen that covers the top of the bodice, from the neck down to the bust.
A lot of examples show it lined with fur, and with contrasting strips of fabric as decoration.


The main inspiration for this project was this tutorial on a fur-lined gollar from Handcrafted History.

I started with making a pattern from some scrap fabric.
I decided to make my gollar in two pieces, to make it easier to fit it. A gollar is not a full or semi-circle. My pattern started out as a circle, and then I folded and folded and folded away fabric until I had a pattern that fit. For an even better fit you could also make a shoulder seam, but I decided that a back seam was enough. It's important to mark out the grain line on the template, neither the center front nor the center back ended up on the grainline after my modifications.

I then cut out the gollar in one layer of wool and a layer in some kind of linen blend. It's an old fabric that looks quite like linen, but it doesn't feel like it so I guess I bought it before I was very accurate when it came to fabrics.

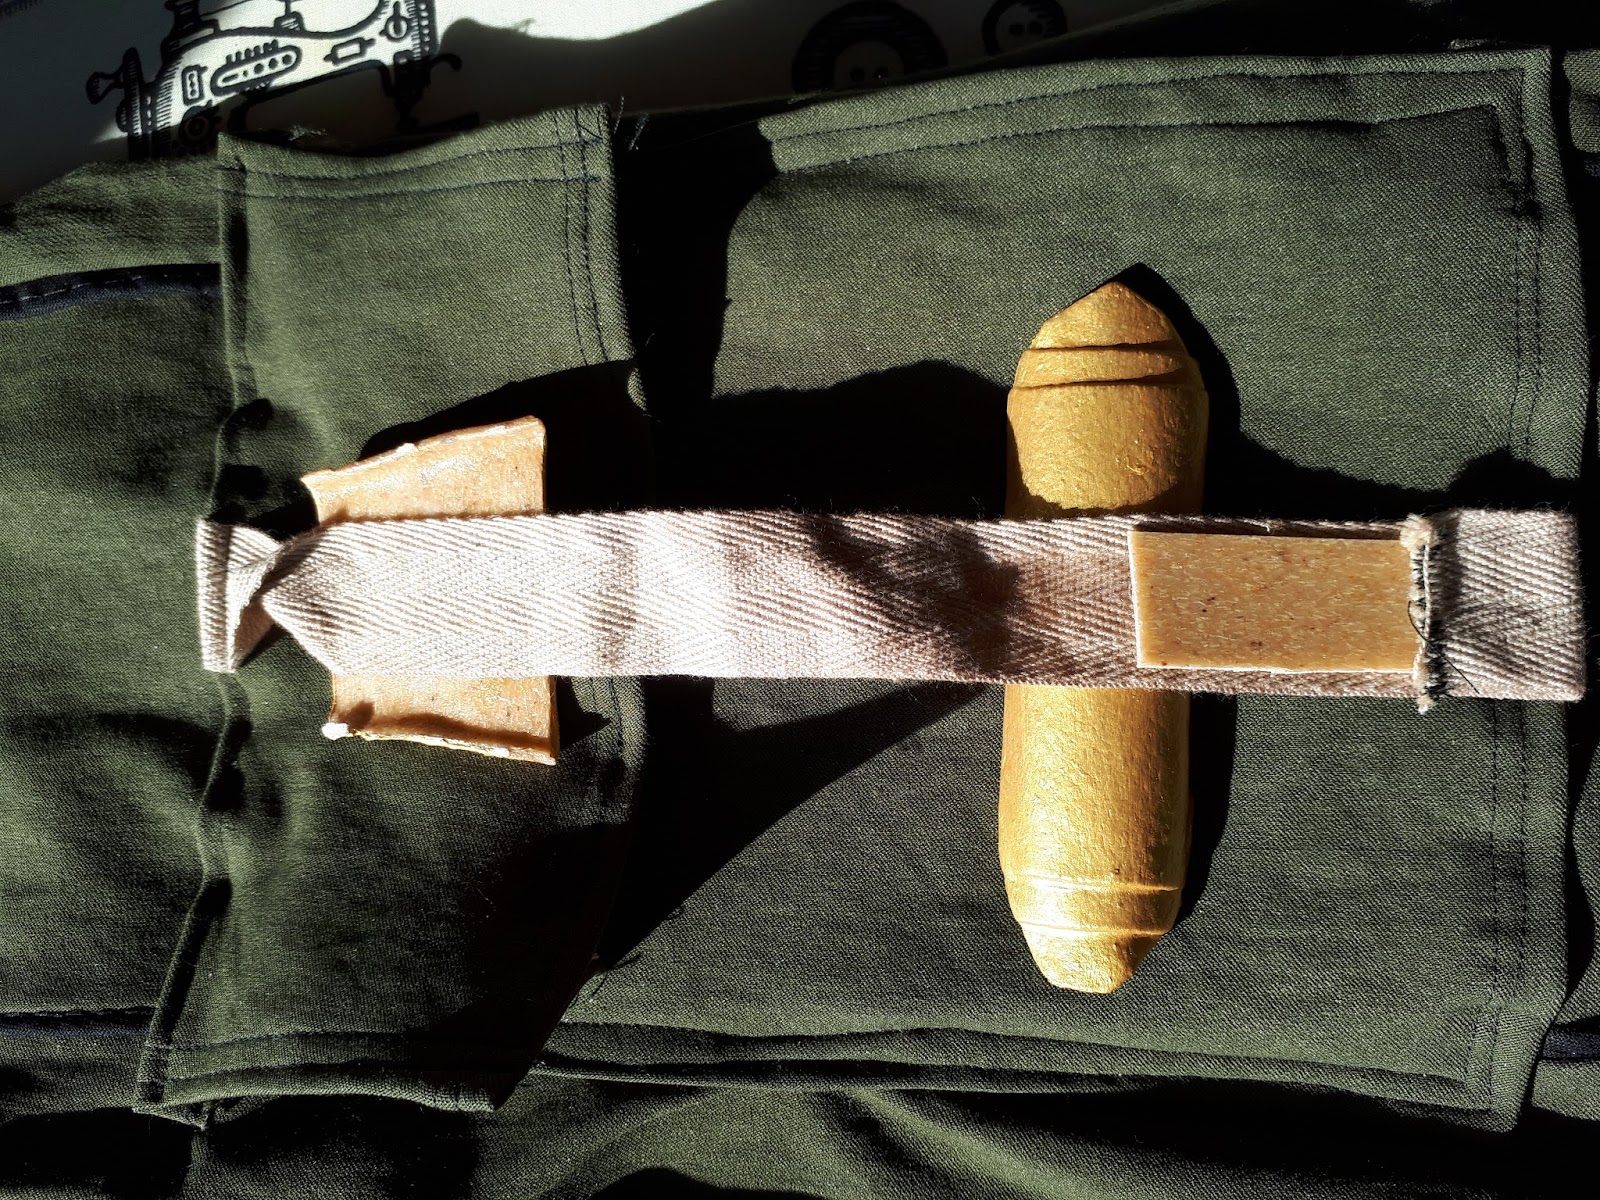
I sewed the center seam and added a straight strip of the wool fabric as a collar. At this point I also made and attached the threadcovered buttons and the button loops I talked about in an earlier post.

Then it was time for the fur. I don't have a trouble working with fur per se, as a meat eater it woud be hypocritical of me to not be able to work with all parts of an animal. I do not like the idea of breeding animals for the fur, in dreadful conditions though. For that reason I wouldn't buy  new fur, unless I was sure that the animals had been treated well, but I don't have a problem reusing old furs, or wearing old fur. There are few things that are more comfortable on a cold winter than a fur.

My mother had a fur hat from my grandmother. It had both shrunk a bit and my mother's cats had found it and played with it. It wasn't usable as a hat anymore.

I took the hat and disassembled it. It consisted of a brim and a top.


The fur was quite fragile in places, where it had gone dry and brittle. Still I could cut the brim in two parts and when I had cut off the most damaged parts it was just enough to line the collar and the front edges with the fur.

I sewed the fur to the wool right side to right side and turned it. I couldn't press the fur, but I used my fingers to press the edges flat.


Then I sewed the linen lining and attached it securely to the seam allowance of the collar. I folded the fur to the back, sandwiching the linen lining between the fur and the wool along the neck and the front edges, and attached the fur to the lining.


This is the inside of the gollar, showing the shape and the lining.


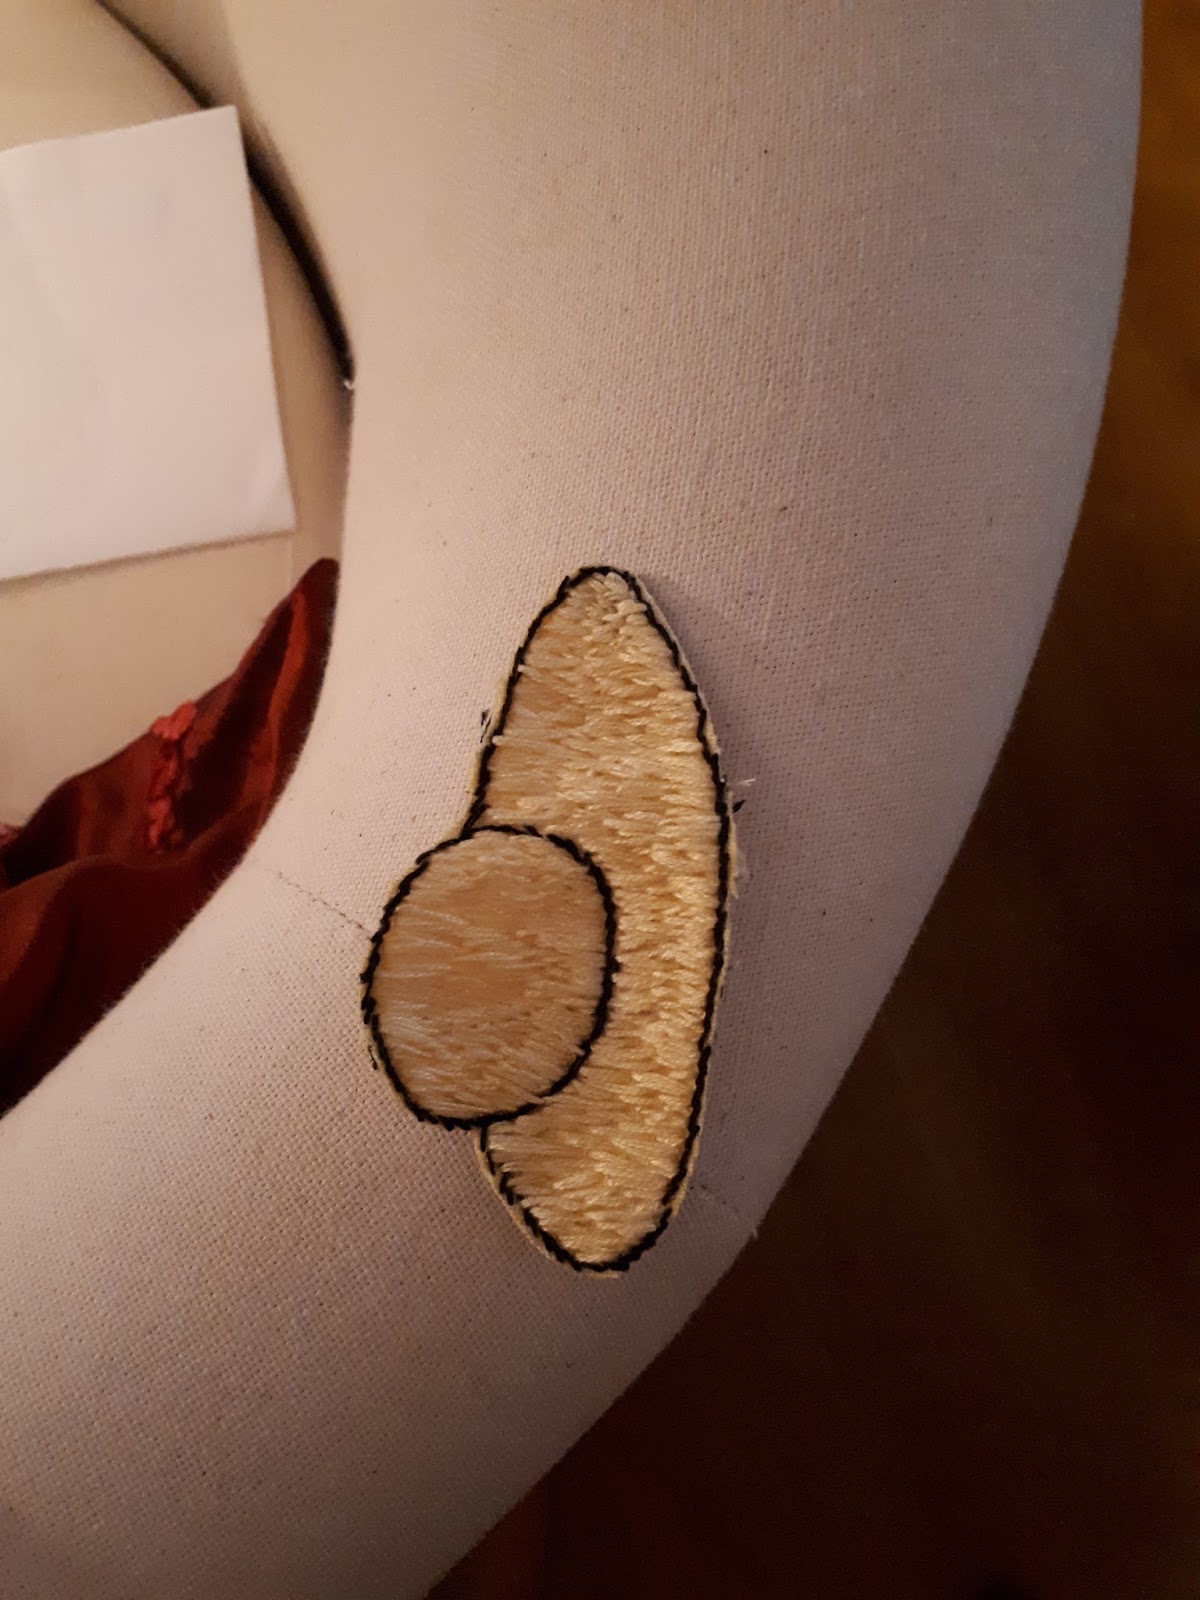
Front of the gollar, with my two handworked buttons visible.

It can also be worn unbuttoned, if I really want to show off the fur.

The making of the buttons and button loops have been documented here.

The Challenge: 4  buttons and fastening
Material: 0,5 m of red wool, 0,5 m of linen blend, 1 fur cap
Pattern: My own
Year: 1520s
Notions: Thread for the buttons and the button loops, linen thread to sew with
How historically accurate is it? 60%
Hours to complete: One day
First worn: -
Total cost: All the materials were from my stash or had been given to me, if bought new, except for the fur, I think around $20.