Saturday 26 March 2016

X-wing helmet

For many years I've said that I'm going to make an x-wing pilot costume, I even took the chance to pick up a helmet and chestbox when I was in Anaheim, so I could save on the shipping. Over the last few months I've felt that I really need a non-face character costume for trooping, but one that is still recognizable as clearly Star Wars. X-wing pilot fits the bill. One reason why it's taken so long for me to get going on the costume though is that I don't find it particularly interesting to make. Today you can just order all parts and have them delivered. I considered making my own jumpsuit, but making a good sturdy flightsuit would be more time consuming than fun. During the last few months I have started to collect the pieces I need, and now I'm hoping to have it done by early May so I can wear it to a convention.

Now over Easter I decided to work away on some costume projects, and first of all I decided to paint my X-wing helmet. This is my third rebel pilot helmet, and I always want them to symbolize something.

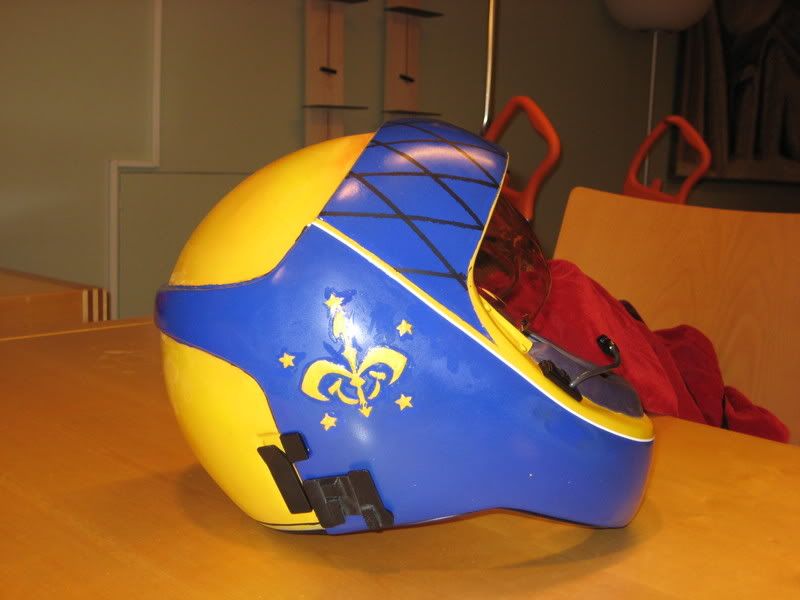
For my first helmet (a Y-wing helmet that at the time was the only option for A-wing pilots) I drew inspiration from medieval history and took the colours and criss cross pattern from my the coat of arms of two families, while I had the th symbol for the Royal Handmaiden Society on the side. I paid a person to make this helmet for me.

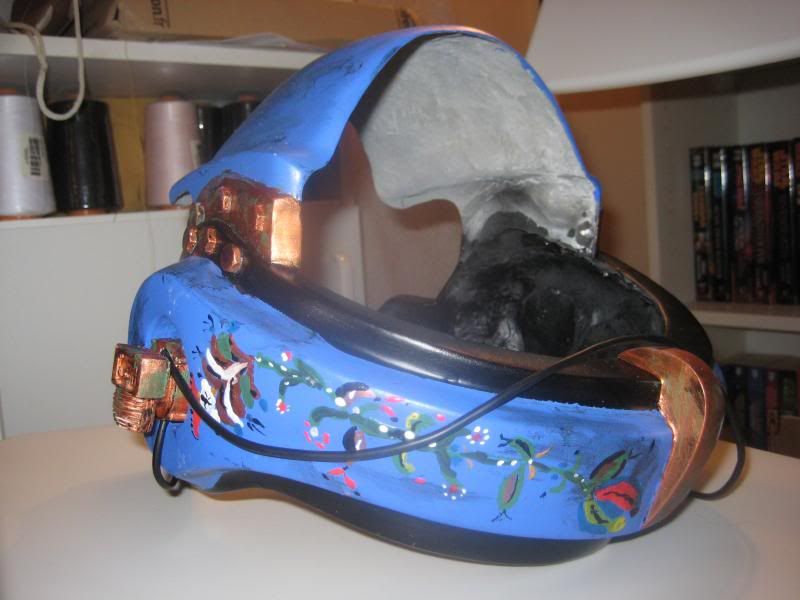
My second helmet, a proper A-wing helmet, was inspired by Falun and Dalarna. With Dalecarlian blue and copper detailing. I painted the base colours and then I asked my mother to make the traditional kurbit motifs. 

For the X-wing helmet I first of all decided that I had to do it myself, which meant that I had to make it fairly simple. I really don't like painting and drawing, it's simply not for me. Then I decided that I wanted to make a helmet symbolizing my love for winter and skiing. The colour scheme would be grey/silver with blue accents, but how could I come up with a symbol for skiing that still looked like it belonged in the Star Wars galaxy?

This was the solution. It was the logo for the world ski championships in Falun 1993, and since my father was the one running the organisation my childhood was more or less based around them. The logo is both an F, for Falun, and a stylized ski jumper. Unfortunately my mother had thrown out the remaining stickers from '93 that we had, otherwise it would have been easy to put them on instead of painting the logo.


I started out with marking the areas that I wanted to be silver and used masking tape to make sure I wouldn't paint outside of them. Unfortunately it turned out that the silver paint that I had bought was too sheer and white, thankfully I found that I had a few drops of colour called "tin" left. So I really used the last drops of paint to make the helmet grey,


With the helmet kit I had gotten quite a few decals. I would have preferred them to be blue, but I'd rather have a good looking rebel logo in black than a bad one in blue. The decals on the mohawk and the yellow and red marks were also included, and I've put them on in a similar fashion as the one worn by Wedge Antilles. I can't draw a straight line if my life depended on it, so the ski jumper isn't as crips as I would have liked him to be. BUt on the other hand I feel that it looks like one of those flags you can paint on your cheeks when you are on sports competitions, so it still fits. 

As a top layer I took the silver paint that had been too sheer and dotted it all over the painted surfaces. I felt that it gave the impression of a layer of frost over the helmet. It also dulled the sheen of the paint.

To weather the helmet I dotted some black paint. Then I took a wet kitchen towel and used two fingers to press and smear out the paint. This makes it look very much like finger prints. While painting I had also tried to notice where I held the helmet. Those were areas where I weathered it a bit extra, to make it look like it's been carried a long.


Wednesday 23 March 2016

A possible Edwardian costume for May

This year I'm going to take part in the 1900 event at the nationl railway museum again. Now I do have my shirtwais from last year and one or two skirts to wear, so I don't really need to make anything new. I still want to make something though. I've had a lot of fun over the last few days to look at Edwardian sportswear so I have decided to try and make a biking outft from around 1890.


Ideally the outfit would consist of jacket, vest, bloomers, gaiters and a hat, but I'm thinking that I will do just as much as I have time for. I will start with the bloomers, then gaiters and if I have time a vest or a jacket. I'm very doubtful about the last two though, so I will focus on the bloomers and the gaiters. For a hat I'm thinking about just decorating my small 18th century bergère.

My plan for the bloomers was to use a veyr old pattern for a pair of drawers that I have used many, many years ago. I can't find it in my pattern stack though, and I've actually worn out the drawers so I can't cut them up and use them as a pattern either. I didn't feel like starting from scratch though, so I have actually ordered Laughing Moon's bicycle outfit.


With that pattern I get both bloomers and gaiters, and a jacket as a bonus. I'm hoping that the pattern won't take too long to arrive. In the meantime I need to decide what kind of fabric I should use. My stash has started to overflow a bit, so I went to in to it to look for something suitable and I've ended up with 2,5 alternatives, funny enough they actually match so I could use them together.


The fabric to the left was the big surprise, I have no memory of buying it. It's a fairly thick cotton sateen. I have probably bought it for the shiny side, but I actually like the duller back of the fabric and for a sporting outfit that might be more suitable. The other fabric is a purple pinstripe fabric that I picked up in a op shop also a long time ago, I don't know what the fibre content is. I'm leaning towards using the pinstripe, but I don't think that would look good for the gaiters. I'm also thinking that it would be good to find a stiffer fabric for them.


Saturday 19 March 2016

Simple non-accurate regency gown

After the 16th century shift I felt that I needed something simple and something that didn't involve too much handsewing. Just sitting down by the sewing machine and relax with a quick project. The result was what I call a fake regency gown.

The background is that 1,5 years ago I made this gown to use for our dramatized tours in the mine.
While I was happy with craftmanship of it, I had miscalculated the bodice and it's quite a large dress. The waist is also more 1830's than 1812, the year that the dramatized tour take place. Since I made the dress it has gotten a lot of use and wear and I felt that it was time to make Another one. This time I wanted to make it smaller, and also raise the waist to a more regency-like silhouette.

In order to function as a dress for the tours it needs to meet some specifications. It need to be easily adjustable, since it's going to be worn by a lot of different shaped women. The temperature in the mine is around 7 C, like in a fridge, so it needs to be big enough to wear a layer or two under it. It's also necessary to be able to get in and out of the dress in a minute or so.

This dress is the result. It fits me, but with bordering on tight sleeves, when I'm wearing a long-sleeved t-shirt under it, so it should be no problem for people wanting to wear more layers.

For the bodice pattern I used the pattern that I made for my gaulle, but I cut off 10 cm from the waist. I also enlarged the front piece and back pieces. The front is on fold, so simply placed the pattern 10 cm from the fold, and for the back pieces I did the same with placing them 10 cm from the center back seam. I did not change the side pieces. The neckline needs to be high, since nobody is going to wear stays, but rather modern t-shirts/shirts under that need to be hidden. For simplicity I opted for a drawstring neckline.

I sewed the bodice together, added the skirt which is simply a tube of 3 m of fabric that's been gathered and added a drawstring to the waist. The sleeves are my basic 2-piece pattern, it's adapted from TV493. I've set the sleeves so that the centre of the undersleeve meets the side seam, and they fit really well to the armscye, even if they are from the different patterns. They only needed a small boxpleat at the top. With more care I could probably have eased the sleeves in without any pleats at all.

All in all the project was a simple drawstring regency gown, not particularly accurate, but with an apron and neckerchief it will look good enough.

Regency in general is not my favorite era, but when I tried this gown on myself I got tempted to make a drawstring dress for myself. Here are some points I would change though.
1. I would make the back totally fitted, and only enlarge the front piece of the bodice.
2. I would make the skirt without gathers in the front, and with pleats in the back. The fullness of the skirt in front makes me feel like I'm wearing maternity wear. A lighter fabric, and less of it would make it look beeter, I think.
3. A deepter neckline, of course.

I don't have any plans for a regency dress at the moment, but at least now I know where I would start if I want to make one, or a new gaulle but with drawstring instead of a drop front.

Monday 14 March 2016

I darned some jeans

It's no secret that I only own one pair of trousers, a pair of jeans. (except for sweat pants and training stuff). The bad thing with having just one pair is that I wear them out until the fabric simply rips. This usually happens in the inner thigh. So what do to then when I'm on my way to a meeting, where a skirt/dress would be totally wrong, but I don't feel like sitting a day in training pants.

The rip was on the inside of the thighs, so not really visible, but I didn't want it to get bigger and become visible. Well with 10 minutes to go, so not enough time to make a patch, until I was off I remember that my mother showed me how to darn many, many years ago.

It looks awful but for a quick fix it served its purpose. Go me. I also felt that my pride as a hobby seamstress told me that I needed to be able to fix a hole in the trousers.

Still I guess it's about time to get a new pair of trousers.

Wednesday 9 March 2016

Edwardian sportswear

The HSM challenge for April is gender-bender. For the longest time I have had zero inspiration for that one. I also want to concentrate on my 16th century project and my current Star Wars project, so I feel like I already have a bit too many projects going on. Still I started to look around for inspiration and I have one long term planned project that I had as a starting point to find inspiration.

This is a picture of Paula, Countess von Lamberg. She was one of the pioneers of women's ski jumping, and jumped an impressive 22 meters in the early 20th century. I would love to one day recreate her outfit, even if it's hard to actually see what she's wearing. I'm guessing a jacket and skirt, all in wool.

Still it was a starting point, and I started to look for pictures of other early female ski jumpers. Pictures can be found in the book "Licence to Jump - the history of women's ski jumping" . Most of the pictures are like the one above though, taken from a distance and only showing the flying so it's hard to make out any details. There is a really nice picture of the sisters Dorthy and Maxine graves in front of a hill from some time in the 1930's. They're wearing what looks like a soft wool wrap jacket with shawl collar and baggy pants in the same fabric. My first idea was to recreate that jacket, but it's not quire realistic. I'm not used to working in knitted fabrics (and I'm pretty sure that the fabric is a knit) and I'm not used to the style either.

I then started to look at accessories, but most of them are knitted scarves, caps and mittens. And I can't knit.

Recreating a female ski jumper's outfit will have to wait for some other time. I started instead to look at general Edwardian sportswear. I'm once again invited to take part in a "back to 1900" -event at the national railway museum in May, so something that I could wear with the shirtwaist I did last year could also be fitting.

Just look at this magnificent ski outfit. I want it, all in gold and purple.

Anyway, on to something more realistic for this small project.

This bicycle outfit shows up with a few descriptions on pinterest. One of them dates it to 1895. I really like both the colours and the style.

This bicycle outfit is a bit more simpe and restrained. It's an Austrian outfit from 1900. Overall quite a few of the bicycle outfits with baggy pants seem to be from the German cultural sphere.

For a more British inspired look there is this golf outfit from around 1908.

Not just a knitted vest, but a full knitted sweater from 1895. I just fell in love with this one, it make me almost want to learn how to knit myself. (Then I remembered that I've hated knitting every time I've tried it).

So that being said I think Edwardian sportswear can help me come up with something, both for the challenge and the event in May. The sportswear is clearly inspired by menswear after all. If I have enough time I could go for a vest or a full pair of bloomers. If I don't have that much time a collar or simply a tie would do as well.

Saturday 5 March 2016

HSM Challenge 2 - the patchwork pleated shift

Finally, I'm done with my HSM February challenge. It's taken way longer than planned due to some mistakes and miscalculations.

I decided to start my 16th century project with a shift, and a smocked shift at that. Smocking of course fitted well with the HSM challenge of tucks and pleats. This is a new area for me, and I haven't totally gone into full research mode on it. I relied heavily on the tutorials and instructions for a smocked shift, or hemd, by Katafalk and by Genoveva.

For fabric I used the last piece of fine linen that I had in my stash. It was a piece of 110x270 cm, and I thought it would be enough to make a narrow, but still smocked shift. I wouldn't had had a problem getting an 18th century chemise out of that.

Here is Genoveva's pattern for a shift that I used, even if I had to make every piece a bit narrower than in the pattern. I didn't sew the gussets, the sleeve or side seams, but just around 20 cm down to connect the sleeves to the back and front sections.

Then it was time to start with the smocking. I started with the cuffs, since I figured it would be good to start on a smaller section. I also first hemmed the edge of the cuff.

 I made a template to mark out the dots for the smocking. For the cuffs I felt that the pleats were too wide, so I halfed them compared to the template, by simply putting an extra dot in the middle between all the dots of the template.

I first used my chalk pencil and then chalk, but it didn't work. The chalk broke all the time and the dots got too big. Still I did the cuffs with chalk.

I then sewed the gathering stitched and pulled the cuff together to fit my wrist.

I did honeycomb smocking, which was quite easy, but maybe not the best smocking pattern for my size of pleats. Still I'm really happy with my first ever attempt of smocking.


I covered the back of the smocking with a piece of fabric, to make sure it kept its size. I had ran out of fine linen so I used a piece of coarser linen for that.

Then it was on to the neckline. After having asked in the HSM group for a better way to mark the dots than chalk I simply used an ordinary pencil. The dots got a lot smaller, and it never broke.

I gathered and did the same honeycomb smocking as with the cuffs.

Then I needed to bind the neckline, and my first try was to make a casing strip and bind the edges with it. Like this example from Mary of Habsburg's shift.

Since I was out of fabric to make casing with I simply cut off a piece from the hem, thinking that as long as the shift reached below the knees it would be long enough. I sewed the casing on, and then I sewed the sleeves and side seams.

Then it was time to try the shift, and I was really disappointed. I had always known that the sleeves were on th edge of being too short, and now with the smocking done they were definitely too short. The neckline was gaping, since I hadn't cut the strip on the bias, and it was also somewhere in between a low and high neck. Still I wore the shift like that on the 29th of February, so technically I was done with the HSM challenge.


In the end I decided that I would need to do a lot of changes, or else I wouldn't feel anything but disappointment whenever I wore the shift.

I started with making the sleeves longer. I ripped up the seam and to be sure that I would get a straight line, despite the pleats on the sleeves distorting the fabric, I pulled a thread in the linen.
I cut off the sleeves there, and then I cut two strips from the bottom of the shift (again) so that I could add them in and make the sleeves longer.

I then ripped off the casing, stretched the neckline until it was wider, and just like with cuffs I just covered the back of the smocking with a strip of fabric. For that strip I used the old casing, and I had to patch it with some of the coarser linen as well. One problem now was that the edge of the neckline hadn't been hemmed, since I had planned to keep it within the casing. With all the smal pleats it was not going to be fun trying to hem it. In the end I simply folded the edge over to the wrong side and attached it there. It was a selvage edge so I didn't have to worry about fraying.

With all the strips that I had cut off from the bottom, by now the shift was way too short. So I finished by adding a strip of the coarse linen to the bottom. For the photos here it should be noted that the dressform is around 10 cm shorter than myself.

The whole shift, front
Side


Sleeve, with the added strips of fabric

Close up of the neckline smocking
 So yay, finally I'm done! With this project I learnt a new technique, smocking, and I also have gotten a lot better at doing felled seams. Still I'm not sure that I will make a totally handsewn shift again in a long time, and if I do I will make sure to have enough fabric so that I don't have to make extra seams when I have to add fabric here and there. It was also the first time I used sewing silk for a thread, and it was a charm to work with.

Just the facts

What the item is: An early 16th century smocked shift

The Challenge: 2 Tucks and pleats

Fabric/Materials: 110x270 cm fine linen, 150x50 cm coarser linen

Pattern: http://germanrenaissance.net/wp-content/uploads/2014/05/low-neck-hemd-pattern.jpg

Year: ca 1520

Notions: silk thread, hook and eyes (for the cuffs)

How historically accurate is it? I would place it around 85%

Hours to complete: 1,5 months

First worn: 29th of February (in it's first version)

Total cost: $5 for the silk thread, the rest was from really old stash fabrics.

me-made clothes, or rather not

The discussion on how much of the clothes that you wear for everyday that are also made by yourself  just came up. It was Lemomi Oakes (The Dreamstress) who made a blog post about it here. This is also a question that I get quite often, or when I wear something that people don't recognize the usual question is "have you made it yourself?".

Almost always the answer is "no" though. In my current wardrobe I have three things that I've made myself, two skirts and a hat. Everything else that I have done over the last years have been costumes or at least evening wear. After reading the answers over at the Dreamstress about how people seem to make so much of their own clothes, it was refreshing to also read this blog post by Trystan. Just like me she hardly makes any of her everyday clothes.

I'm going to list the main reasons why I just concentrate on costumes and fancy clothes.

1. Time - it takes time to make a nice well-fitting garment. I'm not a fast sewer, mostly because I procrastinate too much, and since this is a hobby I much rather spend it on making the fantastical creations of my dreams than something I just go to work in.

2. Fabric - I think it's very hard to find fabrics that scream "make me into something casual and normal". It doesn't help that most of the stores I have a chance to visit are just filled with home decorating fabrics, and then they have a stash of very strange patternes stretch velvets. Seriously I just can't imagine where all these stretch velvets come from, and how they crop up in every fabric stores, but always just in the sheep remnants bin. I've never seen them on a bolt, and even less seen anyone buying or using them. If I have to order fabrics online it's also rarely worth it to just order a meter or so, since you need to add shipping, so it's much more fun to buy meters and meters of fabric that can be used for costumes instead.

3. Skill - I don't trust my own skills in making modern collars, sleeves, facings and such that you need in order to make a good looking garment. I have the feeling that I would spend a lot of time trying to make something, and then I wouldn't be happy with it in the end anyway, so back to point 1.

So I will probably go on concentrating on making costumes, but who knows if I get inspiration for it I might do "normal" clothes as well, it's just that so far I've lacked the inspiration for it.

edit/

I would say something that has given me some inspiration for everyday wear though is Lauren's (American Duchess) quest to create a 1930's wardrobe for everyday wear. If I'm to do clothes for everyday use they would probably be vintage inspired, even if the 1930's aren't my particular era.

Thursday 3 March 2016

Spending the week as a medievalish queen

I haven't updated in a while. I have been working away though, but I thought that I was going to try and not make a lot of small updates but a big one when I'm finished on my current project, which is also my HSM challenge for February. There have been some delays in that project though.

Anyway, now for something completely different. For this year's school holidays we have decided to have a medieval theme, since the only part of the museum that's finished and open is the early history, up to around the 1530s. Children who come to the museum get a paper with different tasks that they need to finish, and when they have done that they can come to the king/queen and get knighted. I'm the queen of course on the days when I'm working.

I also decided that since a king/queen needs a crown I would make something easy and try out worbla. I had bought a sheet some time ago intending to make the crown and sceptre for Queen Elsa out of it.

I started out with finding a crown template and cutting it out in the worbla.


I only had access to a regular pair of scissors though so it was hard to get the finer details cut out. After that it was time to put gesso on, sand, gesso, sand and so on. (gesso was bought at slöjd-detaljer.se)

I had heard that 5-6 layers of gesso would be enough, but this is the crown after 8 layers of gesso. There are some spots that are really nice and smooth, but most of the crown is rough. Now since this was a fast project that was only intended to at least look better than a plastic crown that you could buy at the toy store I felt that it was enough, but I'm hesitant to use it for Elsa where I want it to really look like metal.

The last thing was to just spray paint the crown with some gold paint and glue some plastic crystals on, they were also bought for Elsa but I've since decided to make the jewels myself whenever I get to making Elsa.

All in all my experience with worbla is that it was a quite easy material to cut and shape, the surface is too rough for someone as impatient as me though. I have heard that transparent worble has a lot smoother surface so I would be willing to try that in the future.

The king and queen of course neeeds a suitable throne room. The museum that I work in is in an 18th century building and one room, that was the combined meeting room and church for the mine is quite big. (We still use it as a church a couple of times a year). To make the room feel smaller and more inviting we have a structure that we can put up as a circle to make a room within a room. I decided that the room should look like a royal tent, with the king/queen being on a visit to the mine.

I'm quite happy with the result, especially since interior decorating isn't exactly my thing. It of course helps to have access to some 18th and 19th century chairs and a lot of velveteen pillows. The royal mantle is a really old bedcover from IKEA. I've lent it now to so many different things where they need something royal that it was well worth the money.

I'm wearing my fake Mary of Habsburg gown. It's totally inaccurate but people get impressed by the shiny gold. I also get to play with a really nice sword when I knight the children. (it's blunt so I don't risk hurting anyone). In this picture I'm actually wearing my HSM project, it's a smocked shift. I could have made a post about it, since it was finished. You can see how uneven and gaping the neckline is though, so I decided to rip up the whole neckline and start over with a new shape for it. More to come on that...