Thursday 27 September 2018

HSM Challenge 9 - my Christmas stockings

The HSM Challenge 9 was the following:
SeptemberHands and Feet: Create a fabulous accessory for your hands or feet.
Back in the beginning of the year when I saw the challenge I figured that I would probably do some kind of gloves or mittens. When September rolled along I realised that it would be a good opportunity to make a pair of hose for my late medieval/early 16th century ensemble.

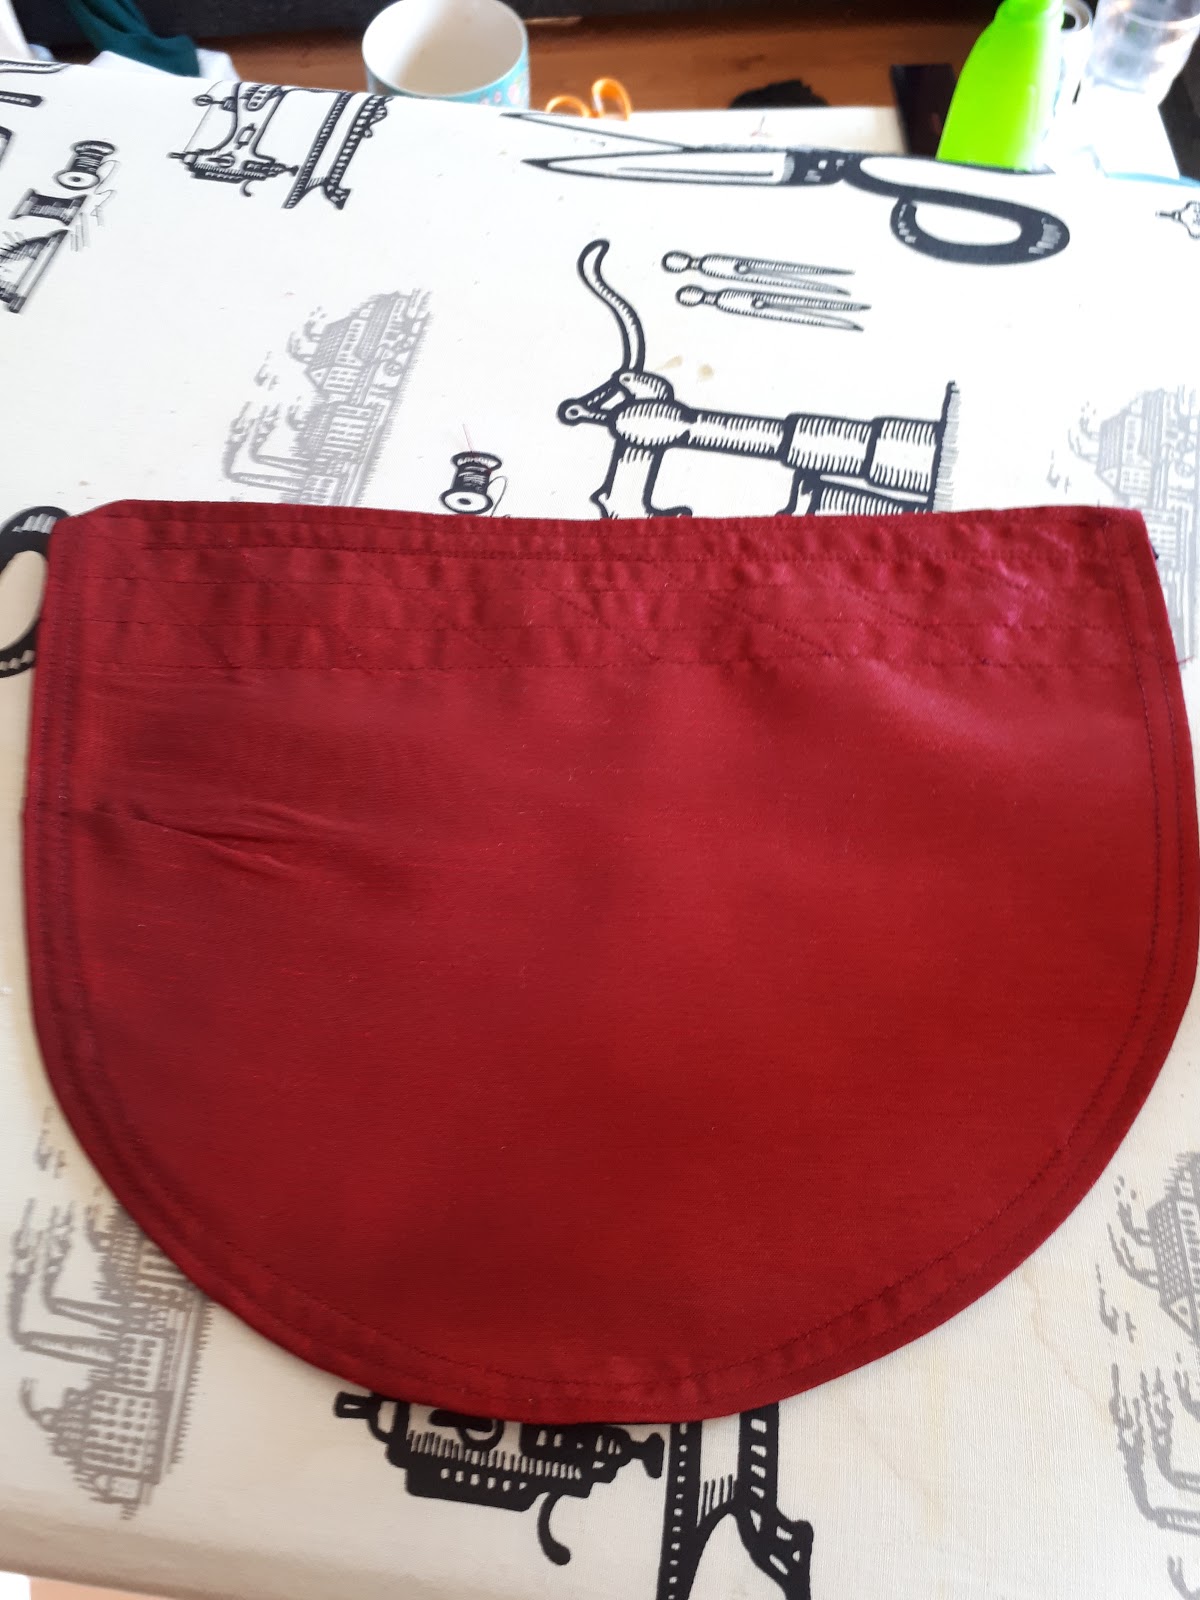
Women's hose in the time only went up to the knee, so it's not the full length hose that men wore, which also make them easier than a pair of long hose. I had my friend Linnea help me create a pattern. The main piece of the hose was simply a piece of fabric that I pinned along my calves and down to my toes. I then cut two triangular gores out of it to make the ankles easier to bend.

Yes, this is what my calf and foot look like, and it's also a good illustrations on why perfectly symmetrical patterns rarely fit that well.

For the fabric I once again used my bolt of red wool twill. I also cut out a sole piece and two triangles to make the gores. My first sole piece was patterned very tightly after my foot, and when I had sewn it to the maine hose, the whole thing felt too tight. I made a new bigger one, but that ended up way too big.

The solution was to turn the hose inside out, and then pin it tight to my foot, and sew a new seam.

As you can see there's a really big difference between the old and new seam. I actually think that my first sole that I cut out wasn't too bad, but I was unused to the fit and remade it.

The hose are sewn together with backstitches and then felled with waxed linen thread.

They do not stay up by themselves, so I will need to get some kind of garters to make them stay up. I have already asked my mother to knit a pair for me, but it would be more correct to use leather or a woven band.

I am happy with the fit, except for the heels, there is a bit too much fabric there. I also don't think that it will be possible for me to fit the hose in the shoes that I use, and when I finally buy a pair of proper historical shoes I will probably have to upsize to take the hose into account.

As for the name, well when I brought them with me to our Tuesday cosplay/costume meet the first reaction was that I had made a pair of Christmas stockings, and that Santa Claus would be able to fit a lot of presents in them.

The HSM facts

The Challenge: 9 - Make something for your hands or feet.

Material: 0,5 of red wool twill

Pattern: Drafted on my body.

Year: late medieval early 16th century

Notions: waxed linen thread

How historically accurate is it? I think around 75%. The more I've worked with this fabric the more I feel that it's not a really historically accurate fabric.

Hours to complete: 5

First worn: I'm home sick with a cold, and it's been really nice to walk around in a long pair of woollen socks. I'm planning to  properly wear them on an even next weekend.

Total cost: From my stash, but the fabric would have cost $10 new.

Monday 24 September 2018

Storing my costumes

Costuming is not just a fairly expensive hobby, it also takes up a lot of space. I'm the first to admit that my apartment is overstuffed with things. A third room that I could use as a combined crafting room/library would be a dream. Except for the space I love everything with my apartment though, and since the prices around here have trebled since I bought my apartment I'm not likely to move just to get another room. I have to make do with the space that I have.

Basically my costume related things are divided up into three areas.

1. I have my crafting corner in my living room.


Here i keep thread and all other sewing supplies, under the desk I also have three large boxes with corset supplies, general craft supplies and foam. To be honest whenever I'm doing a project the sewing corner takes over the whole living roo.

2. My fabric stash
This is my main issue. I try to keep fabric to a minimum, but for some reason it always overflows.

3. My attic storage.
This is where I keep my costumes, and since I spent four hours on Sunday cleaning up and reorganizing it, I might as well show it.

The left corner of the back is the stuff that I never touch, mainly thngs that belongs to the apartment or mementos from my childhood that I want to keep. The right corner keeps all my Christmas decorations, I need to be able to get to them once a year. In front of them I keep my suitcases and bags.

Along the wall there are nails where I keep my costumes that I want to hang. Mainly the most fragile costumes, or costumes that I wear a lot, or simply costumes that take up lesser space than if I would pack them in a box. The box on that side is my dye box, where I keep my dye supplies and I also use it to dye in.

On the other side I keep my boxes with costumes. Packing them into boxes is maybe not the best way, but otherwise they would take up too much space. They are fairly airtight and I also add balls of cedar wood to them to protect the textiles in them.

I have three rows of boxes, one with general things, one with Star Wars costumes and one with historical things. When I started using boxes I had fairly large and high boxes, I'm more and more trying to switch them for boxes that are flat, and that way I can keep one costume per box. The Star Wars costume boxes are stacked with the ones I use the most at the top.

My historical costumes are divided into eras or kind of things, so there is one for the 16th century, one for 18th century clothes, one for 18th century accesories, one for corsets, one for shifts and petticoats from the 18th century and onwards, and one box for panniers and other supports.

Finally in the corner I have a small shelf where I can pack away smaller things in boxes, and I keep my shoes there as well. My best and most used wigs are also standing on the shelf, while the other wigs are packed away in a box (on styrofoam heads).

My plan for now is to buy a larger shelf, that goes all the way to the ceiling, add more nails to hang clothes bags on and add a proper shoe rack. I'm also looking for a wooden box that I can use to store my household things that I use when I'm at medieval events.

Saturday 22 September 2018

ComicCon Stockholm 2018

ComicCon Stockholm took place the weekend 14th to 16th of September. It bills itself as the largest popculture event in the Nordic Countries, and that is probably true. It has grown out of an earlier game convenction (Gamex) and it has had problems finding a balance between games and general popculture. It's still not perfect, but I felt that it was better than some years, unfortunately it's also now sponsored by one specific store, which has lead to other stores selling popculture stuff not being invited. The merchandise is limited to the one sponsor (and now special con prizes) and smaller independent traders.

Anyway this year I wasn't motivated at all for the convention. If I hadn't booked my hotel in May I would probably not have gone. I felt that I only had my old costumes, nothing new to bring. The dye for my Melisandre coat and hood didn't show up in time so I would not be able to bring the full costume. I stressed to get TLJ Leia done, got it into a wearable but not finished state, only to forget the undergown at home.

In the end it turned out to be one of my best conventions in a long time, and a big part of that was that I had people around that could take a lot of funny photos during the weekend.

Cosplay Dalarna had it's biggest group photo so far on a convention.


 On Friday I wore my X-wing pilot first, and I couldn't resist climbing on the the big airplane wing that was in the main hall. Ingeli, who took the photo, said she was a really good friend since she didn't film what it looked like when I tried to get onto the wing. (I basically needed to be pushed over it by two people)

Looking S-foils in attack position

 AFter my stint in X-wing I quickly changed to Mon Mothma, and of course I had to take my photo on the Iron throne that HBO had in its area. If I can't rule the galaxy I guess Westeros will do.


The real reason I switched was because Mads Mikkelsen was there and got inducted as an honorary member of the 501st legion, and I wanted to wear a costume that was a bit connected with Rogue One.


The day after I also made sure to have him sign my "A Royal Affaire" DVD.


The three days of ComicCon all have very different atmospheres. On Friday it's quite easy going and you have time to check out all the stands, and if you are interested in games that's the day you have time to test play them without any lines. Saturday was really crowded though. The Nordic Legions had their stand outside the main hall, and after I had gotten my autograph I didn't go in to the main hall for the rest of the day. I did my shifts in the stand and walked the parades, but there was too much people to do anything else.


The R2 builders had invited Simon Wilkie as C3P-0 and I got my photo with him, as you can see the stitches on my white over poncho had unraveled so I need to fix that before the next time I wear it.

Sunday is a family day, with less people, but a lot of kids everywhere. I had brought my Melisandre costume and I used the time to take photos in the HBO area.


As a child I dreamt of a red motorcycle, here I could at least mount a motorcycle in a big red gown.


I finished the con in my X-wing pilot costume again, and finally we managed to be three orange pilots in costume at the same time, thanks to Aiwei from Norway. It was really fun to be in a group and goof around.


So it was a really fun convention, and it shows that you don't need new costumes to have fun, the important thing is to hang around with fun people.


Monday 10 September 2018

My snow cone reticule

This was a small project, that of course took longer than planned, but it was fun.

I bought the "American Duchess Guide to 18th century dressmaking" when it was released, but I haven't really been into any big 18th century projects this year. When I made my roundgown and chemisette for I used the book for inspiration, and then I felt the need to make a new reticule. There were some weird accessories in the 1790's and I wanted something more than just a soft bag with a drawstring. I picked their "Sundae best" reticule, on page 221.

I used some cream silk satin for the soft part, and the cardboard for the bottom structure was from a moving box. I thought about what I would use for the bottom part, and then realised that it would be fun to be able to call it a "snow cone" if I kept to a winter theme. I didn't have any exta silk, so I took some grey high quality poly satin, and then for trim I used a silver etallic braid.


The silver braid was fraying a lot, but that made it possible for me to cut off a piece of braid and use the strings to make the tassle.

Overall the instructions in the book were easy to follow, I think there is one typo in the pattern, asking you to cut two pieces of fabric to cover the cardboard, when you need 4, but otherwise it was really good. The reticule is handmade, mostly because it was a nice little project to work on while watching TV. The finished bag is roomy, but the silk ribbons were narrow enough that they cut into my wrist when I wore my phone in the bag. I could probably use some wider ribbons for that.

Friday 7 September 2018

A bag for Melisandre and a pilgrim

With a heatwave raging, and temperatures soaring to 35 Celsius, being able to carry water is essential. I wanted to be able to carry a bottle of water, but being discrete about it, which ruled out any of my normal bags.

I made a simple bag out of the left overs from the dress. Really all the white lining that you can see was taken from the scraps left over when I cut out the dress, that also dictated the size of the bag.

I started with two rectangles for the back and front. The bottom and side was one continous piece of fabric
I sewed one rectangle to the bottom/side.


I also added a divider in the middle of the bag, so that the water bottle want fall down, and it will be eaiser to carry other stuff in it. When it was added I sewed the other rectangle to the bottom/sides as well. The bottom of the divider was fastened to the bottom piece with some hand stitches.

I now had a white bag.


I then made the strap, by sandwiching more of the cotton lining in between the red fabric.

I also reinforced the strap with some top stitching along the whole strap.


I sewed the strap to the lining.


I then sewed another bag in the red fabric, but without the divider and slipped it over the lining. The red fabric was folded over the lining to hide the raw edges of both fabrics.

Now I had a functionable bag, but I felt that it was missing something so I decided to make a top flap for it. I cut out a piece in both lining and red fabric. I also quilted the top part to give it a bit more structure, and because it looked nice.


I bound the edge with bias tape.


I then attached the flap to the side of the bag. Tada, a finished bag.


Inside of the bag
The bag worked great at NärCon, and it was so nice to be able to carry stuff with me. It wasn't as discrete as I had hoped though, since I also carried a white parasol hanging from it.

This kind of bag is similar to medieval pilgrim bags.

They are usually trapezoid in shape and made in what seams to be leather or coloured fabric. I made similar bag to the Melisandre bag, out of the leftover of the green wool. I had a larger piece of fabric, so instead of a separate flap I made the main fabric piece so long that I could fold it over the opening. Since the wool is sturdier than the poly dupioni I used for Melisandre I also didn't line this bag, it's just in one layer. Finally I added three tassels of wool yarn at the bottom, which seems to have been a very popular decoration. Now I had a more medieval-like bag to wear at Medieval Week in Visby.


Tuesday 4 September 2018

Jane Austen Garden party at Hildasholm, Leksand

Last weekend it was the end of season celebrations at Hildasholm in Leksand. Hildasholm is a stately cottage that is well worth a visit for the beautiful gardens and interiors from the early 20th century, a lot of arts and crafts and romanticism.. It was a small summer house for the insanely rich Hilda Munthe, so when she wasn't in one of her bigger houses in England or Italy she stayed in Leksand.

They had chosen to call the day a Garden party à la Jane Austen, and I took my mother and new late 1790's outfit and went there.

To be honest I didn't notice a lot of Jane Austen, but it was a nice market day, and if you were in historical dress you got a guided tour in the house for free. I happen to know the head guide there, and since he knows my interest in historical clothing he pointed out a few extra things. The most exciting thing was that in the big doll house there is a miniature Fortuny gown for a doll, modelled after one of the two Fortuny gowns that Hilda Munthe owned. Unfortunately those dresses are in her home in England and not in Leksand though.

I wore my new roundgown. It was really comfortable, but a bit too long even with my Kensington shoes so I will need to shorten it a few cm. Under it I wore my late 18th century stays, small bumpad and petticoats. I had borrwed a bonnet from Linnea, and added the chemisette and a new redicule as accessories. I had not had time to starch the collar of the chemisette, but it worked fine anyway. I was happy when I found a portrait of Hilda's great grandmother, and she was also wearing a soft and unstarched chemisette in the early 19th century.


The gown was really comfortable, but I will need to fasten it with some pins to keep it from sliding down, the belt was not enough to keep both of the gown in position.

As I said my mother also wanted to come, and be dressed up. My mother has a lot of physical disabilites, including the spine and hips, so she can't wear a corset. She also would need to be able to wear a pair of walking shoes instead of something more historical. That made it a bit problematic, since she's taller than me and all my 18th century skirts are on the short side to begin with. In the end she could wear my gaulle, and for headwear we wrapped a big scarf around her head as a turban.

So yes my mother was a lot more daring in her fashion choice, compared to my prim and proper dress.

I did meet up with some other people in costume, and I've been invited to their chat group, so it's quite likely that there will be more regency themed events happpening in the future.


Sunday 2 September 2018

A fake torch for Melisandre

It is always easier to pose for photos or interact with people if you have a prop. I wanted Melisandre to be more than just a pretty dress, so I needed to come up with something. Melisandre is known for burning people at the stake, so I figured that a torch would be a good prop.

This feels like a really new development from me. I'm actually making props, not just sewing clothes.

The foundation for the torch was a wooden dowel. I cut strips of EVA-foam and glued them to the dowel with contact glue.


I finished this stage by wrapping a thin piece of foam around the torch to make it look like it's hold together by something.

Then I primed everything with a lot of layers of watered down wood glue.


I painted the foam with acrylic paint. The base layers was quite a light brown, then I added a darker brown at the top, where it should look like soot, and on some spots I used the dark brown with added black for a very burnt look. The wrap is painted in the dark brown paint, with some black to get it even darker.


I was really happy with the painted torch, but the torch needed to look like it was burning, not as if it was burnt out. To create the flames I cut out a lot of flame like shapes in more transparent worbla.


I then made a dye bath using iDye poly orange and threw in the worbla.


 The heat from the dye bath softened the worbla, but it didn't melt. I let the worbla lie in the dye for around 40 minutes.


For the smaller pieces of worbla I had made a yellow dye bath as well, but it wasn't strong enough in colour. I then mixed the yellow and orange dye bath and put the the smaller pieces in that new dye batch, but just for a couple of minutes.

Here are the dried pieces of dyed worbla.


Then it was just a question of glueing the flames to the torch. The distortion that the worbla had gone through in the dye bath actually helped the flames to look more natureal. You can use a heat gun to shape the worbla more, but I was happy with this result.