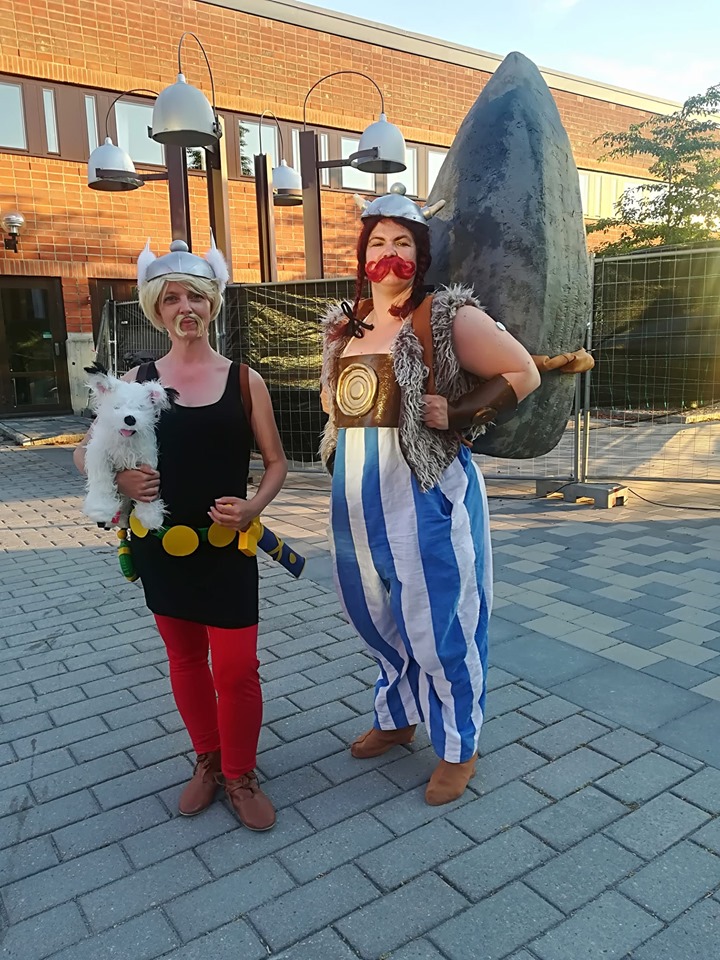
It's time to sum up the finishing parts of my Obelix costume, and in this post I will talk about the trousers and shoes.
I didn't take a lot of photos of the trousers, while I was working on them unfortunately. The first issue with the trousers was to find a striped white and blue fabric. I didn't find anything close to those broad stripes, and I didn't even find a suitable blue fabric at all. I then decided to make my own stripes and to dye my own blue fabric. I worked with a thin cotton satin from Stoff&Stil. I like this fabric because it's thin and easy to work with. It wrinkles a lot though, so if you want to make something more elegant it can be annoying. For a soft summer garment it was perfect though. I bought a lot of natural coloured cotton satin, and then I dyed half of it using the regular textile dye that I can buy in the local paint store. I dyed the fabric by hand, and it did get a bit blotchy, but nothing that is noticable when you cut it up into strips.
I then spent a lot of time ripping the white and blue fabric into strips and sewing it together into a striped fabric. When I had a fabric that I thought was wide enough I took my 1890s bloomer pattern and used that as a guide. Basically I used the crotch area, and then I just took the pattern out to the end of the fabric, I also lengthened it both upwards and downwards. I then sewed it all together, and it was way too tight.
Or rather, I had make a perfect summer jumpsuit. It was flattering and so comfortable to wear, but it wasn't exactly the big trousers that Obelix would wear. I don't think I've heard the term sexy Obelix before, but that was the main comment when I tried them on. I had to rip them apart, and trace the pattern so I still have it for when I want to make summer jumpsuit, and then I added 2 more stripes on each side.
Now the trousers were gigantic at the top and legs though. I simply had to take in all the seams to get it into something more managable. A bonus with this is that you get the tapered look of the stripes that Obelix has in the comic. The finishing touch was to hem the top and the bottom and since I don't want any serious costume malfunctions I added a pair of shoulder straps, that I fasten with velcro. The shoulder straps will be hidden by the vest, and is one reason why I wanted to do the film version with the vest.
Obelix also needed some kind of shoe. Also since I'm not really tall I wanted to add some height in my shoes, and thankfully it's quite easy to find sandals and shoes with heels. In the end though I went with an old pair of wedge heeled sandals with a thick sole that I had planned to throw out after the summer since they were starting to get way too worn.
I used a fake stretch suede fabric and started with simply tracing the shoe on the fabric.
The fabric is folded in the back, so the only seam is the middle front seam. I depended a lot on the fabric being stretchy so I didn't have to be very careful.
Then I put the shoecover over the shoe and attached it to the lace of the sandal. It's easier with a curved needle.
I added some hot clue to fix the fabric to the side of the sandal, but the sole is still just the sole of the original shoe. It's not a perfect pair of shoes, but they worked since they are mostly covered by the trousers anyway.
I'm not that much taller than Ann-Sofi, as Asterix, but she's wearing medieval leather shoes that are very flat and I'm wearing my sandals with a bit of heel and that is enough to make a noticable difference between us.
Showing posts with label shoes. Show all posts
Sunday, 4 August 2019
Thursday, 21 March 2019
Enfys Nest shoes
My Enfys Nest has really hit a lot of speedbumps. First of all my helmet is not going to arrive before Celebration. It will make it a lot easier to pack, but the helmet is the coolest part of the costume and even if I wear a ginger wig it won't be the same. I ordered the arm fan shields, since I felt that it was a bit out of my league to make a pair that could fold in and out. That package has been stuck at a FedEx facility for the last two weeks with the tracking info only saying "shipment delay beyond our control". Today the tracking has changed to "in transit" and I can only hope that means that it's actually moving. Still getting it across the Atlantic, through Swedish customs and to my adress in two weeks is unlikely. I have a glimmer of hope, due to the change in the shipping status, but I must be realistic. The third thing that hasn't arrived are the hairpin beads for the breastplate decorations. Apparently hairpin beads are very common in the US, but not in Europe. I found a shop in the UK, but they are also delayed. As it is now I'm starting to feel that I will go to Celebration with an unfinished costume and I will have to save the proper presentation for NärCon or Stockholm ComicCon later in the year.
I started out with a pair of fairly cheap pull on sneakers. The important thing was to get the big chunky sole. I also wanted a pair of pull on, so I wouldn't have to worry about lacing the shoes or making sure that they would stay on my foot in other ways.
I then covered the shoes in pieces of scrap fabric until I felt that they covered the shoe the way I wanted. I'm not showing you what the pattern looked like, since I was not happy with it. If I remake the shoes I would go about it differently.
I used the orange fabric as a guide and cut out the main fabric. To get the quilted back I sandwiched a layer of wadding between the two pieces of fabric and quilted it down. I made a satin stitch border along the quilted piece.
The tongue was also quilted, but instead of wadding I used a piece of thin felt. I thougth the wadding would have been too clunky, but in hindsight the felt was too thin and I shoud probably have used the wadding. It was sewn on the the shoe by hand as well.
Then it was time to sand and paint the buckles that a friend had helped me to 3D-print. The link to the model is here.
At least I have finished the shoes and here is my step by step on how I made them.
I started out with a pair of fairly cheap pull on sneakers. The important thing was to get the big chunky sole. I also wanted a pair of pull on, so I wouldn't have to worry about lacing the shoes or making sure that they would stay on my foot in other ways.
I then covered the shoes in pieces of scrap fabric until I felt that they covered the shoe the way I wanted. I'm not showing you what the pattern looked like, since I was not happy with it. If I remake the shoes I would go about it differently.
I used the orange fabric as a guide and cut out the main fabric. To get the quilted back I sandwiched a layer of wadding between the two pieces of fabric and quilted it down. I made a satin stitch border along the quilted piece.
I used a curved needle to sew the outer fabric to the shoe. This really hurt my fingers and it's not a seam that I'm really proud of, but the fabric shell is attached to the shoe well enough.
I covered the edge of the opening with some cotton tape.
I started with painting all the pieces silver. The buckles were then painted with ivory black in thin layers to let the silver shine through a bit. The clasps were painted with grey, but with the same brush that I had used with the ivory black. Above you can see the difference between the silver at the bottom and the dulled down on the top. I'm really happy with the rusty look. I can really recommend working with ivory black if you want something to look old and rusty. It has a lot of brown in it which gives a really dirty and rusty feeling to the colour, compared to pure black.
The leather for the buckle straps came from an old belt that I bought at an op shop. I took away the backing of the belt to make it softer and easier to use.
I played around with placement and look of the straps, and then I attached the rounded front piece, the main piece that goes over the foot and the bottom fabric strap by sewing them permanently to the shoe. I glued the buckle, with the leather strap, on to the bottom fabric strap. I made sure to test that I could take the shoe on and off without having to adjust that strap before I glued the buckle on. I used contact glue.
The top strap needs to be functional, so that I can open it to get my foot into the shoe. I sewed a piece of velcro to the end of the strap that goes on the inside of the foot. Then I glued the buckle and the leather strap on to the fabric strap. The leather strap and buckle have no function at all since I don't want to strain the plastic buckle at all.
I cut off the top of the boots so I got the height that I wanted and painted the rockets. The rockets are also painted with silver, grey and some ivory black. The rockets were found and bought on etsy. Now comes the part that I really like, the weathering.
I started with taking the shoes to work and and wear them for a full day. They are discrete enough when the buckles are hidden under my work trousers. The dirt at work is too brown though to get the kind of weathering that Enfys Nest has. I brushed off most of the dirt, but that helped to make the fabric look a bit worn, and the dirt had also really dampened the bright white of the soles. The dirt marks were also good for guiding me when I started to go over the books with mainly grey acrylic paint. The paint was watered down and dry brushed on.
The finishing touches were to glue on the rockets with contact glue and darken the edges of the leather straps with more ivory black.
The shoes are finished. I am already thinking about redoing them though. There simply are a bit too many details that are a bit off. At te same time I'm really happy with the general look of the shoes, and they were a lot cheaper than buying a pair of Demobaza Moon Rovers, the kind of shoe that was bought and modified for the original costume. They cost €400, while my shoes probably ended up with a total price tag of $80, and most of that was the price of the shoes and rockets.e
Monday, 24 July 2017
Bellossom hairflowers and shoes
The next step that I finished for my Bellossom has been the hairflowers and shoes. The shoes were really simple.
I found a pair of very cheap fabric shoes in cream with embossed flowers on them. I simply spayed them with a layer of yellow paint and then I took a fabric marker and filled in all the flowers on the shoes.
The hairflowers were a bit more complicated though. This was my first try of using a material called fosshape. It's a feltlike thermoplastic material. Meaning that it feels like fabric, but when you heat it up it becomes hard, it also shrinks and I found it a bit hard to predict how much it would shrink. It depended on the heat.
The last thing I did with the flowers was to fill the centre with some scraps of chiffon to hide the red bottom and make it a bit more organic.
The hairflowers were a bit more complicated though. This was my first try of using a material called fosshape. It's a feltlike thermoplastic material. Meaning that it feels like fabric, but when you heat it up it becomes hard, it also shrinks and I found it a bit hard to predict how much it would shrink. It depended on the heat.
I started with cutting out five petals for each flower.
I sewed the petals together and placed them over a deep plate to give them a bit more shape. I used a heatgun on a low setting to shape the fosshape.

After a while I turned the flower and the deep plate and went over it so that both sides had hardened.
The flowers were harder, but still quite flimsy so I added a piece of buckram in the middle to give it a more stable centre part.
I then tried to mold the centre pod of the flower over a light holder with but it didn't work. As you can see the fosshape started to curl upwards on its own, rather than downwards even if I tried to force it down.
For the second attempt I instead made a cylinder of the fosshape and with the help of a plier I could get it to curl up around the light holder.

Here are the basic flowers, I'm really happy with the right one.
I then used spraypaint to paint the flowers, and finally I simply sewed the yellow centres to the base flower.
After having used fosshape I the best used for it is if you have a frame that you want to have covered, and that will be covered with yet material. The surface of the fosshape, even after having been heated, was still quite fuzzy and felt-like. I did a test flower first where I used an iron to heat it, and then I could get a smoother surface, but I also got markes from the iron. It's very lightweight and there was no problem painting it, but I think it will be very hard to make it into a smooth and clean finish. Like other thermoplastics it sticks to itself when heated, but it doesn't melt into and bond together, and it was not enough to just have the stickyness to keep two pieces of fosshape together. It's possible to sew through the fosshape after it's gotten hard, but use a very thin needle since the holes will be visible. I think the best way of using fosshape is as alighter version of buckram, and instead of using hot water you use a heatgun to shape it.
Then I needed to fasten the flowers to my head somehow. I wanted something that was adjustable and could be used both with a wig, or with a caul or piece of fabric covering the head. Now for NärCon I'm planning on using a green veil, but I also have a green wig for future use. My solution was to use magnets.
I glued two flat pieces of magnetic metal to the underside of the flower.
Then I sewed 2x3 small neodym magnets into a simple cotton headband.
Me wearing the headband.
The flowers are held in Place by the magnets.
Monday, 20 June 2016
Boots for TFA Leia
The vest didn't get finished this weekend, but instead I can show you the boots that I'm going to use for it.
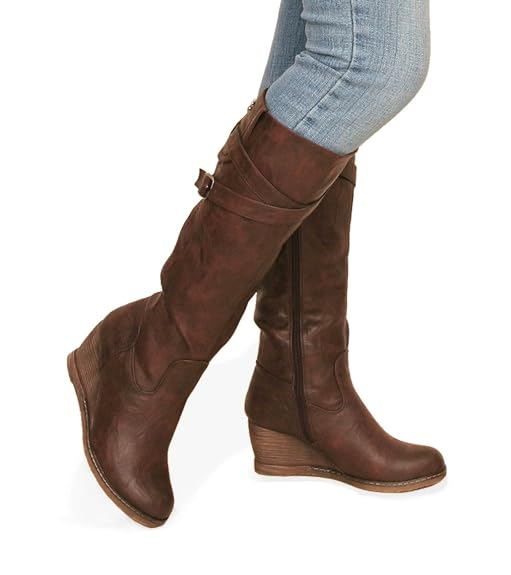
It turned out it wasn't so easy to find a pair of brown wedge heel boots. In the end I setled for these ones. They do have a zipper up the side, but there was no chance that I could find a pair of boots without a zipper that I could get up my calves.
When I tried the boots on for the first time I was worried, they were so tight. I could just get them up, but it hurt a lot. When I took them off I had marks after the straps. Still that made me hopeful that it was the straps and not the bootshaft itself that was too tight. I cut off the straps, and also a flap that was at top of the boot, that also had the benefit of removing the brand name on the boot since it was a metal thing on the flap.
The boots are still tight, but I have no problem getting the leg of the jumpsuit into them. There are some marks where I removed the straps, but I don't think they are too visible. I'm also thinking about finding some kind of brown paint that will work on the wedge heels to make them blend better with the boot itself.
It turned out it wasn't so easy to find a pair of brown wedge heel boots. In the end I setled for these ones. They do have a zipper up the side, but there was no chance that I could find a pair of boots without a zipper that I could get up my calves.
When I tried the boots on for the first time I was worried, they were so tight. I could just get them up, but it hurt a lot. When I took them off I had marks after the straps. Still that made me hopeful that it was the straps and not the bootshaft itself that was too tight. I cut off the straps, and also a flap that was at top of the boot, that also had the benefit of removing the brand name on the boot since it was a metal thing on the flap.
The boots are still tight, but I have no problem getting the leg of the jumpsuit into them. There are some marks where I removed the straps, but I don't think they are too visible. I'm also thinking about finding some kind of brown paint that will work on the wedge heels to make them blend better with the boot itself.
Wednesday, 13 May 2015
They're back!
For years I've oogled the American Duchess shoe shop, and of course followed her blog, knowing that one day I would buy a pair of her shoes. Already from the start I fell in love with the Kensington, and in particular the oxblood Kensingtons, but they've been sold out. Many times I've thought about maybe buying a pair of black Kensington, which would be a lot more practical, or maybe the ivory and dye them myself. Today I checked my facebook during breakfast and this was on my wall.
The Kensington is back in oxblood!
I'm so happy, and decided to buy them straight away. Now I can't wait, even if I'm always nervous about ordering shoes online.
I'm taking the rest of the week off though. Ascencion day is a holiday in Sweden, and I've taken the Friday off from work. I'm off to the mountains with my mother. I won't stay idle though, since I need to make the blouse for my 1900 outfit. I'm really looking forward to going up there, just sitting in the glazed veranda and relax and handsew for a couple of days.
The Kensington is back in oxblood!
I'm so happy, and decided to buy them straight away. Now I can't wait, even if I'm always nervous about ordering shoes online.
I'm taking the rest of the week off though. Ascencion day is a holiday in Sweden, and I've taken the Friday off from work. I'm off to the mountains with my mother. I won't stay idle though, since I need to make the blouse for my 1900 outfit. I'm really looking forward to going up there, just sitting in the glazed veranda and relax and handsew for a couple of days.
Tuesday, 21 October 2014
New shoes from American Duchess
It's time again for a new shoe from American Duchess
Pre-orders are up, and even if it's not really a time period I'm planning to do anything with I would still love to get a pair.
More information can be found here.
Pre-orders are up, and even if it's not really a time period I'm planning to do anything with I would still love to get a pair.
More information can be found here.
Saturday, 5 July 2014
Revolutionary shoes
The last thing I needed to complete my revolutionary outfit was a pair of red shoes. I'd love to get my hands on a pair of red Kensington from American Duchess, but I will have to wait and see if they'll come back. Without any luck in finding accurate shoes, I had to make decent shoes. I'm not going to start with shoemaking, so it was a question of refurbishing a pair of excisting shoes.
These were a pair of beige leather pumps that I picked up from a second hand store in May. The first thing I had to do was dye them red. I found a product called All-in-one leather shoe recolouring/dye stain pigment paint on ebay.
I didn't clean the shoes properly before starting to apply the paint. The first layer was a real disappointment. I used just a thing layer, thinking that it would be good to use as a primer, the result was a blotchy pink shade. You could see every stroke from the inbuilt brush and the shade was horrible. I was ready to give up, especially since the colour wasn't the bright red that I wanted, but decided to try some more layers. For the next layer I took a lot of paint on the brush, it was dripping with paint, and applied generously all over the shoe. That was the trick, all of a sudden the the shoes turned an uniform bright red shade. I had the shoes rest over night and then I added another thick layers just to be sure.
I was very happy with this result. In the original fashion plate the only thing visible is a plain red toe, I felt that it was a bit too plain though. The shoes I had dyed basically looked like just a red pair of pumps and didn't look 18th century enough. I decided to trim them a bit, but not too much. I added a thin black piece of satin ribbon round the opening, using superglue. Then I boxpleated two pieced of grosgrain ribbon. I put a row of stitches down the middle, to keep the pleats in shape, and then I used more superglue to attach them to the front.
This is the final result, after having been worn a full day. You can see that I've missed and put some dye on the inside as well. I didn't put any sealer on the paint. After having worn them a whole day in quite moist conditions, and including dancing on asphalt, I still think they hold up very well. There are some scratches on the toes, but I can touch up on the paint no problem, and the dye hasn't bleed. I don't have any marks on my feet, or my white stockings either. The only bad thing with the shoes are that they are pointier than I'm used to, so my little toes felt quite squeezed after a couple of hours. The heel was very comfortable though.
Just the facts
Materials: one pair of second hand pumps, one bottle of all-in-one leather dye, satin ribbon, grosgrain ribbon.
Cost: $30 (split more or less half between the shoes and the paint)
Year: Late 18th century
How historically accurate is it? Not very, 10% for the general look.
Hours to complete: 2, but a lot of waiting time to let the paint dry
First worn: 28th of June for Silvergruvans Dagar in Sala.
What I've learned with the project
My main lesson was that it isn't hard to dye and trim shoes, and I'm probably going do similar things in the future.
These were a pair of beige leather pumps that I picked up from a second hand store in May. The first thing I had to do was dye them red. I found a product called All-in-one leather shoe recolouring/dye stain pigment paint on ebay.
I didn't clean the shoes properly before starting to apply the paint. The first layer was a real disappointment. I used just a thing layer, thinking that it would be good to use as a primer, the result was a blotchy pink shade. You could see every stroke from the inbuilt brush and the shade was horrible. I was ready to give up, especially since the colour wasn't the bright red that I wanted, but decided to try some more layers. For the next layer I took a lot of paint on the brush, it was dripping with paint, and applied generously all over the shoe. That was the trick, all of a sudden the the shoes turned an uniform bright red shade. I had the shoes rest over night and then I added another thick layers just to be sure.
I was very happy with this result. In the original fashion plate the only thing visible is a plain red toe, I felt that it was a bit too plain though. The shoes I had dyed basically looked like just a red pair of pumps and didn't look 18th century enough. I decided to trim them a bit, but not too much. I added a thin black piece of satin ribbon round the opening, using superglue. Then I boxpleated two pieced of grosgrain ribbon. I put a row of stitches down the middle, to keep the pleats in shape, and then I used more superglue to attach them to the front.
This is the final result, after having been worn a full day. You can see that I've missed and put some dye on the inside as well. I didn't put any sealer on the paint. After having worn them a whole day in quite moist conditions, and including dancing on asphalt, I still think they hold up very well. There are some scratches on the toes, but I can touch up on the paint no problem, and the dye hasn't bleed. I don't have any marks on my feet, or my white stockings either. The only bad thing with the shoes are that they are pointier than I'm used to, so my little toes felt quite squeezed after a couple of hours. The heel was very comfortable though.
Just the facts
Materials: one pair of second hand pumps, one bottle of all-in-one leather dye, satin ribbon, grosgrain ribbon.
Cost: $30 (split more or less half between the shoes and the paint)
Year: Late 18th century
How historically accurate is it? Not very, 10% for the general look.
Hours to complete: 2, but a lot of waiting time to let the paint dry
First worn: 28th of June for Silvergruvans Dagar in Sala.
What I've learned with the project
My main lesson was that it isn't hard to dye and trim shoes, and I'm probably going do similar things in the future.
Tuesday, 20 May 2014
Some things I picked up
I was only supposed to buy some red sewing thread so that I could finish my hat, but on the way to the fabric shop I went in to the second hand store and found a nice pair of shoes. Then I decided to go to the quilt shop, rather than the more central curtain store. I'm calling them the quilt store and the fabric store since that's basically the kind of fabrics that they carry. The quilt shop doesn't claim to be anything else either. What I don't like with these shops is that it's impossible to buy any fabrics that are actually usable for making clothes. In the quilt shop there is quite a nice selections of quilting cottons though, including cottons with nice historical prints. When I went there it also happened that a large section was on sale, and even if it's not super cheap compared to when I read posts from other people, the cost was around $10/m, which is cheap around here.
For the shoes I'm going to try and dye them red, I've already bought the leather dye. I really want a pair of bright red shoes for my revolutionary dress, and I dream about a pair of red Kensingtons from American Duchess, but since they aren't available at the moment I will try with these. They are a bit on the big side, but that means that I shouldn't have any problems wearing a thin knitted stocking with them.
The fabric is screaming pierrot jacket towards me, but I only have two meters so I'm not sure that will be enough to make that kind of jacket. I could have bought another meter of the fabric, but I want to challenge myself and actually make things that doesn't need so much fabric. We will so, for now it goes into the stash.
For the shoes I'm going to try and dye them red, I've already bought the leather dye. I really want a pair of bright red shoes for my revolutionary dress, and I dream about a pair of red Kensingtons from American Duchess, but since they aren't available at the moment I will try with these. They are a bit on the big side, but that means that I shouldn't have any problems wearing a thin knitted stocking with them.
The fabric is screaming pierrot jacket towards me, but I only have two meters so I'm not sure that will be enough to make that kind of jacket. I could have bought another meter of the fabric, but I want to challenge myself and actually make things that doesn't need so much fabric. We will so, for now it goes into the stash.
Wednesday, 26 February 2014
American Duchess: Nankeen regency boots giveaway
American Duchess has just announced her new regency style boot "Nankeen", and there's a giveaway.
Click here for your chance to enter
These are my most favorite boots from her so far, and in fact I'm more interested in using them for everyday wear than for regency recreations, since that's not a style I'm really interested, or feel comfortable in.
I'm almost done for the HSF challenge 4, it's a new pair of stays. The only thing left is the binding, but it's killing my hands as usual, and I also happen to work around 16 hours/day this week. That's what you get for not taking a holiday and instead trying to combine your everyday work with volunteering for the organizing of a world cup competition in ski jumping.
Click here for your chance to enter
These are my most favorite boots from her so far, and in fact I'm more interested in using them for everyday wear than for regency recreations, since that's not a style I'm really interested, or feel comfortable in.
I'm almost done for the HSF challenge 4, it's a new pair of stays. The only thing left is the binding, but it's killing my hands as usual, and I also happen to work around 16 hours/day this week. That's what you get for not taking a holiday and instead trying to combine your everyday work with volunteering for the organizing of a world cup competition in ski jumping.
Friday, 27 December 2013
cheap 18th century shoes
When doing historical costuming, it's always so hard to find shoes. There are quite a few wonderful shoemakers out there, but the prices are what you can expect from artisans doing a specialized craft. I plan on buying a pair of shoes from American Duchess one day, those shoes aren't too expensive, but the freight and customs double the final price. For my first events I used the pair of shoes I wear with my folk costume, but this summer I got to know all the things that are wrong with them. They are also a bit clumsy. Throughout the summer and autumn I was on the lookout for a suitable pair of shoes, whenever I visited the local second hand store. I wanted a pair of black or red shoes, and I mostly looked at the shape of the heel, I wanted something at least close to a classic pompadour heel.
One day I stumbled upon these for 125 SEK.They had an ugly plastic buckle, but I started with removing that one. Then I discovered that the straps were asymmetric, one long and one short.
I cut off a piece of the too long strap, and simply used superglue to attach it to the shorter one. Then I folded both straps into the shoe and attached them to the side with more superglue.
I threaded some nice ribbon in the loops that were formed from the straps, and voilà a pair of decent 18th century shoes. I can also change the ribbons whenever I want to match whatever I'm wearing.
There are no pics of the heels, and I like them because of the shape, but it's visible that they are built up from several layers of plastic. Still I don't think anyone is going to crawl on their knees and judge the shoes that closely. They still look better than my folk costume shoes toegether with my historical gowns.
| original shoe |
One day I stumbled upon these for 125 SEK.They had an ugly plastic buckle, but I started with removing that one. Then I discovered that the straps were asymmetric, one long and one short.
| Straps folded |
I cut off a piece of the too long strap, and simply used superglue to attach it to the shorter one. Then I folded both straps into the shoe and attached them to the side with more superglue.
I threaded some nice ribbon in the loops that were formed from the straps, and voilà a pair of decent 18th century shoes. I can also change the ribbons whenever I want to match whatever I'm wearing.
There are no pics of the heels, and I like them because of the shape, but it's visible that they are built up from several layers of plastic. Still I don't think anyone is going to crawl on their knees and judge the shoes that closely. They still look better than my folk costume shoes toegether with my historical gowns.
Subscribe to:
Posts (Atom)