Showing posts with label medieval. Show all posts

Thursday, 5 June 2025

Leksand medieval fair

 Over Ascension day it was the Medieval fair in Leksand and me and my 16th century group in Dalarna were there. For the first time my husband also joined us and slept in a tent. I didn't bring any new clothes, instead this year the focus was on getting the interior of the tent more practical.


This is one half of the tent. The new addition was that I had bought a big basket, where you could put your clothes when undressing, that way they were all in the same spot instead of being spread all over the floor.

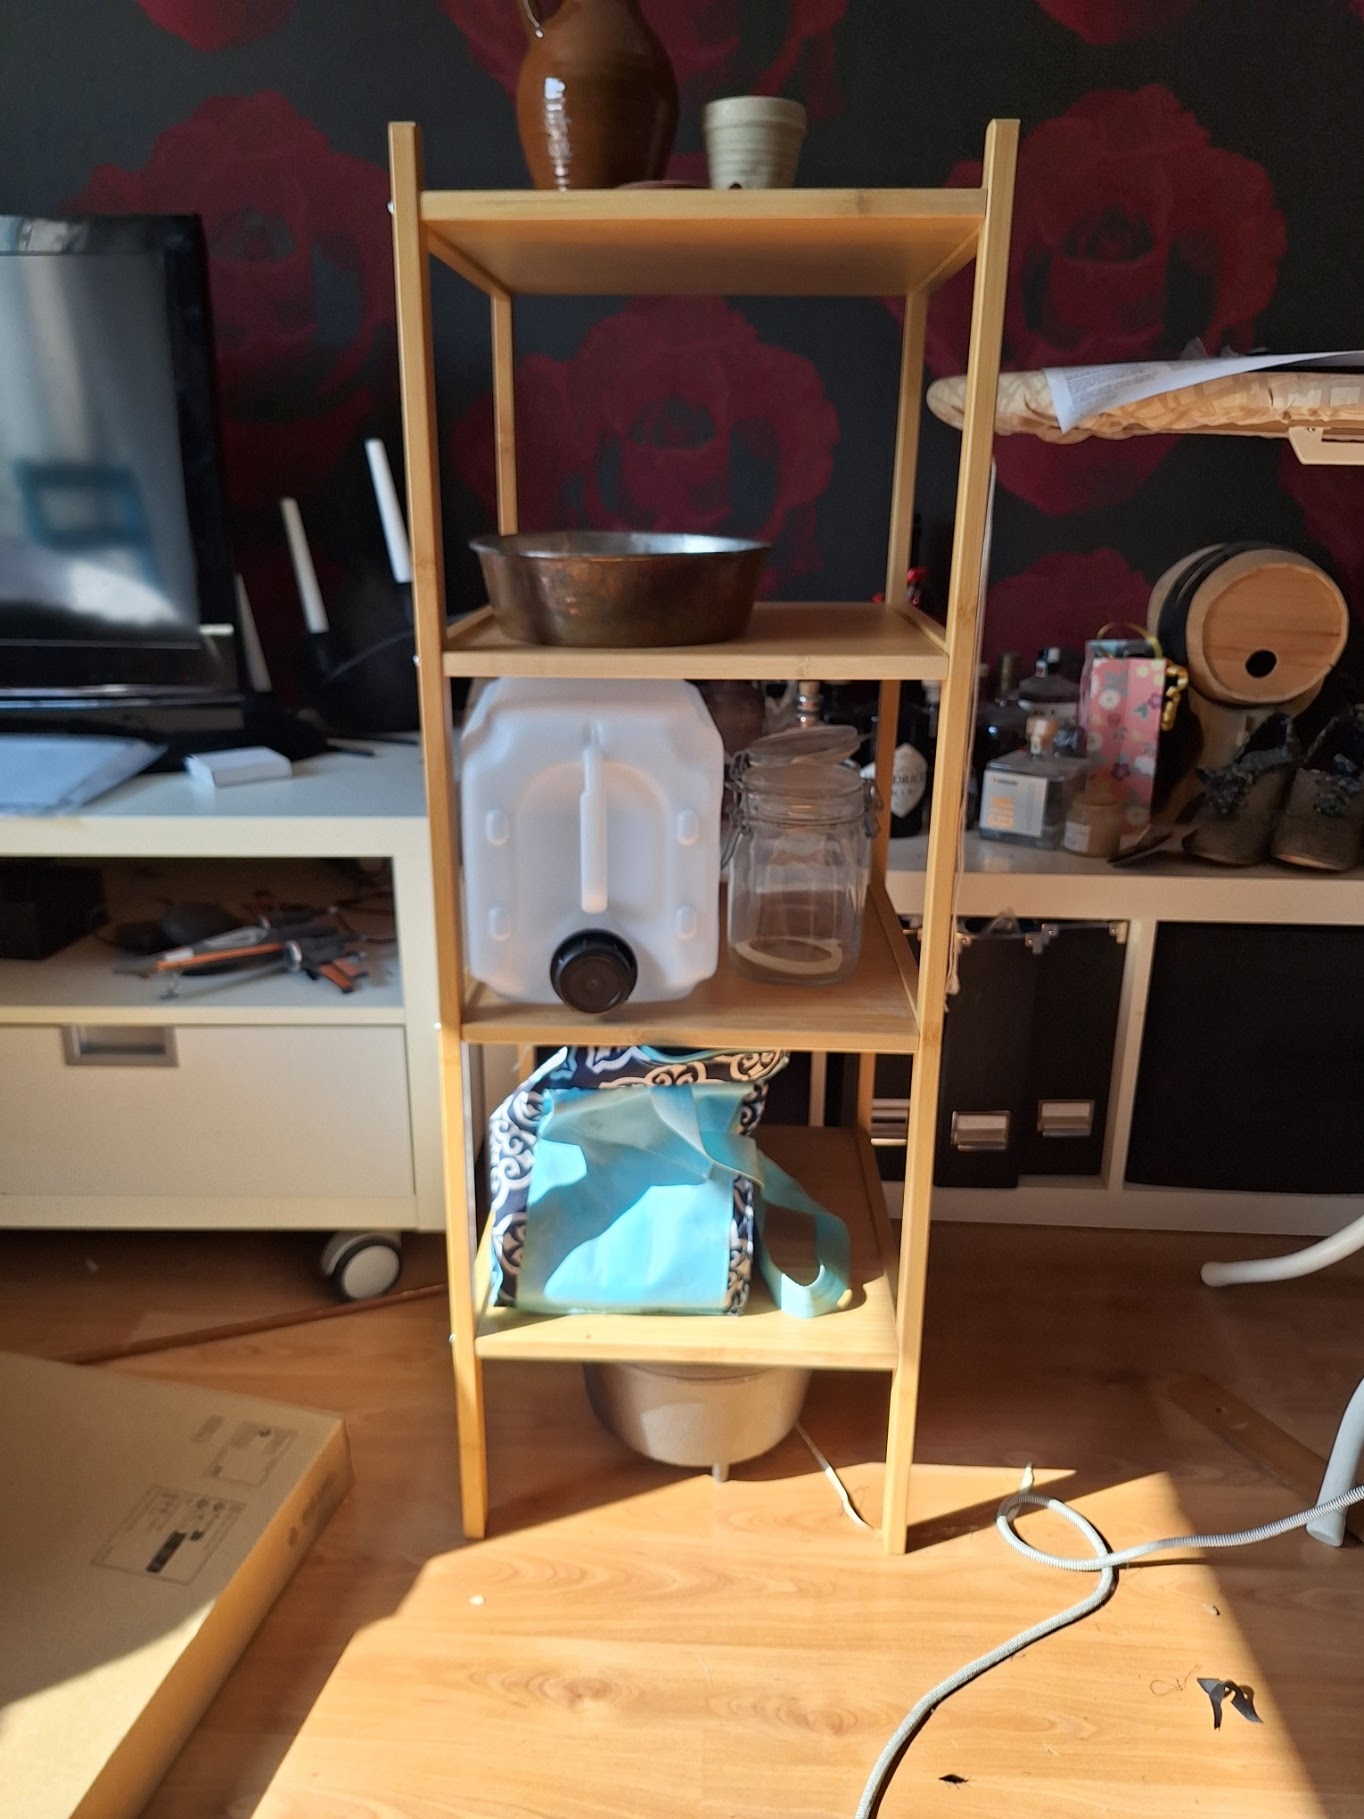
The other part of the tent and I am so happy with my new pantry/food storage.

It started out as this bathroom shelf (Råggrund from IKEA). I then covered the sides in a linen curtain. In the shelves I could have everything in plastic containers with good lids to keep bugs and other stuff out. The top pegs in the corners also worked great to hang aprons and handkerchiefs from. It's not historically correct in any way, more of a LARP standard, but it worked and I'm happy with it. I can't do carpentry work, but I am good at assembing IKEA furniture and sewing, so I used the skills I have to make something that cleared up a lot of floor space in the tent and that felt a lot more hygienic.


I was so happy that my husband enjoyed the experience, and he said that he slept like a baby. One thing is sure as much as I like my friend Emma, who I usually share the bed with, it was nice to have a husband (and a lot of wool blankets) to snuggle up to when the temperature dropped to around 4 degrees in the night. The trick to keep the heat was one duvet, four wool blankets a hot water bottle between us, and to sleep in a modern but warm hoodie and flanell trousers set.

Much of my time was spent cooking food. I usually use Leksand to try some medieval recipes that I've made in my modern kitchen, before I make them in a larger scale in Visby. This time there were some success - my homemade gnocchi, chicken in cumin sauce and the fish stew, and some total failures - when I tried to make cheese with rennet and it refused to curdle. 

Keep an eye out on my historical food blog for more information about the food.


Sunday, 10 December 2023

HSM23 Challenge 12 - paired to perfection - a pair of medieval mittens

 With some time at home and some scrap wool I decided that I would do a pair of medieval mittens, since that would also help me complete one of the HSM challenges.

A lot of image sources for medieval mittens can be found here and Margaret Roe Designs also has a write-up and pattern for medieval mittens. Me being me I also decided that just a simple  mitten would be too boring and easy, so I decided to make a three-fingered set of mittens. Also since I know from my modern winterwear that I really like the three-fingered design a lot, more nimble than a simple mitten but still warmer than gloves with individual fingers.

I started out with simply drawing an outline of my hand on white scrap fabric. (it's the table cloths from my wedding that I've kept as scrap fabric for making patterns and muslins.)

I have extremely short fingers, after all I forced my violin teacher to teach me differently since my reach was so much smaller than most people. At this time I also thought that I was going to make the mittens for my husband so I added quite a lot of extra length.

I made a thumb piece and a slit in the palm to add it. As you can see this first version of the thumb didn't work. It was so narrow that I could hardly get my thumb into it, and you have the big wrinkle going from the split of the two fingers and towards the thumb, there was obviously a lot strain there.

The new version of the thumb was a lot wider, and I moved the slit in towards more of the palm of the hand. With this version  I was ready to cut out the proper fabric. The fabric that I used is a very green wool, I think the colour is too bright to really feel historical and it is kind of a stiff fabric, so I treat it as my "worst" wool fabric, but good for this kind of small experimental projects.


Each mitten consists of four pieces, a front and back main piece and two thumbpieces. The thumb was made more narrow from the pattern. All pieces were joined together with whip stitches, and I started with the thumb before sewing the main pieces together.


Along the way I kept adjusting the size, so I kept taking the fingers in and make them shorter.


Here are the scrap that I cut off from the mittens while working on them.


I added two fabric loops on each mitten so that I could pull a string through to tighten the gloves. I had made them fairly wide so that I could pull them outside of my cuffs on my clothes, but I wanted them to be tight around the wrist so that they fall off too easily. 


And this is me wearing the mittens, while holding a cup of hot, spiced beer

What the item is: A pair of medieval mittens
How it fits the challenge: it is a pair of mittens
Material: Wool fabric
Pattern: My own
Year: Late Middle Ages
Notions: thread, cotton string
How historically accurate is it? Accurate pattern, but the material is decent but not totally accurate so somewhere around 50%
Hours to complete: 4 hours ( I am a slow handsewer)
First worn: At a Christmas market on December 10th
Total cost: All made from stash, but bought new around $10.


Sunday, 30 July 2023

Beach 2023 (or 1523)

 As I am heading off for Medieval Week in Visby again I realized that I needed something for bathing. The beach in Visby is honestly not a bathing beach, but it's the water and it's nice to go down and wash off. It's very public, so something to wear is essential. Last year I simply had a bikini, and when going down and up I pulled one of my regular shift over it to cover up, and look a bit more historical. 

Bathing shift were a thing in the Middle Ages, it's easy to google and find a lot of examples of them. Now most of them looks to be fairly tight around the bust, and from quite a sheer fabric. I decided to draw inspiration from them, but make a modern version.

I wanted to be able to pull the shift both down and up, so for that reason the shift is quite loose around the top, so I can pull it down over my bottom and hips. The straps have snaps, so when I want to get changed to what I'm going to wear I can undo the straps, pull the regular shift over me, and then remove the bathing shift by pulling it down. 

It's also quite a bit shorter than the images of the medieval bathing shifts, they were shorter, but not that short. I would say this is not historically accurate, but I can move around in the camp in it, and I can leave it to dry when we have the camp open for visitors. It is also totally machine sewn, since it wasn't a plan to make it historically accurate.

The top has a draw string as well as straps.


The straps are fastened with very modern snaps.


The pattern is really just a tube of fabric, and I have added a front and back gore to make it wider over the hips. 


Saturday, 4 September 2021

Fingerloop braid vs. lucet cord

 I was in need of a string and since I didn't have anything better to do I decided to do a comparison between making a fingerloop braid and a lucet cord.

They are both techniques that have been used historically to make strings. Lucet forks have been found from the viking age. Fingerloop braiding can be seen in medieval manuscripts and there are extant fingerloop braids from the 15th century and onwards. I have definitely seen discussions on which kind of cord is the most accurate for a specific time period, but I don't know enough of it myself. I have used both kinds of cords, especially for lacing my kirtles.

To learn how to fingerbraid I watched this video from Morgan Donner. 

Here is a video tutorial on how to make lucet cord. To make a lucet cord you must have a tool. Lucet forks can be bought, and they are pretty common at viking/medieval markets, but you can make do with something as simple as a plastic fork that you remove the middle parts of so you end up with just the two outer pegs.

I used the same yarn for both strings, a wool yarn I picked up in Visby when I had to cut off the lacing to my kirtle and needed to make a new lacing cord.


I first made the fingerloop braid and it took me around 40 minutes, I then made a lucet cord for 40 minutes to see how long it would get.

As you can see I'm much faster with the fingerloop braid than the lucet. The fingerloop braid ended up 66 cm and the lucet cord 18 cm. The fingerloop is thicker at 3 mm while the lucet cord is just 1,5 mm. They have about the same stretch in them, the lucet cord is a bit more springy but it's not a big difference.

For me the main difference is how long I want the cord to be. With fingerloop braiding you worked with fixed loops, and for myself I can't make make a braid that is longer than my arms can stretch it out while braiding. The 66 cm is how long I can make it comfortably. In Visby me and Emma worked a braid together and then we could make a lot longer cord, but it also took quite some time. The lucet cord can be worked continously until I have a cord that is exactly how long I want it. I can also put down the lucet and pick it up later, while with the fingerloop braiding I have to finish the braid in one session. That's not really a problem nowadays when I've gotten quite fast with the braiding. 

There is also a difference if the yarn or string that is used breaks. With fingerloop braiding it is possible to tie the ends together and continue, even if it will be a bit uncomfortable with one loop being smaller than the other. If the string for the lucet breaks I can't do that. On the other hand I can just unravel the lucet cord without a problem and restart. 

So there you have a comparison. I prefer to make fingerloop braids nowadays, unless I need a really long cord. I have been nown to bring the lucet with me when doing other stuff though so if I want something to just keep my hands busy that's a simple craft too bring along.


Thursday, 5 August 2021

What I've been working on

 This summer I knew that I was going to go to Medieval Week in Visby, and that I needed some stuff. I'm leaving on Saturday, and to be honest I have not finished anything, but I have things that are in various states of completion.

The most finished thing is this simple kirtle. It's a standard square pieces with gores, and I'm mostly using the 14th century as inspiration. I have not had time to fell the seams or hem it though, I'm still bringing it with me to use as a nightgown so I don't have to worry about freezing.

I wanted a new hood to wear over my wulsthaube, but I also found an embroidery challenge that I wanted to do. I have a long way to go until I have finished the blackwork, but I'm bringing it with me to work on during the week. I will have to stick with my old hood or just a a veil over the wulst.

I have also cut up an old shift that I'm hoping to sew together in a new version. This one I'm actually hoping to finish until I leave on Saturday.

I will also try to make separate posts about all the projects once they are totally finished.


Friday, 30 October 2020

HSM Challenge 10 - get crafty

 This is the October challenge, so it felt good to actually finish it in the right month. This was also a total 180 degrees from my big Celebration project. This was small, cheap and quick.

OctoberGet Crafty: Make use of your own skills or learn a new one to make something from scratch rather than buy material. The possibilities for learning and applying new skills and techniques are endless. Lace, pleated self-fabric trim, knotted fly trim, embroidery, dyeing, knitting your own corset laces, hand painting your own fabric…

I decided to make cloth buttons, so that I don't have to rely on bought hooks and eyes for closure of my 16th century things. 


 The fabric for the buttons started out as a wool skirt I found in a second hand store. In 2016 it was turned into my first dreadful attempt at a 16th century teller barret, and quick guards for my undergown to turn more into an outer garment. I didn't have an outer gown at the time.

Back in 2016
I never used the hat again, and earlier this year I cut it up. There was still pretty large pieces of wool, so I've kept them for small things. Like buttons. The buttons are made from this tutorial. When I use them I will probably cover them with thread, but I won't do that until I know what I'm going to use them for, so that I can match them to the project. For now they are going into the regular button box.

The Challenge: October - get crafty

Material: scraps of reen wool

Pattern:  this tutorial

Year: medieval

Notions: waxed linen thread

How historically accurate is it? They are so basic so they are definitely very accurate, 95% or so

Hours to complete: less than an hour

First worn: not yet

Total cost: all from stash, but probably less than $5


Sunday, 30 August 2020

Fingerloop braiding

 Over the summer I have realized that the most correct cord for me to use on my 16th century gowns should be made by fingerloop braiding. Lucet cors had gone out of fashion by that time. I have tried to follow instructions on fingerloop braiding, but I hadn't understood them. Then I found this video about an easier way of doing fingerloop braiding, and it really was easy.


I think I picked up the movement of the fingers within just a few turns, and then I could do it while watching stuff on the computer.


I worked in my kitchen. My kitchen table turned out to be perfect to create the loops around it's ending, and I could tie the loops to my kitchen aid. I could also put the loops down on the table, and then continue to pick them up later. The little metal thingies were used when I stopped overnight and I wanted to make it easier to keep the loops apart.

Now one thing I noticed straight away is that fingerloop braiding hurts my shoulders. I get this after a while when doing lucet cords as well, but then only in one shoulder. Fingerloop braiding is slow and I would not be able to do it all in one go, due to the shoulder pain.


For this test cord I used heavy linen thread. It wore out and one of the loops broke. Thankfully it broke at the top of the loop, so when I tied it together the knot didn't end up in the middle of the braid. The knot made this loop shorter than the others, and it turned a bit fiddlier to work after that. The video tutorial had the same problem, so you can see how she worked it out.


I continued, but after a while the knot on the broken loop broke as well, and since this was a test cord I didn't feel like continuing. So this is the finished fingerloop braid. To finish it I took the bows and tied them into a simple overhand knot.

So my impressions of fingerloop braiding compared to lucet cord.

It was easier to pick up this method of fingerbraiding than it was for me to learn to lucet. The finished fingerbraid cord is very strong and stiff, while lucet gives a cord that is much springier. 

It is possible to do a very long lucet cord, while the fingerloop braid is restricted to how far you can stretch your arms out to tighten then braid. If you have a friend that can help you it is possible to make longer cords. I don't think it's a coincidence that a lot of medieval manuscripts that show fingerbraiding show two people working together.

When doing lucet cord it's possible to bring it with you, I've been working my lucet while watching sports and listening to lectures, while the fingerloop braid needs a fixed spot when you work it.

With fingerloop braiding it's possible to work with colours and different techniques to make beautiful patterns, and even eyelets, while with lucet you are basically stuck with just one piece of string.

This very thin cord that I made is thin enough that I think there would be a risk for it to cut into the fabric if I used it to lace my gowns and kirtles. I need to find a yarn or thread that is a bit thicker than my linen thread, and I need to find a friend that can help me make a really long cord for the lacing, but I definitely think if I get those then I rather use fingerloop braiding than lucet for my cords.


Monday, 27 July 2020

Medieval baking

Bread is an interesting subject. For the medieval person the saying "our daily bread" was totally natural, most of the energy intake simply came from bread. In essence bread is simply flour and water that's been heated up to become firm. There are so many variation on bread though, and recently I got curious about experimenting with medieval bread baking. In Swedish original sources, like food inventories at castles, there is always a difference between "herrebröd" - the lords' bread and "svennebröd" - the servants bread. In general it says that the finer bread was made from sifted flour, while the servants had to make do with bread from coarse and unsifted flour. But what kind of flour did they use?

Since I live in the middle of Sweden, well this is where it gets tricky if I want to recreate a bread that could have been eaten in my region. Wheat was a luxury, due to the climate only small amounts of wheat were harvested, and that was in the south part of Sweden. Barley was the most common crop in the north of Sweden well into the 20th century, since it's possible to grow it here. Rye started to make inroads into the medieval farms, but when looking it up it seems as if rye was harvested up to to around Lake Mälardalen. The people working at Västerås castle in the first decades of the 16th century were mostly supplied with bread made from rye. It is known that the area around Falun mine, so where I live, had to import food to supply the comparatively large population here, and my guess is that even if barley was harvested locally it was mostly rye that was imported.

So in the choice of flour for my medieval bread I could use wheat, rye or barley. They have very different qualities when it comes to baking bread though. The region where I live is still sometimes called the "crisp bread belt", the reason is simple barely can't be used to make nice soft loafs of bread, instead you make the thin and hard crisp bread from it. Since the inventory from Västerås talks about rye and wheat, I decided to work with those flours instead.

regular wheat flour, a mix of sifted rye and wheat flour, coarse rye flour
In order for the bread to raise you also need a leavening agent. All the modern cookbooks that offer medieval recipes that I've seen talk about the use of sourdough for the leavening in the Middle Ages in the Nordic countries. It is worth noting that there might be a lot of geographical differences within Europe as to what kind of leavning to use. Even if it's later Townsends has an episode on 18th century cooking talking about how sourdough was not used in the references that they have found, which are mainly in English, at the same time though when reading the Kajsa Warg's "Hielpreda i hushållet" in Swedisn from the 18th century she talks about making bread from sourdough. My secondary sources say that the kind of yeast you use for beer or baking yeast was not available here. I decided to go for sourdough, and thankfully you can find sourdough startes in some largers supermarkets so I could skip that step.


On the back of the package of the sourdough starter there was a recipe, I used that quantty of water, but nothing else from the recipe. Most modern recipes, even those saying they are historical, add extra fresh yeast to the dough, but I went with only the sourdough. The top metallic bowl is for the servants' bread. For that I simply just used the coarse rye flour, water and 1/3 of the sourdough packet. The dough was really hard and compact, no matter how much I needed it. This is what I suspected, since the rye doesn't have the same gluten content that makes wheat flour so great for baking.

For the lords' bread I used the mix of 60 wheat flor and 40 sifted rye flour that you can buy (rågsikt) and 2/3 of the sourdough. Inspired by a recipe from a Danish cookbook from 1616 (transcribed into both Danish and English) that makes a bread with sourdough and mentions several spices I also added ground aniseed and caraway seeds and about a table spoon of honey. This behaved much more like a regular bread dough and it was nice and soft to knead it and feel it starting to become elastic.

Both doughs were set to raise for an hour, then turned and left for another hour. Then it was time to turn them into bread shapes. The servants bread was still very dense and compact, it hadn't raised at all. So I baked it into a fairly thin round shape, similar to a crisp bread but it was so dense that I couldn't get it quite as flat as a crisp bread. The lords' bread was baked into four smaller round shapes.

For the baking I used 200 degrees for the servants's bread, for the lords' bread I put it into the oven at 250 degrees to form a very hard crust and then lowered the temperature to around 220. Both breads were soft and nice straight from the oven when they were warm, but got hard and chewy when they got cold. The people who tasted it claimed that both tasted really good, especially with butter on them. There were jokes about the servants' bread, similarities with the Discworld dwarf bread and possible use of it as a projectile weapon.


The lords' bread is very similar to what I imagine a medieval daily bread would be. It can be used as a plate, it can be softened with liquids and used to scoop up soups and drippings.  It is also pretty similar to the fairly flat shape of bread you can see in medieval images.

Even if I'm happy with the lords' bread, I don't think the servants' bread is something that would have been handed out from a castle kitchen. Did they maybe add in some wheat flour to the coarse rye, just to make it easier to bake? Or did they use a finer rye flour than I did, to make it more similar to a modern dark rye bread? For now I have a lot of flour in my pantry, but I would like to do this kind of bake again and then I would switch the premade wheat/rye mixed flour with my own mix of spelt/dinkel wheat, which is closer to the medieval wheat, and fine rye flour. And I would try and make the servants' bread from fine rye flour instead of coarse rye flour.

The inspiration for the bread baking came from an article about the food inventories of Västerås castle 1517-1520, and I have written more about that article over at Historiekullan (in Swedish)

Sunday, 29 December 2019

HSM2019 challenge 12 - on a shoestring

I haven't done many HSM challenges this year, but I really wanted to finish up the year with one. The theme for challenge 12 was
"On a shoestring - It’s an expensive time of year, so make an item on a tight budget (say, under $15, or less than you’d spend on a reasonable priced takeaway meal for one person in your country "
Shouldn't be too hard to come up with something, right. I had scraps of wool from left from the year, and small enough that they wouldn't end up costing more than the allowed budget. I just couldn't come up with anything though, Finally yesterday, with a bit of panic, I remembered that I hadn't finished the cords for attaching the sleeves to my mustard kirtle. When I wore it in August I had pinned the sleeves on, but I had decided to make eyelets and tie them on with cords. I had made one cord back in the autumn, but I needed a pair, so I sat down watched the Witcher on Netflix and finished the second cord.


The cords are lucet cords made of a brown wool yarn. I bought a lucet fork (slynggaffel) many years ago, and now I finally feel like I have gotten the hand of making lucet cords. There are a lot of video tutorials for lucet cords out there, but I felt that I got the hang of it when I follwed this written tutorial instead. The one problem I have with the technique is that if I make a mistake I either have to unravel everything I've done, or end up with clear cap in the cord. That happened on one of the strings, but I decided to live with it and if it breaks I can always make a new one. One thing to remember with lucet cords is that they are springy, they are still very strong though and work fine for lacing.

What the item is: - a pair of cords
How it fits the challenge: They are very cheap, and lucet cords were used in the Middle Ages.
Material: A couple of meters of wool yarn
Pattern: None, but I followed this tutorial - https://feltmagnet.com/textiles-sewing/How-to-use-a-lucet
Year: Middle Ages
Notions: - 
How historically accurate is it? I'm not sure how the yarn corresponds to the yarn that was used in the Middle Ages, but the technique is accurate. So maybe 80%
Hours to complete: 6 (3 for each cord - probably faster if you don't watch TV at the same time)
First worn: not yet
Total cost: The yarn was from my stash, but I checked and similar yarns go for around $3 for a whole ball of yarn.

Sunday, 2 June 2019

Leksand Medieval Fair 2019

Over the weekend I was off to the Medieval Fair in Leksand. Just like last year I got to borrow a tent so that I could sleep over. Unlike last year when it was a heatwave the weather was really bad for two of the days and the nights were freezing. Friday and Sunday had great weather though.

I had watched the weather forecast and had to to come up with things to simply survive the weekend. I had planned to wear just my 1520's outfit, but I packed all my outfits to make sure that I had as much clothes as possible, I also packed the cape and fur collar from my Enfys Nest costume, basically I packed everything that I could think of that was made of wool and fur.

I arrived on Thursday afternoon, Monika and Niklas had arrived on Wednesday and set up the camp. They have a really nice and big tent, with a heater, so even if the weather was wet and rainy we had a cozy evening in their tent. Their tent basically served as our living room for the whole weekend.

Twirlng in my Enfys cape when it was only drizzling
Even if the evening was cozy, when I went to bed in my tent it was cold, really cold. Officially the temperature dropped to 2 C, but I wouldn't be too surprised if it touch down on freezing. I had brought as many wool blankets as possible, I tried to wrap myself in all my clothes, but I just couldn't be warm enough to sleep. This was something that happened all nights, even if it wasn't as cold as that first night. I ended up sleeping in my full viking outfit, including my Skjöldehamn hood, but I am exhausted after three nights of just a couple of hours sleep.

Anyway, Friday was windy but sunny and warmer. Mattias, Ann-Sofie and Tom arrived so we had a nice camp. I went around to do some shopping in the fair, mostly picking up stuff like linen and silk thread, but I was really happy to find a medieval style cooking knife. I also attended the medieval fashion show, and was asked to be part of it to represent the early 16th century, since the people doing it stop in the 15th century. I took part in all the remaining fashion shows over the weekend.

On Friday I cooked my chicken in almond milk with grapes, now with some added wine into the sauce. I made the camp version where I use pre-grilled chicken instead of handling raw chicken.

Relaxing in our camp. ladies are sewing the men are just sitting there.

Chicken in almond milk, cooked on the fire.
Saturday was rainy, but not as bad as Thursday. The rain mostly varied between light rain and a drizzle, with some heavier showers. We made sure to start a fire in the morning and kept it going throughout the day, since we realized it would be hard to light it again in the rain. For lunch we made traditional pea soup, which was warm and nice when it was wet and cold outside.


Pea soup with pork

It's convenient with a fair near the town centre, it gives some fun photos of time travellers as well

In th evening we made so much food, a delicious elk stew made from meat that Ann-Sofie had brought. We also had a nice evening with some neighbours that we invited in when we realized we had too much food. They were really grateful since they didn't feel like trying to get a fire going after a full rainy day.

Monika had prepared a really nice kitchen bench where you could prepare all the food, here I am preparing baked apples for dessert.

Sunday was a perfect early summers day. I even got a chance to finally see the tourney, after only hearing the dialogue from it for two years. It was nice to go back though and I'm really looking forward to sleeping a full night in a warm bed.


Wednesday, 1 May 2019

Medieval chicken with almonds and grapes

Today is the first of May and I have invited my mother, sister, and brother-in-law to a spring dinner. I'm going to serve a medieval recipe of chicken that I've worked on for the last year. The first time I did it I made it as a filling for pies that I brought to Tuna Ting. This recipe is more of a stew, if you want it as a filling you need to thicken it more, or simply fish out the meat and vegetables from the broth.


This recipe is not based on a particular recipe from a certain cookbook. Almonds and almond milk were really popular in the time period and variations of cooking meat in almond milk comes up in several cookbooks. The combination of almonds and grapes is still found around the Mediterranean. Today when non-dairy milk products have become a lot more common it is fun to use them when cooking medieval food. Make sure that you get natural and and unsweetened almond milk though. Of course for the most historically accurate version you can make the almond milk yourself. 

This is a recipe for the upper class, and would have been a real rarity up in the North, where you don't exactly have a lot of fresh grapes. It is more likely that they would have used zante currants (korinter) instead if trying to make it up here. If you want to make it even more luxurious add some saffron to it.

This is the base recipe, I will give you vegetarian/vegan and camp-friendly versions at the end.

Ingredients

700 g chicken cut in cubes
4 schalottes, finely chopped
2 cloves of garlic, finely chopped
2-3 handfulls of green grapes
500-600 ml of almond milk.
2-3 egg yolks
fat to fry in.

Fry the schalottes and garlic until they are shiny and translucent, but not brown. Add the chicken and let it get some colour, but don't brown it. Add the almond milk and the grapes and let it simmer until the chicken is cooked through. Whisk the egg yolks in a bowl, add a 100-200 ml of the broth and whisk it in, then add the egg mixture to the main stew and whisk while heating it. The eggs add thickness, if it doesn't thicken enough you can use flour or starch to thicken it, preferably wheat.

Add some fresh grapes on top when you serve it.

Serve with: For a medieval serving I serve it with bread, rice or roasted turnips (majrovor) and some pickled onions.

Vegetarian and vegan versions
This is a recipe that is easy to make vegetarian or vegan versions of. I have switched the chicken for turnips, and that gives it a stronger flavour. Simply cook the turnips until just through, there should be some resistance to them and not a mush. For the vegan version you need to thicken it without the eggs, either with modern starches or if you can find wheat starch. Regular wheat flour can also be used as a thickening agent.

At a camp
Everytime you work with chicken you have to think about the hygiene. In the summer and in a place where you don't have access to a dishwasher, or at least a lot of hot water, it's possible to substitute the raw chicken for pre-grilled chicken. Fry the onions, add the almond milk, bring it to a boil and add the the egg yolks. As a final step take the pre-cocked chicken, remove any skin if it had one, shred it and put it in the almond sauce.

Thursday, 29 November 2018

HSM challenge 11 - an ugly leather pouch

During the summer I made three different bags, two of them historical. When the HSM November challenge: bags and purses rolled along I really didn't have any inspiration at all to make yet another bag. Still I didn't want to fail a challenge when there were only two left of the year. When I organized my attic storage I had found some scrap pieces of leather, and since I need a leather pouch to wear on my belt for my 16th century outfits I decided to try and make a leather pouch or bag.

In my mind I wanted something like this woman has hanging from her belt.


Soon I realized that I wouldn't be able to do that though. The scrap pieces of leather that I had were too stiff and also I didn't have enough to make that kind of round bag with extra pockets. I was down to basically just cutting out as much of the leather as possible and assemble it into a more generic viking/medieval pouch.

This was the size that I could get out. It was based on me wanting a pouch that was big enough to hold my phone and my insulin pen, and since the pen is quite long the pouch had to be long as well. I also cut out a long strip of fabric to use as the side and bottom of the pouch.

I first sewed on the strap that is going to keep the bag on the belt. Here I discovered how hard and difficult it is to sew on leather, especially if you don't have proper leather needles. For the rest of the bag I used an awl to first make the holes before going through them with a needle. I used waxed linen thread for the sewing.

It was also a lot easier when I started using my curved upholstery needle, compared to using a straight needle.

Once I had sewed all the pieces together I wet the bag and turned it right side out. I left it to dry with a lot of plastic bags inside, so that it would keep its shape properly.

After this I discovered that I didn't have enough leather to make a flap to close the bag. Thankfully Niklas in Cosplay Dalarna gave me a piece so that I could finish the bag.

When all was done I oiled the leather with olive oil to darken it.


For the closure I used a piece of scrap leather, fastened it to the front and cut a slit in the flap. If I get my hands on a nice piece of wood or bone I would like to switch the fastening.

All in all I can't say that I really enjoyed working with leather. It's noticable on the quality of the bag as well, in the end I just wanted to finish it. It's a usable item, but not one of the things I particularly proud of.

The Challenge: 11 - bags and purses
Material: a maximum of 0,5 m of leather scraps
Pattern:  My own,
Year:  medieval
Notions: waxed linen thread
How historically accurate is it? It doesn't really look like any bags that I have seen, but it is a generic leather pouch, I would be surprised if there aren't similar bags to this one out there, or that they were used. It is handmade with correct aterials. I'm thinking 30%
Hours to complete: 15 hours
First worn: I'm planning on wearing it next weekend
Total cost: Everything was from my stash, I even got the last piece I needed as a gift.


Friday, 12 October 2018

HSM challenge 10 - my smocked apron

The HSM challenge for October is fabric manipulation - "Take fabric to the next level with any kind of historical embellishment or manipulation: smocking, shirring, embroidering, beading, pinking, ruching, printing, painting, dyeing etc." This was one of the challenges I was sure what I would do, already when I saw the challenges for the year. A very common accessory during the late Middle Ages and early 16th century was the smocked apron.


Of course I wanted a smocked apron for my 1520's outfit, and it would work for the whole 15th century as well. 


I used a length of unbleached linen. I started with hemming the sides, and then I smocked the top. I didn't mar out where I wanted the pleats to be, but instead I free-handed them, making sure that the gathering stitches were quite even by eye. I used 8 rows of gathering stitches.


I smocked the top with honeycomb smocking. To be honest I would have liked the pattern to be larger, this is perfect for a shift, apparently that's what my eye is calibrated to.

This is the back of the top.


When I had finished the smocking I made a long strip of double folded linen fabric and sewed the apron to it. I ended with hemming the bottom of the apron. That was a good thing. The smocking had also affected the length of the fabric. I had first planned to make a quite large hem, but I ended up with just double folding the fabric and do a similar hem to the sides.

It's a nice lightweight apron, and I am very happy with how the smocking turned out, even if it is a bit small. One thing I have done differently from the aprons that I have seen is that I have made the ribbons to tie it with so long that I can tie them on the front. I did it because my stiff shoulder makes it hard for me to work behind my back, now I can tie it a lot easier compared to my other apron with shorter ribbons.

The Challenge: 10 - fabric manipulation
Material: 1,5 m of unbleached linen
Pattern:  My own, after historical images
Year: 15th-16th century
Notions: waxed linen thread
How historically accurate is it? It's based on historical images and totally handsewn with appropriate materials, but the smocking pattern is a bit too large and I don't have any evidence for the long ribbons. I would say 75%
Hours to complete: 10 hours
First worn: I brought it to work on an SCA event first weekend of October and I had planned to wear it to the evening feast, but I didn't finish it due to the extra long ribbons, so I haven't worn it yet.
Total cost: Everything was from my stash, but bought new it would have cost around $15.