Showing posts with label accessories. Show all posts

Saturday, 5 September 2026

A small trossfrau hat

 For Abi's funeral it was clear that our reenactment group was going to take a large part, and there were discussions on what we would wear. Many of us felt that we wanted to bring something 16th century to the funeral and many mentioned that they were going to wear their hats. Since Abi was also a cosplayer and liked black and purple I had decided to wear my Her Universe Endor dress, since it's black with purple details. It's a dress I've worn a lot to NärCon, and it was great meeting up with Abi there as well.

Me at Närcon back in 2018

The only 16th century hat that I have is red, but since I had found purple fabric to make flowers from I also decided to make a small trossfrau hat. Of course being me I didn't just want to make a simple hat, I got inspiration from Whilja's corner on how she made a hat with diagonal stripes on the brim. She made a fullsize hat, I decided to just make a small hat to perk on top of the head. Also to be honest this kind of hat in purple is not something I would wear with the rest of my 16th century clothes, so I didn't want to make it too big of a project.


I first cut out a straight piece of black wool that I had measured for the cirumference that I wanted and the width of the brim, when folded in half. I then cut out slashes diagonally in the wool. This would not have worked for a full sized hat, then the brim would collapse, but for this smaller version I didn't have to reinforce the wool in any way. The purple poufy fabric was simply a tube of poly taffetea, that I made longer and wider than the wool, so that it would pouf out between the bands.


I placed the purple tube in the middle of the black wool and folded it over.


I had to arrange the purple fabric and attach it with some stitches to make it look good. I also had to pleat the inner part of the brim to make it lie flat and round. Where the ends of the black met I also cut an extra slash when I saw how the ends overlapped and that it got very wide.


For the centre portion of the hat I first cut it out in the wool, and I made heartshaped cut outs, which I felt was so fitting for Abi. At first I made the purple layer larger, thinking it would look better when poofing out of the cut outs, but I changed my mind and cut it down to the same size. The two layeres were sewn together.


The centre was attached to the brim by hand. The rest of the hat was sewn on the machine. 


This was the finished hat from the top.


I added a pin in the centre, to mask that it wasn't perfectly aligned and I added a purple ribbon to keep the hat on my head.

The final touch was to stick two feathers into the brim. I didn't get any photos of me at the funeral or memorial, so this is me the morning after wearing the hat. I am really happy with it, but I'm not sure if I will wear it again.


Fabric flowers for a wedding and a funeral

 The last month has been emotionally complicated, and that is really a reason why I haven't made any posts about Medieval Week or Mimicon, that took place the week after.

The theme for Medieval Week this year was "love" and the best evening was when we organised a bethrotal and bethrotal feast for our very good friends Mattis and Emma. In the Middle Ages, at least in Sweden, it was actually the bethrotal that was the most important event.


Their wedding was planned for the 29th of August, but this was our way to give them a great Medieval feast as well, together with people who wouldn't be there for the wedding.

Me and David went home on Saturday, and then on Monday we got the news that the wonderful Abigail had passed away on early Monday morning, just 17 years old. Devastating news, of course the most for her family, but the whole family are really the core of the group. It was really strange knowing that our hugging goodbye on Friday evening was in fact a goodbye for much more than until the next sewing meeting or group get together.

As mentioned the wedding was on the 29th, and I had already planned to dye my hair purple to match my folk costume that I was going to wear, and then came the news of the funeral. The funeral was going to be on the first Friday after the wedding, and Abi's favorite colours were black and purple so we were welcome to wear purple for the funeral. 

I then also decided if I had something at home that I could make into accessories, and I started with making some fabric flowers in purple fabric that I found at home.


I started with ripping a strip of fabric, this is a polyester taffeta.
I folded the strip together until it was the width of a petal.
I cut it into a petal shape, making sure to keep the sides together.
Here is the full strip. I also zinged the edges over a tealight to stop them from frying.
Then I sewed a gathering thread along the straight edge and gathered it all together.
I sewed across the bottom of the gathered strip to shape it.


I found that I had these pearls attached to wires in my bead/pearl box. I put one in the middle of each flower, but sticking it through the fabric.
I made a little loop from the wire on the backside, so that I had something I could attach a hairpin to.

Here are the finished flowers. The bottom one was made from a 75 cm strip, and that as almost too big. The top flowers are made from cutting a similar strip in half. The bottom and the top left flowers were also just randomly gathered, but the top right one I worked a bit more with shaping the petals when I gathered them, and I think that one was the best.

For the wedding I put all three flowers in my hair. I didn't want to wear the traditional cap, I wanted something fun with my hair I also didn't wear traditional shoes but wore purple shoes as well.


For the funeral David put one of the flowers on his lapel. 

It was quite hard working on the flowers knowing that they were for both a wedding and funeral, but it also felt very fitting to make and wear them for both occasions. Life is full of joy and sorrow, and both these occasions will be connected to Abi.


And here is a photo of Emma and Mattis and I hope they will have a long and wonderful marriage.

Saturday, 11 July 2026

Two soft summer hats

 I am the kind of person who just can't handle contact lenses, last summer I tried and tried, but apparently one of my failures in life is that I just can't get them into my eyes, and my eyesight is such that even when I could get them in I couldn't see good, just better than withouth. Meaning I could just handle a phone with the lenses in, but I could not drive with them. So I decided that it wasn't worth the frustration, and the money for buying lenses, and I have to go with glasses, and be half blind when in costumes where the glasses don't fit. Since I am also too cheap to buy corrective sunglasses I felt that I needed a summer hat this season to get some shade. Over the years I have loved big summer hats, but to be honest they get lost, the blow off or I simply don't use them because they are too big. I needed something smaller and softer, but I didn't just want a bucket hat. Well I decided to make a hat and went to search for a pattern online.

I found this pattern from Notches Sewing studio on Etsy.  Etsy today is unfortunately full of AI slop and it important to go through the profiles and see if you can find a real person behind the store. This pattern was a bit more expensive than the cheapest patterns, but I liked that it was more than a bucket hat and the fact that there was a youtube tutorial showed me that a real person was behind it. 

For fabrics I went into a local op shop and found some cottons, including two curtains with some stains on. I couldn't really decide on what I would do, and since they cost a total of $10 I bought all of them. I had to buy 1 m of medium weight interfacing, but that was just enough for both hats. In total material and patterns costed around $40, and the fabric I have left will be great to make toiles out of.

My first colour choice was this blue version. The blue was some kind of poly/cotton sateen, with quite a nice shine to it.
A downside was that it felt quite paperly and crumpled quite a lot. 
The pattern is marked as beginner/intermediate. Now there are no written instruction, just the youtube tutorial. It is an easy pattern, and for me it would have been nice to just have some written instructions so I didn't have to stop and play the video all the time. The second hat I made I didn't have to follow the video at all though.
The pattern is one size, and it fit me really well, I think I am normally a size 56 in hats, I have quite a medium sized head.
The pattern is easy, but it is a bit fiddly. In order for it to look good you need to be comfortable with sewing round pieces to each other, and to make topstitching. It is optional to top stitch the brim, but it really helps to make the brim steadier than when just relying on the fusible interfacing. I found it was quite wiggly to attach sew the pieces together when I was working with several pieces that were interfaced. Not hard, but wiggly and fiddly.

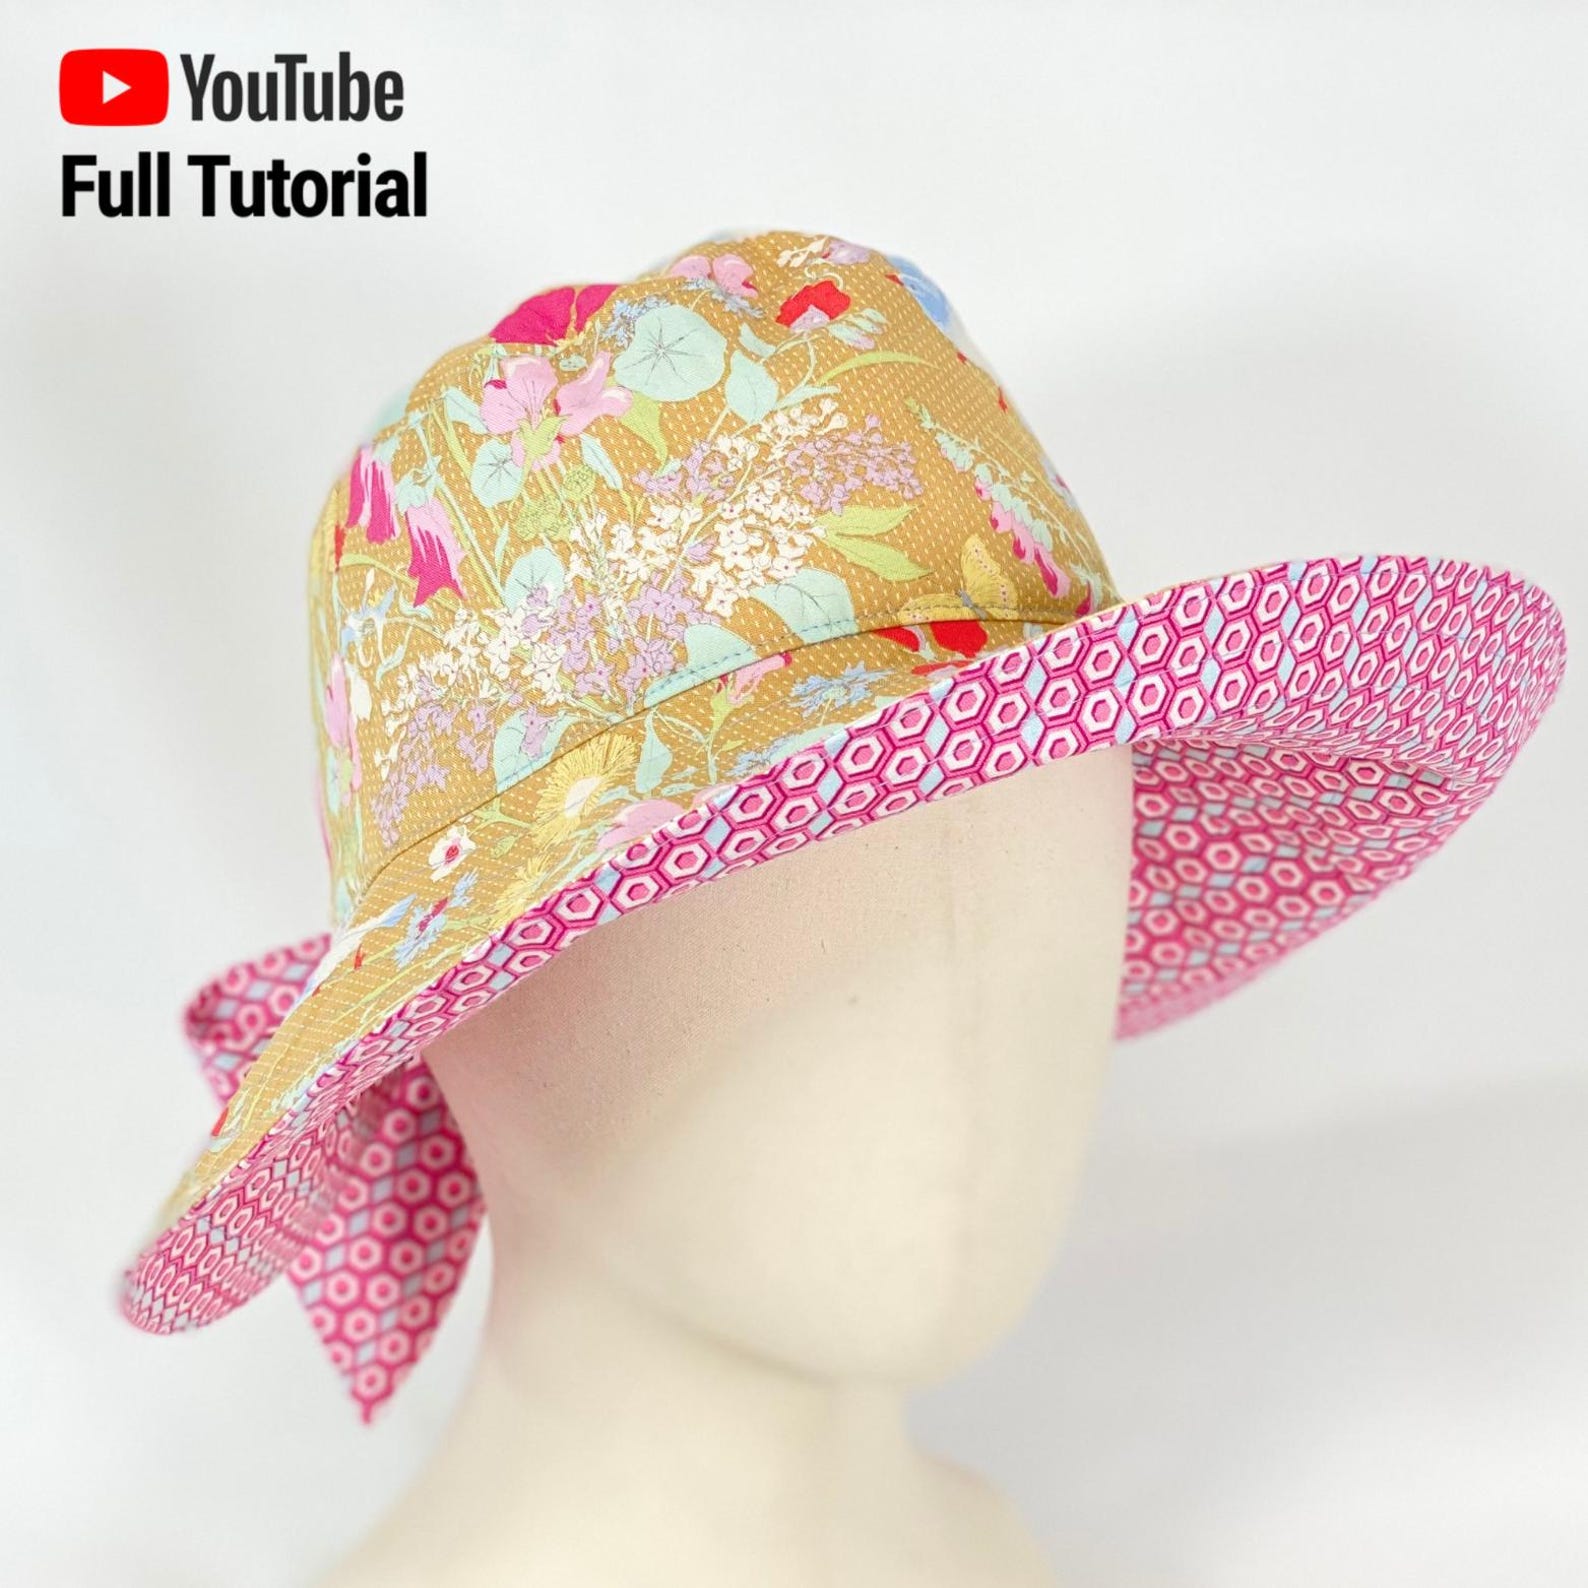
The other hat I made was in a more subdued colour palette, with a sandcoloured outer fabric, and a softer lining. Now the hats are reversible so it is possible to just turn them inside out if I want the flowers on the outside. The brim is steady enough with all the top stitching so it is possible to shape the brim and it keeps that way.
And this is the size of the hat on me, and not on the tiny styrofoam head.

Now I have to summer hats, and it took me one evening and one morning to sew them together.

Thursday, 2 July 2026

A renaissance hairnet

 In my last post I had set up and started on a net with the sprang double grid stitch. I did the net in pink because I already have a black net, even if there are a lot of mistakes in it, and I also have a yellow and red as well, so I felt that I wanted something new. After all I am calling mine and my husband's landsknecht outfits for "50 shades of red", so to make something in pink felt like a fun project, even if I can't say that I have ever seen evidence for pink hairnets. For this I use the yarn "Grane" from Korps.se, which is a z-spun wool, 100 g = 400 m.


The net worked fine and I could make the whole net in one evening. I used 124 loops and it was 43 cm long. When I released it from the loom it was huge. This could never work as hairnet, unless I use my largest and heaviset wulsthaube, the one that was an experiment with wool and that I can't wear for more than a short while without getting neckpains and headaches. I did take my measurements and I could work out that I had a 0,75 conversion rate. Meaning that if I take the number of loops and multiply with 0,75, then I get the finished width. This is all very much depending on yarn and your own tension, but now I had a number.

So I set up a new warp with 80 threads and 40 cm long. It took me a bit less than an evening to make a new net. This size is perfect for my head with my own hair, it might be a tiny bit too small to wear a wulsthaube or large hairpiece under it though. So I guess a good size for me is probably around 90 threads.


I blocked the net over a bowl, but to be honest I don't really see a difference between this and just flatblocking it.


Here is the comparison between the first version and the new version. I think I will use the first version as a net bag for bulky but light things, maybe I should simply keep my yarns there.


Tuesday, 6 January 2026

2025 a recap part 3 - the historical costuming

 As I said in my last post, my historical costuming projects tend to be smaller but I do more of them, since they are usually more about adding pieces to my wardrobe, rathern than creating a new wardrobe. Going into 2025 my main project when it came to historical projects was to make a Lengberg bra/supportive kirtle and a schaube for my husband. Well I did neither.

I started drafting a lengberg bra, but while doing that I realised that wearing a bra, a shift and two wool kirtles/gowns would simply be too bulky. The Lengberg bra also is more correct for the late 15th century silhouette, and after all I do mostly early 16th century. Instead I started focusing on making a supportive wool kirtle, that wouldn't need a bra under it. I did make the kirtle using Matthew Gnagy's barra system, which was a new thing for me, but something that I really enjoyed and that I think I will really be able to use in the future. It was a bit stupid to make an underkirtle in cream, since I had to be really careful when wearing only the kirtle in the camp kitchen when cooking. The full post on the kirtle is here.


In the spring I got invited to a 17th century event, a time period that I had eyed a bit but never seriously considered. At Medieval Week I also found this gorgous raspberry red wool, and I bought enough to make a jacket. I made the jacket into a very generic shape that works from the 16th to the 18th century though. The post about the jacket is here. The event also ginally gave me a reason to make one of these long, flowing headpieces that were used, but are not very common among recreators of the 17th century. The post about that is here.

Then in the autumn I felt that what I really wanted was a 16th century hairnet, and I decided that instead of buying it, I should learn how to do them myself. And thus started my adventures in sprang. This is the first craft with yarn as a base that I have enjoyed. When I also got tablets for tablet weaving in an advent calendar I also set up to learn tablet weaving. I feel that I can now make a wearable net and I see this hairnet as a proof of concept, now I need to learn to work with finer yarns, and decide if I want to make my own tablet band as a decoration, or if I should simply buy one.

And with that I have summarized my crafting year 2025, and now it's time to look into what I want to do in 2026.

Tuesday, 30 December 2025

HSM 25 - The final touch - a belt

 As a final post about the historical sew monthly challenges it's quite fitting to have the "final touch" challenge

The Final Touch: Make an accessory or garment that is the finishing touch to an outfit.

The Christmas blouse that I made had a pattern piece for a belt, and belt were important in the 1930s, both for evening wear and everyday wear. I hadn't bought enough fabric to be able to get the belt out, and I was also out of time to find a belt buckle for it, so I skipped the belt when I cut out the blouse. After having finished the blouse, and realised that it was big enough that I could pull it over the head I really felt that it needed a belt to not feel too baggy. I took out the scraps of fabrics left and realised that I could get half the belt out, it just wasn't wide enough to double up. But I had a thick poly satin in my stash so I cut out half the belt in the green viscose satin and half of it in the in the poly satin. I added a fusible interfacing to the viscose satin, sewed the fabrics into a tube and turned them right. I added topstitching, a belt buckle that I found in my stash and added some eyelets to be able to adjust the width of the belt.

And here I am wearing it on Christmas Eve, with my mother beside me. To bling it up I added a small festive brooch to it, but that's hardly visible in the photo.


What the item is: An evening belt to go with a 1930s blouse
How it fits the challenge: The belt is needed to give the final silhouette of the blouse
Material: 10 x 150 cm of green viscose satin and 10x150 cm of heavy poly satin
Pattern: Lady Marlowe 8380
Year: 1930s
Notions: a belt buckle, eyelets with washers, fusible interfacing
How historically accurate is it? Pattern is correct, hard to say about the rest of the materials, so 50%
Hours to complete: 1 hour
First worn: On Christmas eve
Total cost: $20

And with that I have finished up posting about all the HSM challenges and projects for the year, so it's time to summarize the project year 2025 and look forward to 2026.

Wednesday, 18 December 2024

HSM challenge 7 - always in style

I did it! This year I actually completed all 12 HSM challenges, I think that is the second time I have managed that. The final challenge that I needed to finish was the July challenge - always in style

Make a garment or accessory that is appropriate for more than one historical period… or even a historical piece that can be worn with modern clothing! (Note that the piece should still be ‘historical’, not just ‘historically-inspired’
In order to come up with what I should do I started thinking around. I did just finish a shift that would work for several historical periods, a shift that I had forgotten about and found in a box with just the hemming of the neckline left, but that would also be a bit boring. Then I started thinking about mittens. My wrists are always cold so I have an assortment of cuffwarmers, but I can always use more. Fingerless mittens have been used a lot. I have made a pair of long 18th century ones and some folk costumes in Sweden still have them as an accessory. This autumn Lina Odell also released a book all about doing embroidered mittens with inspiration from folk costumes. Now for the HSM challenge it should be historical and not historically inspired, still I didn't copy a specific pair but rather used several historical parts as an inspiration.

Photo by Hilding Mickelsson/Hälsinglands museum, cc-by-nc
Most preserved mittens seems to be black with silk embroideries. I was sure that I had some black wool, but I was wrong, so I was really happy to find this example of a mitten that was made in another colour.

Photo by Hälsinglands museum, cc-by

This pair of mittens has a typical pattern, made with silk and using satin stitch, stem stitch and herringbone stitch, in Swedish plattsöm, stjälksöm och flätsöm. The mittens also has a pointed tip that is folded back and shows a silk lining.

I started with taking a pair of mittens that I use at work and simply trace it to make a pattern. This is a very simple design, just one seam and a hole for the thumb rather than a sewn thumb. The shape has come from several years of use and molding to my wrist and hand.


I cut out the pattern in a scrap of wool and added the point at the top. I also drew out the base for the embroidery, deciding not to be too accurate but instead being ok with not totally symmetric and perfect pattern.

Most of the embroidery actually felt like just doodling with needle and thread, rather than with a pencil. I didn't have any silk so I used cotton, in the colours that I had at home. I also used mostly chain stitch, which is also a common stitch in folk costumes and that I am simply better at than stem stitch. I also used satin sitch. The raw edges were folded under once and also attached with more chain stitch.


The backsid of the mitten with the simple green row of chain stitch. The most tricky part was actually to attach the point in the right spot. For the lining I used a scrap of poly brocade, that is an historical pattern. I was a bit dissatified with the placement of the point, it didn't end up as centered as I would have liked.


Me wearing the finished mitten, that I also now use at work instead of the old grey ones.


The finished pair of mittens. Compared to the originals I have simplified the design, but I also now want to make more pairs that are more inspired by historical examples. It would be fun to have a pair inspired from my mother's folk costumes, which have a lot of circles and flowers in chainstitch and one inspired by the embroidery on the cap and bag for my own folk costume, which has a flowers in chain stitch. All in all it was a fun project and I can definitely see me making more of these out of scraps of wool.

What the item is: a pair of mittens from the second half of the 19th century
How it fits the challenge: The mittens are from the 19th century, but I am using them with my every day clothes at work
Material: 0,4 m wool
Pattern: my own
Year: ca 1850-1880
Notions: cotton floss
How historically accurate is it? 60% - they are not as elaborate and they use cotton floss and poly brocade instead of silk, they are also a bit too long compared to the original.
Hours to complete: Made over a weekend
First worn: to work on December 17th
Total cost: stash project but probably around $6 if bought new

Monday, 2 December 2024

HSM 2024: Challenge 12: The white work apron

 Going through the list of HSM challenges for 2024 I realised that I have project that I haven't posted about, and that would fit with the final challenge "That's a wrap".

December: That’s a Wrap: Make an accessory or garment that is worn by wrapping it around the body.

In september I started to learn whitework embroidery by working on a an old linen apron. I finished the apron in October, just in time for the 16th century party that me and my husband attended. Since it is an apron I wear it by wrapping it around me and tying it in the back, so that's a fit for the challenge.


I also realised that I didn't take any photos of just the apron, or just me, and now I've packed it away for the winter. Anyway you can see the line of whitewok in the botom of the apron.

The Challenge: December "It's a wrap"
Material: An old linen apron
Pattern: My own, I very much used the instructions from the Royal School of Needlework stitchbank
Year: 1520s
Notions: Linen thread, was
How historically accurate is it? Around 95% (all period materials and stitches, I'm just not sure that they were ever combined in this way)
Hours to complete: a month of having the embroidery at hand while watching tv.
First worn: A 16th century party in October
Total cost: This was a pure stashproject and made from a repurposed older apron.

Sunday, 15 September 2024

Learning whitework embroidery

 After coming home from Visby I have been a bit both worn out from sewing, and restless from not having something to do. All the work I put in with making David's landsknecht meant that I got used to sewing a couple of hours every day, at the same time I don't know what to do right now. I don't need any historical clothing, and also don't have the inspiration to make something that I will just put in my storage, and I don't have a huge inspiration for a cosplay project either. I have made some progress with my female tusken, but when it was clear that I am going to miss the remaining conventions in the autumn I don't feel like putting on some extra drive into it.

So I decided to learn how to do whitework embroidery, and started with drawn work. Now I am not a person to make a sample, I am too impatient and wanted to make something I could use. Since I don't have a fine, white 16th century apron I decided to take the apron that I whipped together last year, but didn't have time to do anything with and add embroidery to it.

I started with drawing away threads, and this was the most fiddly bit.

Now I am unto separating bars of the remaining thread and this is slow, but fairly simple work. Quite nice to do while watching tv.

As for whitework and the 16th century there are definitely examples of white on white embroidery from the early 16th century. From the end of the century there are loads of wonderful, lacy aprons and other examples of drawn threadwork, white on white embroidery and pulled threadwork. I don't want to go for the late century though. The Sture-shirts have drawn thread work on them, and they are from the 1560s. It might be that the simply style was just coming into fashion then.


This drawing of Dürer from 1475 shows a faint line on the edge of the apron. It's impossible to say what kind of decoration it is, but at least a line of embroidery shouldn't be too out of place for the early 16th century judging from this. 

To help me learn the teqhnique I am using some of the books I have at home, but I am also very happy for the Royal School of Needlework's stitchbank with their clear instructions and images.