Friday-Sunday it's time for Stockholm Comic Con Gamex. Up until last year it was only Gamex, and was never interested in going since from what I knew it was just about games. Last year it was expanded into Comic Con Gamex, with a lot more focus on cosplay, and last year was also the first year that the Nordic Legions had a booth there. This year it's time again, and I'm going to be there all days. Last year I also had a talk about "Meet the legion", general stuff about the 501st and Rebel Legion. Now this year I'm going to present two panels that are a bit more specialized.
Friday 16:00-16:45, stage 4
Hår och smink i en galax långt, långt borta (Hair and make up in a galaxy far, far away)
This will be a short overview of make up and hairstyles, basically a combination of the talk I had at Celebration about Queen Amidala make up and the talk that I listened to about hairstyles for Padmé and Leia. I'm going to go through both my tutorial on Queen Amidala make up and two different ways of making Leia's cinnamon buns.
Sunday 14:00-14:45, stage 4
Ladies of the Legions - Star Wars och kvinnlig cosplay (Star Wars and female cosplay)
In this panel me and Ingeli, the CO of the Nordic Garrison, will go through the options and challenges you can face as a female costumer in the Star Wars world. The options might be more varied than you think, hopefully we can give some hints on how to overcome the challenges.
I hope to see as many of you as possible during the weekend. I'm going to work the Nordic Legions both as Endor Leia and my gold handmaiden, and I'm bringing TFA Leia and Rarity for off duty cosplay. I will see if I can bring the jawa or Endor trooper as well, since I need something for parades and I can't walk in the gold handmaiden and there's going to be another Leia there.

Wednesday, 28 October 2015
Sunday, 25 October 2015
A worbla crown for a queen
For the yearly autumn school break I decided that the activities would be centered around knights, it felt logical since we just opened our exhibit about the Middle Ages. I'm going to post mora about it later but this is about one of the things I made.
I don't like working with hard materials, but a year ago I bought a sheet of worbla to try and work with it. Now was the chance to do that, and since the goal was to just make something that looked better than a cheap toy crown I felt that was a suitable challenge, without too high demands of accuracy.
I took my sheet of worbla and cut out some fleur-de-lys shapes in a band, the same size as my head, or rather a bit largers since the crown would be shared between me and a guy. I then heated up the worbla and fixed the ends to each other.

First lesson: The worbla was quite soft, but it was hard to get into the small details, so it would have been better to use a knife instead of a pair of scissors. The crown only uses one layer of worbla, and it's quite flimsy. Good enough for a toy crown, but if I ever make anything else like this I would use double layers. Also when I tried how strong the seal between the ends was, it was easy to pull apart so I superglued them togeter instead.
The next step was to smooth the surface. After having read a ton of different tutorials I decided to go with gesso. I ordered some at Slöjddetaljer.se. Even after 10 layers of gesso, with a lot of drying time inbetween, it was clear that the texture of the worbla was still visible. I had used up about half my can of gesso at this time. Since this crown is just a toy I stopped at 10 layers though and sanded down the surface. I also stopped with the gesso when Pilerud posted that in order to get a smooth worbla surface it was best to use a sheet of transparent worbla, which is completely smooth, rather than applying layers and layers of filling and then sanding them down.

After the sanding I spraypainted the crown gold. It's clear that with enough patience, and gesso or other filler, you can get the worbla really metallic. There are some patches of the crown that looks like that, but the texture of the worble is quite visible on most of the crown. Still I'm thinking that it looks a bit like a hammered metal look. I finished the crown by gluing a pack of plastic crystals on it.

Monday, 19 October 2015
TFA Leia - jumpsuit
Over the weekend I finshed the jumpsuit for The Force Awakens Leia.
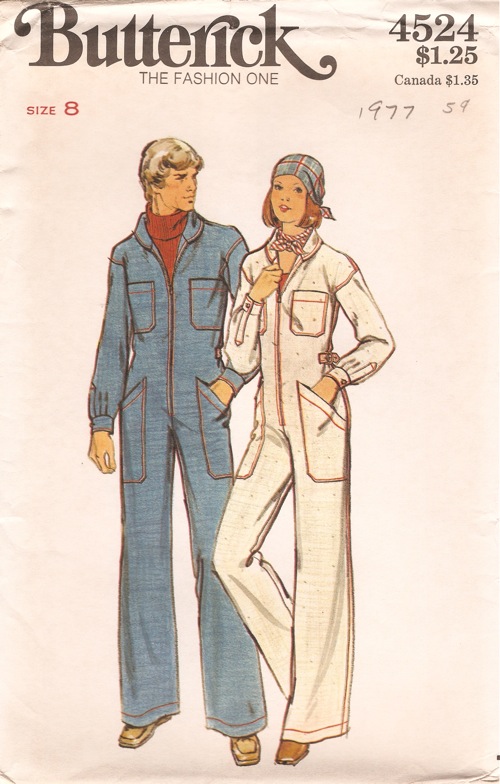
I started out with this vintage 70's pattern.
 Since I had never made a jumpsuit I decided to make a quick mock up. The size was a size 16, which is my regular size, but when looking at the measurments on the envelope they were for a much smaller body than mine. Still I decided to pretty much just do the mock up according the pattern, and see where I should go from there.
 The mock up did offer some surprises, probably due to 1970's fit compared to todays fit. The legs were superwide, and since I usually have problems with my thighs being too big that was a great surprise, and comfortable too. It was really short in the bodice though. I'm not tall, I'm well below average heigh, but it was still hard for me to move in it. It was a bit on the tight side overall in the bodice, but not as much as it should have been according to the envelope. It was close enough over all that I decided to go straight to cutting out my main fabric.
I lengthened the bodice with 3 cm, 1,5 above the waist and 1,5 below it. I also increased the seams in the bodice with 2 cm on each, and tapered the legs towards the feet. Now when I sewed it up it ended up a bit too big, except for the length of the bodice. I could still have increased it a bit more, but it's ok. In order to give it a bit more shape I made two darts from the bust and down to under the waist. I also had to take in the legs a lot. They looked a like big ballon over my hips.
 Here you can see how much I ended up taking the legs in. For the sleeves I made them narrower and made my own cuffs, rather than using the pattern. I also used the collar pattern from the same shirt that I used for Endor Leia, rather than the collar in the pattern.

It's very dark, but here's the finished jjumpsuit. Now I could probably make it a bit smaller, but I want this to be a really comfy costume to just lounge around in.

I tried it out with just a regular black vest and belt to get the feeling. Next step is to make the vest.
Tonight there is also the release of the trailer for TFA. I'm both hoping that we will finally see more of Leia, but i'm also worried that I'm wrong with how I'm doing the costume, or that it will show another costume for Leia.
I started out with this vintage 70's pattern.

I lengthened the bodice with 3 cm, 1,5 above the waist and 1,5 below it. I also increased the seams in the bodice with 2 cm on each, and tapered the legs towards the feet. Now when I sewed it up it ended up a bit too big, except for the length of the bodice. I could still have increased it a bit more, but it's ok. In order to give it a bit more shape I made two darts from the bust and down to under the waist. I also had to take in the legs a lot. They looked a like big ballon over my hips.


It's very dark, but here's the finished jjumpsuit. Now I could probably make it a bit smaller, but I want this to be a really comfy costume to just lounge around in.

Tonight there is also the release of the trailer for TFA. I'm both hoping that we will finally see more of Leia, but i'm also worried that I'm wrong with how I'm doing the costume, or that it will show another costume for Leia.
Saturday, 17 October 2015
Early morning mock-up
Yesterday I finally started to cut out the pattern for The Force Awakens Leia. Now it's the first time I'm making a jumpsuit, and according to the pattern I should need to add a lot to make it fit me. When I had the paper pieces cut out I felt that they were quite big though, so I started to wonder if I really needed to do so many alterations.
The only way of finding out was to make a mock up, and since my mother decided to call me at 7 am on a Saturday morning I had the time to throw something together, before I'm off to judge a ski jumping competition at 9.

 The fit wasn't so bad actually, I would say that for a Hoth Leia I wouldn't need to do many changes. My main issue is actually that I'm too tall in the torso, which is quite funny since I'm well below average height. That made it restrictive, a risk of camel toe, and it was hard to get out of it.
So I've now made a lot of notes on the mock up, but the main things I'm going to change are these:
1. add a few centimeters all around the bodice (1-2 on each seam) below the waist. A looser fit would hide my belly better
2. Lengthen the bodice with 1-2 cm.
3. Seriously taper and shorten the legs below the knees. I want a tight fit so it will be easier to wear them inside my boots.
I've known that I have a tall torso, but this further proves that I my legs must be exceptionally out of proportion and my legs are extremely short. The fit was really comfy around my big thighs though, and that's not common.
The only way of finding out was to make a mock up, and since my mother decided to call me at 7 am on a Saturday morning I had the time to throw something together, before I'm off to judge a ski jumping competition at 9.


So I've now made a lot of notes on the mock up, but the main things I'm going to change are these:
1. add a few centimeters all around the bodice (1-2 on each seam) below the waist. A looser fit would hide my belly better
2. Lengthen the bodice with 1-2 cm.
3. Seriously taper and shorten the legs below the knees. I want a tight fit so it will be easier to wear them inside my boots.
I've known that I have a tall torso, but this further proves that I my legs must be exceptionally out of proportion and my legs are extremely short. The fit was really comfy around my big thighs though, and that's not common.
Monday, 12 October 2015
HSM Challenge 10: Sewing secrets
I made a pocket, after inspiration from the examples I had posted about in my inspiration post.


The size of the pocket was decided by the very non historical measurment of "my mobile phone + credit card holder". I then used some of the leftovers from my dye projects in the spring. I started off with about 2/3 of Dylon goldfish yellow and 1/3 terracotta brown. As soon as I put the fabric in the pot on the stove it was clear that it was going to be too orange so I added more brown straight into the water.
 The result was a gorgeous golden orange colour, that really made the pattern on the fabric pop. Unfortunately me adding some extra brown straight into the dye bath meant that it hadn't quite dissolved and I had some brown spots on the fabric. The first secret of the pocket is that I've hidden those spots under the blue embroidery.
 The second secret is that I only used the nice orange silk for the front and a piece of the back. This is the inside of the pocket, where I used a piece of that old curtain my sister had given me. The pocket may look fancy, but most of it is a sturdy cotton/linen blend.
 This is the backside, the blue cotton tape that I used to bind the edges make sure that nothing of the simple fabric is seen when it's worn.
 The third secret is the embroidery. Looking at extant examples of pockets from the late 18th early 19th century quite a few of them had initials embroidered on them. I embroidered my initials on it, including my middle names so the embroidery says "I M K N". If you can't read those letters it's because they are not in the latin alphabet, they are written in Dalecarlian runes.
Many people know that the vikings used runes for writing. The usage of runes didn't end with the vikings though, quite a few examples of writing with runes have survived from the Middle Ages in Norway and Sweden, in most parts of Scandinavia they disappear in the 15th century though. In Dalarna, the region where I live, the runes didn't only survive, but took on a development of their own. Instead of giving up on the runes when the latin alphabet got more widespread they people around northern Lake Siljan and Älvdalen started to invent runes of their own. The vikings only used 16 runes, but in order to make the writing of runes follow the spelling with the latin alphabet quite a few new runes were created. This is the alphabet that is today called "Dalecarlian runes". The usage of runes around Lake Siljan ended some time in the 17th century, but they survived in the parish of Älvdalen. With time more and more of the runes where switched in favor of latin letters, so that by the end of the 19th century it was more a case of a mixed alphabet. It's generally considered that the last genuine inscription with Dalecarlian runes was written in 1900.
The inscriptions that have survived are inscriptions on wood and stone, I don't know of any embroidered runes. The inscriptions are so diverse though, including psalms and communications between villages, that the knowledge of runes must have been fairly widespread. I don't think it's unlikely that some girl in Älvdalen would have written her initials on a pocket using the familiar runes rather than the latin alphabet.
The facts
What the item is: A pocket
The Challenge: 10 Sewing secrets
What's the Secret?: 1. Only the visible parts are of a nice fabric, the unseen parts are of a simpler fabric. 2. I hid some dye stains with embroidery. 3. I embroidered my initials in Dalecarlian runes, an alphabet that was used at the time but is secret to most people today.
Fabric: 30 cm of a cotton/linen curtain, 30 cm of a damast table cloth
Pattern: My own after extant pockets
Year: 1795 (the specific versions of runes that I used are found on an inscription dated to 1795.
Notions: 2,5 m cotton tape, sewing thread
How historically accurate is it? I would say that it looks like and original but the fabric was dyed with modern methods and I haven't seen any extant textiles with runes on them, so 20% maybe?
Hours to complete: 4
First worn: Not yet
Total cost: All from my stash, and the fabric was gifted to me so really nothing.

In addition to the pocket itself being a garment that's supposed to be unseen and secret it hides three different secrets.
First off for the fabric I had gotten a bunch of stuff from my sister earlier, among others some curtains and a table cloth. The table cloth had some stains on it that just wouldn't go away, so I had planned to give it away. The town has a collection where you can leave fabric pieces and remnants so that they can be used by in creative projects in preschools. I hadn't had time to do that though, and looking through pictures of surviving garments it was clear that brocades and coloured fabrics so I figured it would be a nice fabric for that, if I dyed it..

This is the original table cloth. I cut out two pieces for the pocket, and tried to find an ornament that could be contained in the pocket.


Many people know that the vikings used runes for writing. The usage of runes didn't end with the vikings though, quite a few examples of writing with runes have survived from the Middle Ages in Norway and Sweden, in most parts of Scandinavia they disappear in the 15th century though. In Dalarna, the region where I live, the runes didn't only survive, but took on a development of their own. Instead of giving up on the runes when the latin alphabet got more widespread they people around northern Lake Siljan and Älvdalen started to invent runes of their own. The vikings only used 16 runes, but in order to make the writing of runes follow the spelling with the latin alphabet quite a few new runes were created. This is the alphabet that is today called "Dalecarlian runes". The usage of runes around Lake Siljan ended some time in the 17th century, but they survived in the parish of Älvdalen. With time more and more of the runes where switched in favor of latin letters, so that by the end of the 19th century it was more a case of a mixed alphabet. It's generally considered that the last genuine inscription with Dalecarlian runes was written in 1900.
The inscriptions that have survived are inscriptions on wood and stone, I don't know of any embroidered runes. The inscriptions are so diverse though, including psalms and communications between villages, that the knowledge of runes must have been fairly widespread. I don't think it's unlikely that some girl in Älvdalen would have written her initials on a pocket using the familiar runes rather than the latin alphabet.
The facts
What the item is: A pocket
The Challenge: 10 Sewing secrets
What's the Secret?: 1. Only the visible parts are of a nice fabric, the unseen parts are of a simpler fabric. 2. I hid some dye stains with embroidery. 3. I embroidered my initials in Dalecarlian runes, an alphabet that was used at the time but is secret to most people today.
Fabric: 30 cm of a cotton/linen curtain, 30 cm of a damast table cloth
Pattern: My own after extant pockets
Year: 1795 (the specific versions of runes that I used are found on an inscription dated to 1795.
Notions: 2,5 m cotton tape, sewing thread
How historically accurate is it? I would say that it looks like and original but the fabric was dyed with modern methods and I haven't seen any extant textiles with runes on them, so 20% maybe?
Hours to complete: 4
First worn: Not yet
Total cost: All from my stash, and the fabric was gifted to me so really nothing.
Saturday, 10 October 2015
TFA Leia hair, trial
Leia's hair in the photos from The Force Awakens is a lot lighter than in the OT. It's pulled back from the face, then there is a roll going from one ear to the other, before being braided into a braid on one side. You can also see a small bun at the back of the hair. There is a backview of her head in the trailer, but I haven't got a screen shot of that.


I have bought a wig in that undefinable colour range of dark blonde/light brown/greyish.

It's also the first time I've bought a lace front wig, so that I will be able to pull the hair back and still look natural.
Yesterday I did my first trial in doing the hair, and I think I have a general idea of how it should be done. First I took most of the hair on one side and braided it, I then put the braid over the head to the other side. I did a braid, but I'm thinking the hair might be twisted rather than braided. It was easier to work with a braid though when trying different things. Most of the rest of the hair was pulled to the side and braided. I braided the hair and folded the end of the braid back, so that the tip of the braid was hidden under the top of the braid. The remaining hair was pulled up into a bun at the top back of the hair.


I need to do some more practicing, and making sure that I can hide the hairpins. I also need to cut away the lace at the front
Thursday, 8 October 2015
Princess Leia from The Force Awakens
I'm going to try and make the TFA Leia for Comic-Con at the end of October. Now since there are very few reference pictures of it available I'm also seeing this as a test run, since I've never done a jumpsuit before, and then I could use it to remake a better and more accurate version.
Anyway the photos that I've found are:

 there isn't really a lot of references, but it's a start.
This is what I'm going for.
1. Jumpsuit
To me it seems to be a fairly thin and soft material, looking at the ways it wrinkles on the leg. I have ordered a medium weight grey cotton for it.
There are similarities to other SW costumes, the collar looks to be the same style as the Endor shirt, and there are no visible fastenings at the front. I think that the sleeves are full length, but folded up. The cuffs looks to be quite angled, just like the collar.
I have picked up this vintage sewing pattern very cheap.
It needs a lot of modifications (different collar, different sleeves/cuffs, tapering of the legs) but it was cheap and it's a starting Point.
2. Vest
At first sight the vest looks similar to the RFT vest, but I don't think so anymore. I can't see any pockets on the high res side photo. I also don't see a shoulder seam. What I do see though is two layers of fabric above the shoulder. My theory is that the front of the vest, which looks very smooth, is a second outer layer, possibly padded or made to look like a bulletproof vest. There is also a small stand up collar to the vest, that the jumpsuit collar is resting against. For the vest I have ordered a heavier twill in black.
3. Belt
Black belt with a large, oval belt buckle in silver that the belt passes through.
4. Boots
Only thing that you can see is that the boots are high and black. I'm going for a simple unadorned black boot with a very low heel.
My deadline for this is October 24, so that I have a week before Comic-Con.
Anyway the photos that I've found are:


This is what I'm going for.
1. Jumpsuit
To me it seems to be a fairly thin and soft material, looking at the ways it wrinkles on the leg. I have ordered a medium weight grey cotton for it.
There are similarities to other SW costumes, the collar looks to be the same style as the Endor shirt, and there are no visible fastenings at the front. I think that the sleeves are full length, but folded up. The cuffs looks to be quite angled, just like the collar.
I have picked up this vintage sewing pattern very cheap.
2. Vest
At first sight the vest looks similar to the RFT vest, but I don't think so anymore. I can't see any pockets on the high res side photo. I also don't see a shoulder seam. What I do see though is two layers of fabric above the shoulder. My theory is that the front of the vest, which looks very smooth, is a second outer layer, possibly padded or made to look like a bulletproof vest. There is also a small stand up collar to the vest, that the jumpsuit collar is resting against. For the vest I have ordered a heavier twill in black.
3. Belt
Black belt with a large, oval belt buckle in silver that the belt passes through.
4. Boots
Only thing that you can see is that the boots are high and black. I'm going for a simple unadorned black boot with a very low heel.
My deadline for this is October 24, so that I have a week before Comic-Con.
Monday, 5 October 2015
HSM Challenge 10: Sewing secrets - inspiration
I'm aiming to have a new costume for Stockholm Comic-Con at the end of October, that means that I can only make a small thing for the HSM challenge 10, especially since three of the weekends in October will be spent like this.
 That's me at the K90-ski jumping hill in Örnsköldsvik where I spent Saturday as a distance measurer and Sunday as a jumping judge, next weekend I'm organizing the 90th anniversary for the ski jumping club in Falun, and the weekend after that I'm off to Stockholm to judge a ski jumping competition there.
But back to sewing, and finding a small project that fits the challenge. The challenge is "sewing secrets" - hide something in your sewing, whether it is an almost invisible mend, a secret pocket, a false fastening or front, or a concealed message (such as a political or moral allegiance).
My plan is to make an 18th century pocket. The one I have is a nice one that I've embroidered. When I use it I'm a bit worried that it won't hold up for a totally incorrect phone, or that the embroidery will fray. I want a pocket that's a bit more plain, but also sturdier. Pockets were supposed to be worn under your clothes, so in that way they are secret, but I'm hoping to add something more that won't be obvious even for the people that I might show the pocket to, a proper sewing secret.
With that in mind I dived into Digitalt Museum - which is a great database of digitzed collections from Swedish museums. Of course that means that you have to search in Swedish, and there is no really set terminology, it's just what happened to be written either by the person who collected the object into the collection, or the person putting it up in the database.
A lot of the pockets that have been saved are fancy with beautiful applications, but there are a couple of ones that I feel are closer to what I would like.
This pocket (kjolväska is the search word in digitalt museum) is dated to the late 18th century and it's from Älvdalen in northern Dalarna, the region I'm living in. I like that it doesn't have too much trim, I've seen these kinds of pockets that are totally covered with applications, and I really like that it's made up of several different fabrics that have been pieced together. I would not be able to make the metal hanger though. The fact that it comes from Älvdalen has also given me an idea on what kind of secret I could hide in it.
This is another pocket of fabric that's been pieced together. The shape looks more like the shape of pocket in Costume close-up. I guess that shows that this kind of pocket was simply quite a universal thing in the western world. This one is from Småland, so not from Dalarna.

The third pocket is from Värmland, and as you can see it's rectangular and not rounded like the other two. This pocket is made out of leather, but what I like about it is the letters, they are probably the initials of the owner, and date.
With that in mind my general idea is to make a pocket out of some scraps that I have. There is a craft café next Monday, and since my other major projects is all about machine sewing this could be a nice thing to work with.

But back to sewing, and finding a small project that fits the challenge. The challenge is "sewing secrets" - hide something in your sewing, whether it is an almost invisible mend, a secret pocket, a false fastening or front, or a concealed message (such as a political or moral allegiance).
My plan is to make an 18th century pocket. The one I have is a nice one that I've embroidered. When I use it I'm a bit worried that it won't hold up for a totally incorrect phone, or that the embroidery will fray. I want a pocket that's a bit more plain, but also sturdier. Pockets were supposed to be worn under your clothes, so in that way they are secret, but I'm hoping to add something more that won't be obvious even for the people that I might show the pocket to, a proper sewing secret.
With that in mind I dived into Digitalt Museum - which is a great database of digitzed collections from Swedish museums. Of course that means that you have to search in Swedish, and there is no really set terminology, it's just what happened to be written either by the person who collected the object into the collection, or the person putting it up in the database.
A lot of the pockets that have been saved are fancy with beautiful applications, but there are a couple of ones that I feel are closer to what I would like.
 |
| Foto: Eriksson, Elisabeth / Nordiska museet |
 |
| Eriksson, Elisabeth / Nordiska museet |

The third pocket is from Värmland, and as you can see it's rectangular and not rounded like the other two. This pocket is made out of leather, but what I like about it is the letters, they are probably the initials of the owner, and date.
With that in mind my general idea is to make a pocket out of some scraps that I have. There is a craft café next Monday, and since my other major projects is all about machine sewing this could be a nice thing to work with.
Subscribe to:
Posts (Atom)