Wednesday 24 March 2021

jedi softparts finished

 So I consider myself finished with all the soft parts, even if I'm going to ask for feedback over at the Rebel Legion forums.

The tabards started out as simple strips of fabric. They are connected with a seam at the shoulder, since I wanted them to be quite long. After advice from a jedi costumer I made the tabards double. The bottom parts have a tendency to flip up and show the underside, so I wanted them to look the same. At the waist they are connected with a strip of fabric to also keep them in position, and you can also see that there is a seam there.
The seam is from darts, one for each tabard both back and front. This corrects the angle of the lower part of the tabards, so that they don't cross but hang parallell to each other. This dart took quite some time to get right, and I had to test it over and over again while wearing the tabards. 
Since I didn't have a lot of fabric I had to use the fabric with the dye stains. I have them on the underside of the top where they aren't visible though. The tabards are kept in position by two snaps on each shoulder, that connect to the outer tunic.

The obi
The obi is also in two layers, and here I didn't have enough left of the outer fabric to make it double, so I used a sturdy cotton instead. The cotton lining was shaped to fit with darts.
I didn't want to have any visible seams on the obi, so the outer side is gathered at the top to fit to the lining. The obi is closed with velcro, to make it easy to adjust if I gain or loose weight and depending on how much I'm wearing under the obi.

This is me taking some quick selfies with my phone

The undertunic and skirt
With the outer tunic


Tuesday 23 March 2021

HSM21 Challenge: Zero waste - the jedi petticoat

 After I had finished the faux jedi undertunic I realized that I had fabric left. I had cut the fabric straight, so I had one long piece. I have been thinking quite a lot about 17th century, but not enough to be willing to go all in for an historical recreation. Still brown was a very common colour. The linen/viscose blend that I used for the undertunic is really comfy, so I decided to make a standard petticoat out of it. It can work as an outer petticoat for simpler folk, or as an extra under other skirts.

The whole petticoat is made out of two square pieces, taking up the whole remnant of the fabric. The only waste was that little strip that I tore off to make sure that the fabric was on the grain. 

I sewed the pieces together at the sides and attached them to a piece grosgrain tape. I didn't have enough tape to be able to go all around me several rounds. The traditional way of closing a petticoat like this is to have one set of ties from the back piece that you tie in front of you, and one set from the front piece that you tie in the back. Well I only tied it on one side. 
I left a pocket opening on the other side, but the tape is not open there. Still it's possible to adjust the size waist with the tape on the one side.

The whole skirt is knife pleated. The side seams and the seam attaching the fabric to the tape is sewn on the machine, but it is hemmed by hand. 

What the item is: a generic 17th-18th century petticoat
How it fits the challenge: Made from a long piece of leftover fabric cut in two and pleated to fit, no fabric was left afterwards.
Material: 2 m of linen/viscose blend
Pattern: no particular pattern
Year: 17th-18th century
Notions: 1,5 grosgrain tape, modern sewing thread
How historically accurate is it? The fabrics and notions are modern but the model is correct. So 50%
Hours to complete: 2, most of it for the hemming
First worn: not yet
Total cost: $20


Thursday 11 March 2021

Dyeing fabric for the jedi obi and tabards

 I haven't finished the outer tunic yet, but I decided to work on the fabric for my obi and tabards.

Here you can see the white fabric that I had planned to use. I definitely felt that the white colour was too much of a contrast to the brown fabrics. I first decided to just tone it down with a tea bath.


This was the result after a quite concentrated tea/coffe bath. One shouldn't expect more than a different in shade when using tea/coffee. Worse though was that there must have been some red dye residue in my big pot, becase even if you can't see it clearly here, there was a lot of pinkish splotches on the fabric. I also started to feel that even the toned down colour was still too much of a contrast to the browns. Looking at many of the jedi in the films, most of them keep to just one base colour, I really wanted to get a more brown fabric.

I went to the paint store that also carries limited supplies of dye. The problem was there was only a brand that should be used in the washing machine, and they only had one brown option. Well I went for the brown option and decided that I could probably go ahead and dye on the stove top, or rather in my big plastic vat in the bathroom that I've used before.


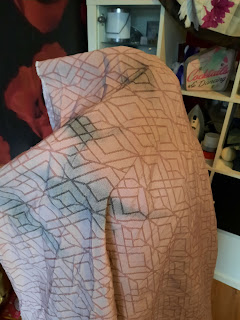
Now at least the fabric got brown, and not dirty white. It was obvious that the fabric that I thought was a cotton was a blend of cotton with some synthethic fibre that didn't take the dye at all. Still the cotton fibres took enough dye that the base fabric turned very lightbrown. An unexpected effect was that fibres in the pattern took the dye very differently, so the geometric pattern went from almost invisible to very clear. This means that I will not have to embroider the pattern to make it stand out.


I got some bad splotches, apparently the dye hadn't quite dissolved when I put the fabric into the dye bath. It's a lot less thant he pink splotches that were there before the brown dye, and I will be able to work around that part of the fabric and still get enough of fabric left for the obi and tabards.

Here is the fabric just draped over the dressform with the inner and outer tunic. The gemoetric pattern actually have the same colour as the inner tunic so now I feel that all the colours and fabrics blend in a lot better. I think I'm going to call this my chocolate-caramel jedi.

Sunday 7 March 2021

Starting the jedi outer tunic

 After finishing the inner yesterday I was on a bit of a roll. Today there has also been several long distance skiing competitions on TV, perfect to have in the background while you are working.


I kept working with the same dress pattern (Simple Sew - Lena). For this though from the side seam, instead of the curved armscye I simply angled a line outwards to get that extra fabric over the shoulder. This is needed to create the shoulder tuck that most, but not all jedi have.

There is a waist seam, and I used the skirt from the dress pattern as well. I had to make it bigger though, so I measured the bodice waist and enlarged the skirt pattern pieces so that they would fit. In the end I made the outer tunic a bit longer than I had planned, it goes to just below the knee. Since the hem is almost 3,5 m it has a really nice flow though, and I think it will look really nice together with the skirt that I'm planning on using. 

Now it's just the sleeves and closure to go, and then it's time for the tabards and obi.

Saturday 6 March 2021

The faux jedi undertunic is done

 Today I finished the jedi undertunic. 


It's only the parts that are visible that are made in the linen/viscose blend, I filled out the rest with a very think black jersey fabric. Even if the wrap-over section is real it is sewn together, and then attached to the black skirt portion. The skirt is so it will be easier to tuck the whole tunic into the skirt. Since I hate make sleeves I felt that I could do the top part in the jersey as well, since it's so much easier to fit sleeves in knitted fabrics compared to woven. The undersleeves are extra long so that they are bunching around the wrists.

The collar is just a straight strip of fabric folded double and sewn to the bodice.