The August challenge for the HSM is "Extant originals -
Copy an extant historical garment as closely as possible". When I first saw the challenge I really thought that I was going to skip this challenge. I knew that I would be busy sewing for Medieval week and NärCon during the summer, and to be honest there aren't that many extant originals for the 16th century, or rather not extant originals that are possible to make with a limited time and budget. When preparing my Viking costume I realized that it could be good to have something warm, and I had seen a lot of hoods called Skjoldehamn hoods, and then I also realized that they are actually based on an extant original.
Not only was this a preserved original that would fit my Viking costume, but there has been a whole MA thesis in archaeology about the Skjoldehamn find, and it was available for free. It is in Norwegian but with a lot of pictures and illustrations.
Nye tanker om Skjoldehamnsfunnet by Dan Halvard Lövlid
First an introduction about the find. In 1936 they found a body buried in a bog in Skjoldehamn, northern Norway. The bog had preserved the clothes, and gave unique insights into a male viking outfit, or is it? Dan Halvard Lövlid has in another essay,
The Skjoldehamn find in light of new knowledge argued that it is likely that the clothes worn are more likely of a Sami origin, Sea Sami to be precise, and that even if it's likely a man it can't be dismissed that it is actually a woman that was buried in Skjoldehamn. What is clear is that the burial is dated to the 11th century and that the clothes have elements that point to both Norse and Sami traditions.
In the rest of the post I will go through what Lövlid writes in his thesis, and my choices and execution of the reconstruction.
Fabric and thread
The original is made out of a dark brown wool twill and sewn with wool threads in different shades of brown and gold.
I did not have acess to brown wool, so instead I have made it out of red wool twill. I have used wool thread in brown, gold and white. This makes my stitches very visible, compared to the originals, but they also show clearly how I have made them. Since this is a reconstruction I think it adds some interest to actually see the seams.
 |
| The cut out fabric |
Pattern
The pattern consists of three pieces, and here I made a mistake. I didn't understand how it was made just from reading the text, until I was well into reconstructing the hood and it was too late to change my pattern mistake. The original is made out of a square main piece and two smaller squares. I have made mine from a long rectangle and two squares.
I did a miniature version of both patterns to show the differences.
My shape of the pattern is to the right and the original shape is to the left. As you can see there are two cuts in the square piece, but it is not completely cut through.
The original was folded, the cuts acted as one opening for the face and one opening to add the front gore into, the hood is then sewed together at the top and the back. My rectangle is simply folded and leaves the front open, and you only need to sew the back together, since the top is a fold.
The different way of approaching the cutting of the pattern is due to saving fabric. For me, using a modern fabric on 150 cm width it's more economical to cut one long and narrow strip all along te width of the fabric, but fabric woven on a handloom is not as wide and then it is much more economical to use a square piece of fabric.
Lövlid has the measurements of the hood in his thesis. The body that was buried was between 155 and 160 cm, and since I am 162 cm I decided to reconcstruct the hood with the original measurements. Now the hood has been distorted and the back is not as well preserved as the front. I have made all the missing fabric symmetrical with the front, and I have also made the square gores symmetrical, even if the original today is not perfectly symmetrical.
The main piece is 1 m long and 25 cm wide. The two gores are squares with a side of 25 cm. The distortion of the original shows one side of 23 cm and one of 28, I decided to use a measurement between them.
The gores
The front gore is attached to the main piece by placing it under the man fabric, and fold the main fabric over the gore. It is then sewed together with fairly big stitches. On the inside the raw edge has a whip stitch with a filler thread to protect the edge.
 |
| The main piece is folder over the gore. |
 |
| The seam from the right side |
 |
| The felled seam on the back |
The back gore is different. The left side has the main fabric folded over the gore, but on the right side the gore is folder over the main fabric. Lövlid mentions that the right side is a selvage and that this could be a reason for the different fold. I didn't have a selvage edge on my fabric, but I would also like to add another possible reason. I'm right handed, and it was easier and quicker for me to sew the seams when they were folded in the same direction, compared to the mirrored folds on the front.
The top and back seams
The original has the edges of fabric folded down and then whipstitched together. Since I only had a fabric fold it wasn't really necessary for me to sew them together, but I simulated the top seam with a pleat and then I added a whipped seam on the top of the hood.
Under the top seam there are several distinctive seams. One seam go all along the front, one seam goes just a third of the way, and a third seams goes all along the top, but then loops around the shorter seam. They are all done with running stitches.
The back seam is sewn with big slanted stitches. My stitches actually ended up too small compared to the original.
The top seams gives the hood a distinct mohawk-like style, but they also fit the hood closer to the head of the wearer. That there are more seams in the back could be a sign that it simply was too big for the wearer and that it had been adjusted for the fit.
Face opening
The face opening has the raw edge turned once and then whip stitched down with a filler thread. The original has filler thread in different colours. It is unclear if it is done for a decorative effect, or of it it is simply a case of using left over pieces of thread.
I used white filler thread for most of the hood, but switched to a more golden colour for the last third. I used pieces of thread that had been leftovers from the other seams. The fact that the change in filler thread is in no way symmetrical makes me think that it was not a design choice, but simply a way of using up small pieces of thread.
Bottom edge
The bottom edge is left unfolded. The raw edge is whipped down, with stitches that wary considerably in size.
 |
| Smaller stitches to the left, bigger to the right |
Some stitches were 1,5 cm big, but most stitches were between 0,5-0,8 cm. I actualy thought the edge with the bigger stitches looked better than the smaller ones.
One of the sides of the front gore has small buttonhole stitches, the other side is not preserved but I chose to continue the buttonhole stitches on the other side of the gore as well.
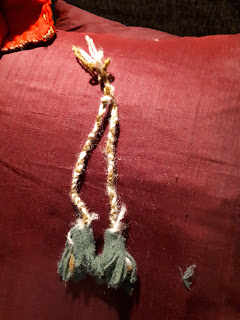
Braids and tassels
On both sides of the hood there is a braid, that ends in a tassel. The left braid is preserved in its full length, the right side is shorter and lacks the tassel. The original is a four double stranded braid, meaning that in total 8 threads are used, made from brown and green wool thread. I used brown and white thread to make the braid. The original tassel is a heavily fulled green fabric. I used a piece of wool flannel. Since it wasn't heavily fulled I dunked it in some warm soap water and squeezed it to full it more. The tassel is sewn to the end of the braid with large stitches.
 |
| Dunking the tassel in water and soap |
The left braid is 19 cm, including the tassel. I chose to use the same measurements for the right tassel.
 |
The finished braids.
|
The braids with tassels are sewn to the front of the hood. There has been an argument about their purpose. If they were made for tying under the chin, then the right tassel would have needed to be a lot longer than the left one. Lövlid argues that instead they were possibly tied behind the head of the wearer, to open up the hood and make it easer to see. It is also possible that they were just there for decoration.
Decorations
On the original hood there are a few strands of thread left quite high up under the top seam on both the left and right sides. They are not connected to any other seam, and the thread is clearly visible against the fabric. The thread is very loose. Lövlid speculates there might have been some kind of decoration added to the hood. I chose to add a small glass bead on each side. This is in style with Norse decorations, but if the hood is more connected to the Sami culture I think that some decoration in silver would have been better.
The finished hood
Me wearing the hood with the side braids left hanging
Me wearing the hood with the braids tied in the back. The tassel also helps so that I didn't need to make a full tie or bow, I simply twisted both braids around each other and the tassels kept them from unraveling.
The fit of the hood
The hood is tight, it will possibly loosen up with wear, but now it's snug. I should not wear any elaborate hairstyle under it, since it is going to be ruined when I pull it on and off. The snug fit will be comfortable when it's cold and windy. To tie the braids behind the head definitely helps with making the field of vision bigger.
The collar portion is not very well fitting. Even if I am about the same height as the person that was buried, I have a bigger chest, and possibly wider shoulders. It bunches up and doesn't lie flat around the upper body at all.
Some reflections
This was an interesting project. I would actually say the quality of it is worse than what I would normally make. I would not do such big and uneven stitches, and I would use waxed linen thread instead of wool. Copying a piece that I feel is of not the best workmanship was a good experience though, and it made me realize that the quest for perfection that a lot of us costumers have, actually isn't always the most accurate method of working. Seams can be badly done, but still serve to keep the garment together, and then they are good enough.
Just the facts
The Challenge: 8 - extant original
Material: 1 m of red wool twill
Pattern: From Lövlid's thesis on the Skjoldehamn find
Year: 11th century
Notions: thread: wool thread, yarn, two beads
How historically accurate is it? This is the most accurate piece that I have ever made, it still has some speculation in it and I am not sure on how my thread would hold up to VIking age thread. I will put it up as 90% accurate
Hours to complete: 10 hours
First worn: August 11th at Medieval Week in Visby.
Total cost: From my stash
Final thoughs
Accurate, but not good looking. That was the general reaction when I wore my hood on the one cold and rainy day in Visby. At the moment I'm not sure if I'm going to keep it in this state, or if I should remake it into something better looking. I would lie to make a more even bottom edge, add some larger gores and possible change top seams. At the same time it is fun to have a garment that's ugly, but it's supposed to be that way. We will see what happens with it in the future.


