This was a small project, that of course took longer than planned, but it was fun.
I bought the "American Duchess Guide to 18th century dressmaking" when it was released, but I haven't really been into any big 18th century projects this year. When I made my roundgown and chemisette for I used the book for inspiration, and then I felt the need to make a new reticule. There were some weird accessories in the 1790's and I wanted something more than just a soft bag with a drawstring. I picked their "Sundae best" reticule, on page 221.
I used some cream silk satin for the soft part, and the cardboard for the bottom structure was from a moving box. I thought about what I would use for the bottom part, and then realised that it would be fun to be able to call it a "snow cone" if I kept to a winter theme. I didn't have any exta silk, so I took some grey high quality poly satin, and then for trim I used a silver etallic braid.
The silver braid was fraying a lot, but that made it possible for me to cut off a piece of braid and use the strings to make the tassle.
Overall the instructions in the book were easy to follow, I think there is one typo in the pattern, asking you to cut two pieces of fabric to cover the cardboard, when you need 4, but otherwise it was really good. The reticule is handmade, mostly because it was a nice little project to work on while watching TV. The finished bag is roomy, but the silk ribbons were narrow enough that they cut into my wrist when I wore my phone in the bag. I could probably use some wider ribbons for that.
Showing posts with label 1790's. Show all posts
Monday, 10 September 2018
Tuesday, 4 September 2018
Jane Austen Garden party at Hildasholm, Leksand
Last weekend it was the end of season celebrations at Hildasholm in Leksand. Hildasholm is a stately cottage that is well worth a visit for the beautiful gardens and interiors from the early 20th century, a lot of arts and crafts and romanticism.. It was a small summer house for the insanely rich Hilda Munthe, so when she wasn't in one of her bigger houses in England or Italy she stayed in Leksand.
They had chosen to call the day a Garden party à la Jane Austen, and I took my mother and new late 1790's outfit and went there.
To be honest I didn't notice a lot of Jane Austen, but it was a nice market day, and if you were in historical dress you got a guided tour in the house for free. I happen to know the head guide there, and since he knows my interest in historical clothing he pointed out a few extra things. The most exciting thing was that in the big doll house there is a miniature Fortuny gown for a doll, modelled after one of the two Fortuny gowns that Hilda Munthe owned. Unfortunately those dresses are in her home in England and not in Leksand though.
I wore my new roundgown. It was really comfortable, but a bit too long even with my Kensington shoes so I will need to shorten it a few cm. Under it I wore my late 18th century stays, small bumpad and petticoats. I had borrwed a bonnet from Linnea, and added the chemisette and a new redicule as accessories. I had not had time to starch the collar of the chemisette, but it worked fine anyway. I was happy when I found a portrait of Hilda's great grandmother, and she was also wearing a soft and unstarched chemisette in the early 19th century.
The gown was really comfortable, but I will need to fasten it with some pins to keep it from sliding down, the belt was not enough to keep both of the gown in position.
As I said my mother also wanted to come, and be dressed up. My mother has a lot of physical disabilites, including the spine and hips, so she can't wear a corset. She also would need to be able to wear a pair of walking shoes instead of something more historical. That made it a bit problematic, since she's taller than me and all my 18th century skirts are on the short side to begin with. In the end she could wear my gaulle, and for headwear we wrapped a big scarf around her head as a turban.
So yes my mother was a lot more daring in her fashion choice, compared to my prim and proper dress.
I did meet up with some other people in costume, and I've been invited to their chat group, so it's quite likely that there will be more regency themed events happpening in the future.
They had chosen to call the day a Garden party à la Jane Austen, and I took my mother and new late 1790's outfit and went there.
To be honest I didn't notice a lot of Jane Austen, but it was a nice market day, and if you were in historical dress you got a guided tour in the house for free. I happen to know the head guide there, and since he knows my interest in historical clothing he pointed out a few extra things. The most exciting thing was that in the big doll house there is a miniature Fortuny gown for a doll, modelled after one of the two Fortuny gowns that Hilda Munthe owned. Unfortunately those dresses are in her home in England and not in Leksand though.
I wore my new roundgown. It was really comfortable, but a bit too long even with my Kensington shoes so I will need to shorten it a few cm. Under it I wore my late 18th century stays, small bumpad and petticoats. I had borrwed a bonnet from Linnea, and added the chemisette and a new redicule as accessories. I had not had time to starch the collar of the chemisette, but it worked fine anyway. I was happy when I found a portrait of Hilda's great grandmother, and she was also wearing a soft and unstarched chemisette in the early 19th century.
The gown was really comfortable, but I will need to fasten it with some pins to keep it from sliding down, the belt was not enough to keep both of the gown in position.
As I said my mother also wanted to come, and be dressed up. My mother has a lot of physical disabilites, including the spine and hips, so she can't wear a corset. She also would need to be able to wear a pair of walking shoes instead of something more historical. That made it a bit problematic, since she's taller than me and all my 18th century skirts are on the short side to begin with. In the end she could wear my gaulle, and for headwear we wrapped a big scarf around her head as a turban.
So yes my mother was a lot more daring in her fashion choice, compared to my prim and proper dress.
I did meet up with some other people in costume, and I've been invited to their chat group, so it's quite likely that there will be more regency themed events happpening in the future.
Wednesday, 29 August 2018
A very simple chemisette
My new roundgown has a very deep neckline. It's very flattering to the bust, but not really suitable for daydress. I decided to make a chemisette to cover the bare skin. For the chemisette I looked at the chemisettes in Arnold and in the American Duchess guide, but I mostly improvised on my own. It's not my most beautiful work, but it's ok.
It's made of a very thin cotton voile. The front is made of two pieces, wider at the top and tapering down. Now for a nice early chemisette I shouldn't have tapered the front so much, the originals were more square. The sides have, not very even, rolled hems.
The back is just one piece, and not very tapered.
The bottom hems of the fronts and back are wide enough to thread a cotton tape through to keep the chemisette in place. From the side it's very obvious that the whole chemisette is pretty loose, but it will stay in place under the gown.
The collar was a cheat. Instead of making several layers, I cut one fairly wide piece of fabric and folded it in not quite half, to offset the edges a bit. The collar was sewn to a cotton tape and then sewn onto the main chemisette.
I am thinking about trying to starch the collar to make it stand up a bit more, now it's quite flappy.
The chemisette is handsewn, mostly because it's been nice to do something while talking to people or watching TV.
It's made of a very thin cotton voile. The front is made of two pieces, wider at the top and tapering down. Now for a nice early chemisette I shouldn't have tapered the front so much, the originals were more square. The sides have, not very even, rolled hems.
The back is just one piece, and not very tapered.
The bottom hems of the fronts and back are wide enough to thread a cotton tape through to keep the chemisette in place. From the side it's very obvious that the whole chemisette is pretty loose, but it will stay in place under the gown.
The collar was a cheat. Instead of making several layers, I cut one fairly wide piece of fabric and folded it in not quite half, to offset the edges a bit. The collar was sewn to a cotton tape and then sewn onto the main chemisette.
I am thinking about trying to starch the collar to make it stand up a bit more, now it's quite flappy.
The chemisette is handsewn, mostly because it's been nice to do something while talking to people or watching TV.
Sunday, 26 August 2018
Am I a regency convert?
While waiting for the material for my Melisandre coat I got bored, and since I have a problem with a stash that is bulging I decided to use up some of my fabric. Next week there is also a Jane Austen Garden party that I would like to go to, so I started to think about updating my gaulle in some way. The easiest way would be to make a half-robe or open robe, out of the cotton curtains that I brought home for free earlier in the year. With a half-robe I figured that it would be possible to raise the waist on the half-robe, and thus make the whole ensemble look a bit later than the mid-1790s.
I started with cutting out the fabric and linen lining, using the gaulle pattern but cutting it shorter to raise the waist.
I mainly used the half-robe from Janet Arnold's Pattern of Fashion (p, 44). To make it cross over I freehanded the bodice lines in front.
The linen lining is fitted closer to the body and closes with three sets of ties. All the photos on the progress are taken on my dress-form, which is not working when I'm doing historical fashion, so it fits better on me than on the dress-form.
For the sleeves I used the roundgown sleeve pattern from "The American Duchess guide to 18th century dressmaking" as an inspiration, but I cut it out a lot bigger and then draped it until it fit fairly well It's not my most well-fitting sleeve, but I really wanted the sleeves to be roomy and comfortable, and the regency allows for a bit of puff on the top of the sleeve.
To set the sleeves I first sewed on the bottom of the sleeve. For this project I'm using the machine for all the invisible seams.
I then sewed the top of the sleeve to the lining, by machine, before I folded the outer fabric over te sleeve and sewed it on, covering the raw edges under the outer fabric. For this I did by hand, using a small backstitch.
Then it was only to hem the neckline of the lining and ouer fabric.
The fine tuning of the neckline shape is done with the help of two buttons and straps.
To make selfcovered buttons I cut out a round piece of fabric and made small gathering stitches all around it.
I pulled the fabric around a round shanked button, and then sewed it on to the gown.
I made a small loop of cotton ribbon and attached it to the inside of the lining.
The loop goes around the button and ruches the neckline to create the final shape.
When I had started working on the gown, and the bodice was done, I decided that since I had so much fabric, then I could just as well make a full roundgown, and not just a half-robe. I used to widths of the curtains, but I had to cut away around 10 cm on each side because they were really worn and sunbleached.
Most of the fabric was pleated into the back piece.
I pinned the rest of the fabric all around the bodice, and the excess fabric was gathered into two small pleats at the side seams. On the Arnold half-robe there is only a pleat on one of the side seams, but I rather have two pleats than cutting off fabric, also with my wide hips I figured that it wouldn't be bad to have some extra fabric there.
The last thing was to make a half belt, that goes from side seam to side seam. It fastens with a hook and bar.
While working on the gown I think I might have become a bit of regency convert. I've always said that I don't like regency and that it's a fashion that is not flattering to my figure. When I have tried it on during the process I have gotten quite surprised on that I feel really comfortable and nice in it. The simplicity of the construction, the use of cotton and comfortable sleeves have definitely made me understand why it's so popular with regency fashion.
Now it should be said that this dress is still mostly rooted in the 1790's, with the waist just a bit above the natural waist.
Now I hope that the weather will be nice and that I will get to that Jane Austen garden party.
I started with cutting out the fabric and linen lining, using the gaulle pattern but cutting it shorter to raise the waist.
I mainly used the half-robe from Janet Arnold's Pattern of Fashion (p, 44). To make it cross over I freehanded the bodice lines in front.
The linen lining is fitted closer to the body and closes with three sets of ties. All the photos on the progress are taken on my dress-form, which is not working when I'm doing historical fashion, so it fits better on me than on the dress-form.
For the sleeves I used the roundgown sleeve pattern from "The American Duchess guide to 18th century dressmaking" as an inspiration, but I cut it out a lot bigger and then draped it until it fit fairly well It's not my most well-fitting sleeve, but I really wanted the sleeves to be roomy and comfortable, and the regency allows for a bit of puff on the top of the sleeve.
To set the sleeves I first sewed on the bottom of the sleeve. For this project I'm using the machine for all the invisible seams.
I then sewed the top of the sleeve to the lining, by machine, before I folded the outer fabric over te sleeve and sewed it on, covering the raw edges under the outer fabric. For this I did by hand, using a small backstitch.
Then it was only to hem the neckline of the lining and ouer fabric.
The fine tuning of the neckline shape is done with the help of two buttons and straps.
To make selfcovered buttons I cut out a round piece of fabric and made small gathering stitches all around it.
I pulled the fabric around a round shanked button, and then sewed it on to the gown.
I made a small loop of cotton ribbon and attached it to the inside of the lining.
The loop goes around the button and ruches the neckline to create the final shape.
When I had started working on the gown, and the bodice was done, I decided that since I had so much fabric, then I could just as well make a full roundgown, and not just a half-robe. I used to widths of the curtains, but I had to cut away around 10 cm on each side because they were really worn and sunbleached.
Most of the fabric was pleated into the back piece.
The last thing was to make a half belt, that goes from side seam to side seam. It fastens with a hook and bar.
While working on the gown I think I might have become a bit of regency convert. I've always said that I don't like regency and that it's a fashion that is not flattering to my figure. When I have tried it on during the process I have gotten quite surprised on that I feel really comfortable and nice in it. The simplicity of the construction, the use of cotton and comfortable sleeves have definitely made me understand why it's so popular with regency fashion.
Now it should be said that this dress is still mostly rooted in the 1790's, with the waist just a bit above the natural waist.
Now I hope that the weather will be nice and that I will get to that Jane Austen garden party.
Sunday, 9 August 2015
18th century hair styling
So over the last days I've tried to style my hair in 18th century styles. I can do a decent pouf, as seen here, but that has never been my favorite hairstyle, and at least at the moment my 18th century wardrobe is a bit later than when the pouf was fashionable. Of course I am dreaming of one day having a huge hedgehog hairstyle, but in order to achieve that I would need to style a wig, and now I only had my own hair to work with.
For the photoshoot at Staberg I started the evening before that and put my hair in a lot of pincurls.
I did the pincurls by first wetting my hair and then rolling it around my fingers. I didn't really have a strategy so I just rolled and pinned the hair up. When all the hair was up I dampened it some more, and then I put it all under a buff so that I would be able to sleep on it without the curls coming loose.
The reason why I prefer pincruls is because when they are pinned up and under the buff there's no problem sleeping on it. I've tried to sleep with the hair bound up on both foamrollers and hard plastic rollers, and it's been so uncomfortable that I haven't slept much at all.
This is what my hair looked like the next morning, when I had removed the pins.
My hair naturally falls in a very visible part, if it's allowed to fall by itself, so to avoid that I pinned the middle section back, and then I simply started to tease the hair as much as I could. I actually think my hair is a bit too long for a really good bushy hairstyle, because it tends to droop down. I tried to solve that by pinning the end of the hair up under the rest of the hair.
This close up from Staberg is the one that shows off the hair best. It's quite nice, but it's not enormous enough. I want more hair. I also think I need to practice teasing the hair better.
Now today I dressed up in 18th century style again, but today I wanted to use my gaulle and go for a 1790's look instead. The event was a small scale affair, and since I went there alone I don't have any pictures from it. I did try out driving in stays though, and since I hadn't cinched them totally that was no problem. the last few kilometers when I had stayed, cinched the stays and put on the gaulle was no fun though.
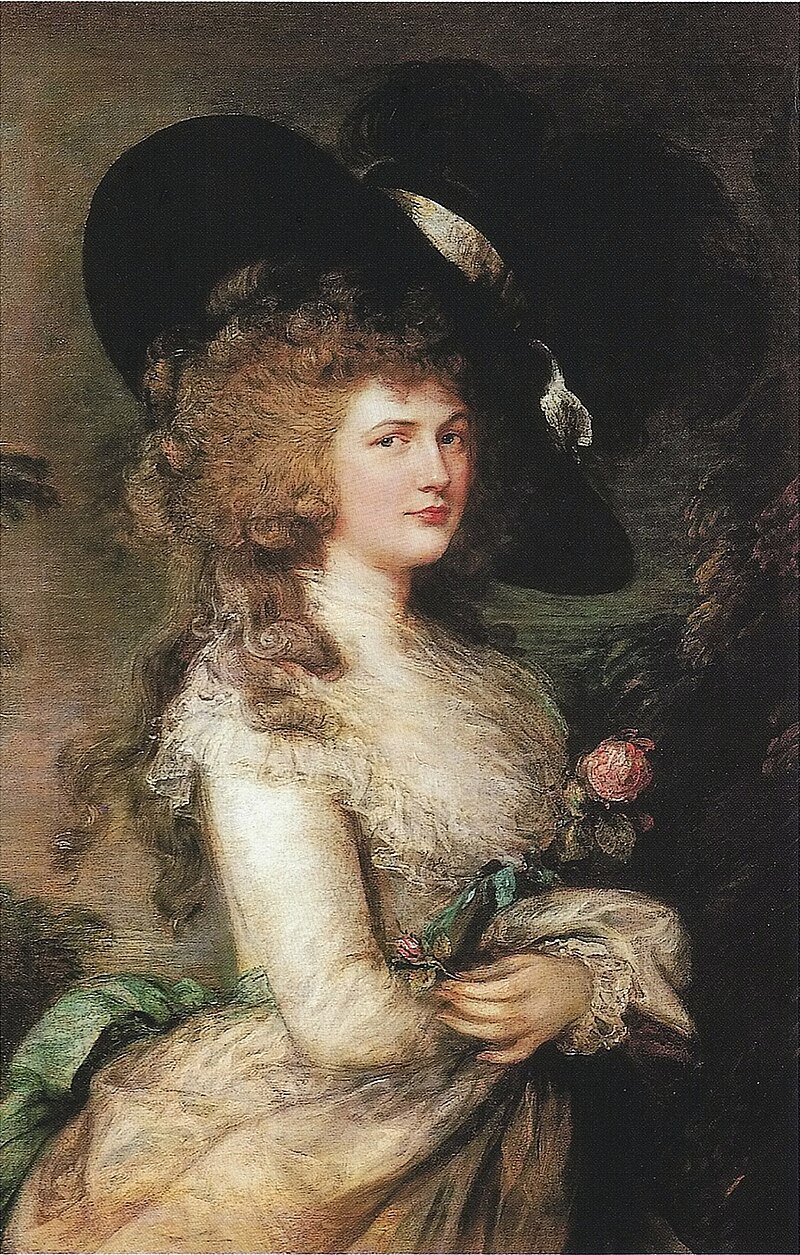
Anyway for the hair today I realized that after all I have the wonderful 18th century hair & wig styling book, so why not use it. What I really like about this book is that it has both an extensive chapter with photos of portraits and what the hairstyles actually looked like, and then it also has the instructions on how to achieve them. For this hairstyle I mostly followed the instructions for the "Adela - simple short and long hairstyle". Working with my own hair I knew that I wouldn't be able to achieve the full style, but looking at the reference pictures in the first part of the book I felt that I could achieve something quite good anyway.
Just like with the previous hairstyle I started the day before with rolling the hair up. The main difference is that I was more thorough with how I parted it, making two distinct sections of hair (back and front). I also rolled the curls in front with the help of roll form, it's a spoonhandle from the kitchen. This made the curls a lot more uniform. In the back I used larger foamrolls for the hair. Unfortunately I ran out of foamrollers so I had to braid the hair and hope that I would be able to heat set it with my curling iron in the morning. The curling iron didn't give anything like results of the wetset curls though, so in the end I simply took those bad curls and pinned them up under the rest of the hair to give it some volume.
When I took out the foamrollers and the pins I didn't brush out the looks. I simply used my fingers to shake the out a bit and added a hairband.
I'm quite pleased with this hairstyle, but when I do it again I would like to use a bigger roll form and see what difference that would make to the hairstyle.
| One day my hairstyle will rival the Duchess of Devonshire's. |
The reason why I prefer pincruls is because when they are pinned up and under the buff there's no problem sleeping on it. I've tried to sleep with the hair bound up on both foamrollers and hard plastic rollers, and it's been so uncomfortable that I haven't slept much at all.
This is what my hair looked like the next morning, when I had removed the pins.
My hair naturally falls in a very visible part, if it's allowed to fall by itself, so to avoid that I pinned the middle section back, and then I simply started to tease the hair as much as I could. I actually think my hair is a bit too long for a really good bushy hairstyle, because it tends to droop down. I tried to solve that by pinning the end of the hair up under the rest of the hair.
This close up from Staberg is the one that shows off the hair best. It's quite nice, but it's not enormous enough. I want more hair. I also think I need to practice teasing the hair better.
Now today I dressed up in 18th century style again, but today I wanted to use my gaulle and go for a 1790's look instead. The event was a small scale affair, and since I went there alone I don't have any pictures from it. I did try out driving in stays though, and since I hadn't cinched them totally that was no problem. the last few kilometers when I had stayed, cinched the stays and put on the gaulle was no fun though.
Anyway for the hair today I realized that after all I have the wonderful 18th century hair & wig styling book, so why not use it. What I really like about this book is that it has both an extensive chapter with photos of portraits and what the hairstyles actually looked like, and then it also has the instructions on how to achieve them. For this hairstyle I mostly followed the instructions for the "Adela - simple short and long hairstyle". Working with my own hair I knew that I wouldn't be able to achieve the full style, but looking at the reference pictures in the first part of the book I felt that I could achieve something quite good anyway.
When I took out the foamrollers and the pins I didn't brush out the looks. I simply used my fingers to shake the out a bit and added a hairband.
I'm quite pleased with this hairstyle, but when I do it again I would like to use a bigger roll form and see what difference that would make to the hairstyle.
Monday, 26 May 2014
Photoshoot pictures
Wednesday, 14 May 2014
HSF Challenge 9: Black and white
This is the challenge that grew. My first plan was to just finish the gaulle, since it's white, then I realized that it would look a lot better with a sash, and since the challenge was black and white I decided to make a black sash. I found something that was described as silk organza on ebay, and it was so cheap that I decided to take a chance and buy it. I was quite sure that it wouldn't be silk, but when it came it didn't behave like poly organza at all. I didn't do a burn test, but I'm pretty sure that it is actually silk.
So I sewed together three lengths of organza to make a sash that was long enough and hemmed it by hand. Then I felt that the outfit wouldn't be complete, so I decided to make a hat as well, and decorate it with what was left of the organza and some white pearls.
The challenge costume consists of three parts:
The white gaulle, the main piece. It's made of 6 m of cotton voile and one meter of fine linen to line the bodice and sleeves. The seams of the bodice and the side seams of the skirt are sewn by machine, but felled by hand. The sleeves are totally sewn by hand, and all the hems as well. For more information on the gaulle you can follow the tag 1787 revolutionary.
The sash, made out of 1 meter of silk organza, sewn by hand.
The hat, made from a storebought straw hat and leftovers from the silk organza. A full post on the hat can be found here.
As a bonus it's worn with the stays from HSF14 challenge 4: Under it all and a petticoat I made for the HSF13 challenge 15:Colour challenge white.
I also had to try the full outfit on myself. I must say that it's probably my favorite historical outfit I've ever made. I really hope that I can get the chance to make a proper photoshoot with it. As for now I just threw it on and put on my big wig, without styling the hair.
The HSF facts:
The Challenge: 9 - black and white
Fabric: 6 m cotton voile, 1 m linen, 1 m silk organza
Pattern: Self drafted from the instructions in Constructing Historical Clothes, and with inspiration from the bib front gown in Patterns of Fashion 1.
Year: ca 1790
Notions: sewing thread, pearls, straw hat
How historically accurate is it? The gaulle and the sash around 85%, the hat 25%
Hours to complete: The gaulle - 1 month, the sash - three evenings, the hat - 3 hours
First worn: For the photo above
Total cost: gaulle - ca $65, sash - $4, hat - $20
What I've learned with this challenge
This is a challenge that has really helped me to develop a lot of different skills. For the first time I've drafted my own pattern, I've handsewn most of the gown and I even made the hat.
So I sewed together three lengths of organza to make a sash that was long enough and hemmed it by hand. Then I felt that the outfit wouldn't be complete, so I decided to make a hat as well, and decorate it with what was left of the organza and some white pearls.
The challenge costume consists of three parts:
The white gaulle, the main piece. It's made of 6 m of cotton voile and one meter of fine linen to line the bodice and sleeves. The seams of the bodice and the side seams of the skirt are sewn by machine, but felled by hand. The sleeves are totally sewn by hand, and all the hems as well. For more information on the gaulle you can follow the tag 1787 revolutionary.
The sash, made out of 1 meter of silk organza, sewn by hand.
The hat, made from a storebought straw hat and leftovers from the silk organza. A full post on the hat can be found here.
As a bonus it's worn with the stays from HSF14 challenge 4: Under it all and a petticoat I made for the HSF13 challenge 15:Colour challenge white.
![]() |
| Front |
![]() |
| BackS |
![]() |
| Side |
| Me barefoot and out of focus, but still |
The Challenge: 9 - black and white
Fabric: 6 m cotton voile, 1 m linen, 1 m silk organza
Pattern: Self drafted from the instructions in Constructing Historical Clothes, and with inspiration from the bib front gown in Patterns of Fashion 1.
Year: ca 1790
Notions: sewing thread, pearls, straw hat
How historically accurate is it? The gaulle and the sash around 85%, the hat 25%
Hours to complete: The gaulle - 1 month, the sash - three evenings, the hat - 3 hours
First worn: For the photo above
Total cost: gaulle - ca $65, sash - $4, hat - $20
What I've learned with this challenge
This is a challenge that has really helped me to develop a lot of different skills. For the first time I've drafted my own pattern, I've handsewn most of the gown and I even made the hat.
Subscribe to:
Posts (Atom)