Showing posts with label tusken female. Show all posts

Sunday, 4 January 2026

2025 recap part 2 - the cosplay projects

 I am not as productive when it comes to cosplay, but that is also because when I make a cosplay project just one project involves everything from top to toe, so it's hard to make just small and quick cosplay projects. For 2025 my plan was to finish my female tusken raider and to make a Toadette cosplay from Supermario. 


The tusken female had been an on and off project for more than a decade, so it was really time to finish it. I got it done in early spring and had it approved in both legions by the summer, so that I could use it for trooping for the first time at Stockholm Comiccon. I really like the costume and it is quite comfortable for being a masked costume. There are quite a lot of posts about the projects here.

The plan to make Toadette for NärCon turned out to be a bigger project than I had planned when my husband agreed to come with me to NärCon and to wear cosplay for the first time. The whole project ballooned, literally when it came to our hats, and in the end it wasn't such a small and easy project, but it was fun and my husband loved it and wore his Toadbert costume more than I wore Toadette. The project posts are here


My husband even got so hooked on cosplay that for comiccon he wanted to go in cosplay, even if I couldn't fit the Toadbert hats in our luggage. The answer was for him to grab his bathrobe, a towel and a tea mug and go as Arthur Dent from Hitchhiker's guide to the galaxy. And yes he proved more popular and people recognized him more in his 5 minute closet cosplay than my painstakingly researched and quite expensive Tusken.

Sunday, 16 March 2025

Female tusken photos

 So as usual it was so much fun finally being able to try your new costume for the first time. The weather was lovely, so I brought my husband and decided to go to work for some photos.

It was fairly easy to get into the full costume, even if it of course helped to have someone help you with things like holding the gloves and wraps, since those are put on after the mask when your vision is quite impaired.


After the more formal photos it was time to have some fun with my tusken baby


Taking the costume out for a spin, before it's time to actually wear it to an event is good. For this I learnt that it's quite light and comfy, and I feel more mobile than in my old costume. A bad thing though is that when I lift my arms the bodice of the undergown shows, that's in another fabric than the skirt. I need to fix that someone, but since the skirt is quite long it will probably not be a problem to shorten the bodice quite a lot and raise ths skirt. I also need to do something about the sash and belt that keeps the bag on, I need to combine them into one piece so that the bag belt is always hidden under the sash. The final thing I need to fix is the bump on the back of the skull, I still ned to take in the top part of the hood to make it lie more smootly against the head.


And a final thank you kiss to my husband, who hasn't even seen all Star Wars film, but was nice enough to come with me as a photographer.

Friday, 14 March 2025

The female tusken gown

 I realised that I had never posted about the gown that I will wear as the base layer for the female tusken.

I sewed it up in the summer, because me and my friends were planning a dye day.


It was a day when we had access to our combined large pots, an outside kitchen and a garden with both garden hoses for water and a place to hang the fabrics to dry.


I had problems finding a good dye. The fabric in the dress is raw silk and viscose, while the shawl is polyester. I also didn't want to dye them brown, just sand coloured. In the end I used a dye that was called "caramel" and it didn't really dye as dark as I wanted it to. The photo above shows the fabric for the shawl and the gown when they were still wet.

And this shows the fabrics when they were dryed. It's also very clear how different the fibres take on the dye, with the viscose taking on the most and the polyester the least. That was also why I needed to make a really strong dye bath for the shawl to darken it a bit more.

The fabric for the skirt and sleeves is a gorgeous, slubby raw silk, or silk noile. I only had a limited amount of it, that's why I made the bodice out of viscose, since that won't be visible anyway. For the tusken you can opt for short or long sleeves. For my old tusken I had rather short sleeves, but it was always hard to make sure that the arm wraps stayed up well enough to leave no gaps between the sleeves and the wraps, so this time I went for longer sleeves. 

Tuesday, 11 March 2025

Reusing my old parts for the female tusken

 With a new shawl, new gown and new mask and bracelets it was time to go up to my storage and retrieve the parts from the old tusken to see what I could use.


I found a plastic box with quite a lot of stuff in it, both for my jawa and tusken. Except for the old shawl and hood, jawa scraps and fabric strips I found quite a lot of things that I can reuse.


The armwraps and gloves. The armwraps are sewn on to a loose sleeve of stretch fabric, so I can just pull them on and don't need to rewrap them every time.


A gauze sash and a long strip of fabric to use for holding up the bag.


My old boots. Strips of fabric wrapped and glued to a leather boot. I think the extra strips of fabric that I had in the box are in case I wear these out.


The bag was actually not from the old tusken, instead this was the first piece that I remade when I wanted to redo the tusken, so still more than 10 years ago. It is still the most complicated leather work that I have done, and back then I thought I would like to learn leather work, so I also found a pair of leather scissors and some other leather tools. The bag lacked the tusk decoration, so I made one out of foam clay and added it on to the bag.


I also had kept my tusken baby waiting to finally get a day out.


The final things that I will keep are these shoe covers. I made them for a journey to a Celebration in Orlando, I'm thinking it must have been 2012. I didn't want to pack my whole boots, so I made shoe covers that I can use over any shoe when I need to be mindful on how much I can pack while travelling to an event.

And with all these old parts down from the attic I felt that it was time to get it all on and take new approval photos for the 501st and Rebel Legion


Saturday, 8 March 2025

Tusken female shawl take two

 When I just want to finish something, then I'm bad with documenting what I do so I just rushed this process on to get the shawl finished.

For my take two I gave up on working with tucks. Instead I started with just sewing myself into a sheet and adjusting it until I had a good fit. Then thankfully I had a friend that I could dress up in this and I freehanded the segments with a pen and cut the sheet up at the lines to get a pattern.

I started from the top and made sure that I got that fit right before going downwards. This was a bit tricky since it needed to be a lot tighter than I had planned at first. In the end I made it tight enough so that when the mask is on, it is held in place just by the hooded part of the shawl. This is unlike my old version, where the mask was first held in place, and then I simply put the shawl on over it.

Getting the hole for the mask was the most fiddly thing though, and in the end that process ate a more fabric than I thought it would, so that after four segments in place it was a lot shorter than my mock up. The good thing with working one segment at a time though was that I could simply make the fifth segment a bit wider to be back on track.

Finally the shawl was done! Then at least it was time to do the fun part, weathering it.


First it got a a proper dunk in a strong teabath, the tea should really look black. And then it was time for me to unleach my secret weathering weapon.


This was something I discovered when I did my original tusken. The water from the mine where I work reacts in interesting ways with the tea stains. It's not a water that I would recommend drinking or bathing, but it's perfect for this. For my last tusken I simply took the costume on and walked a bit in the mine, for this I felt it was easier to get some water up and spray it on the fabric. Once the mine water hits the fabric that's been in a tea bath it both lightens the fabric and turns it into a strange grey colour. So I worked the shawl from the bottom and up, making sure to get it more dirty at the bottom. I also had the gown that goes under it get the same treatment and I hung them up together so that I could work on them at the same time.


And with that the shawl was done. I made sure to protect the bathroom walls behind the shawl since I didn't want to stain them.


Monday, 24 February 2025

Female tusken failure

 So it was time for me to start with the soft parts of the female tusken, the main thing I have left to do.

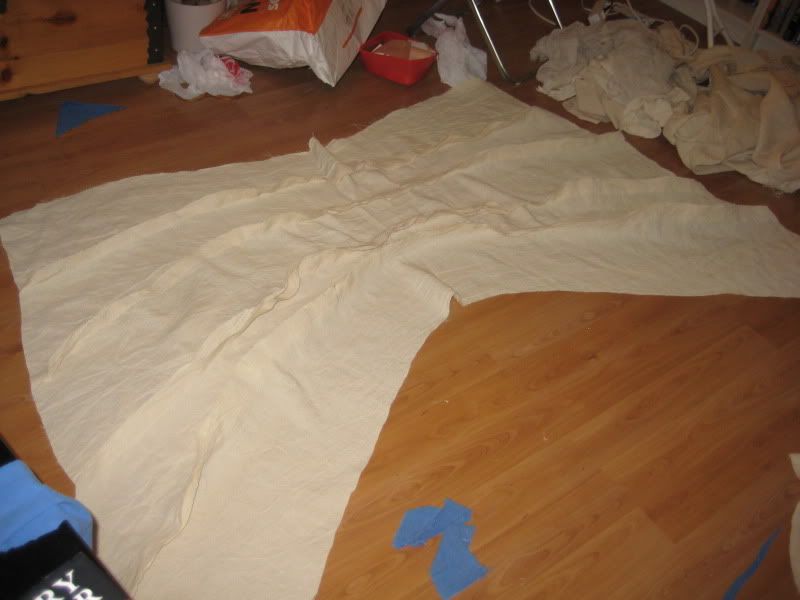
After having stared at this image in high resolution for far too long I realised that there is omething strange going on with the fabric. The weave of the fabric continues without a break over the frayed edges and into the next segment. Either they have done some crazy pattern matching when cutting out, or the fabric simply isn't cut. The more I thought about the only solution would be if the fabric was pleated into tucks, and then those tucks would be cut open and the fabric frayed to create the edge. Tha would also explain why there is a female tusken whitout a frayed edge on the seams, it looks like it is inside out, and it might be possible that the tuck is so small that it didn't create a nice fray so then they just turned it the other side out. That is purely my speculation.

A huge issue here was to be able to work this by my own, it would have been a lot easier to work on a body.


Well some creatitivy with a styrofoam head and the stand for my dress making mannequin at least gave me something to work on, even if the head is way smaller than my own.


After a day of pleating and pinning and tacking this is where I was at. I felt like a Christmas tree when wearing it, definitely not the body hugging shawl of the female tusken. It was also way too short in the back.

I simply couldn't get enough fabric on the sides to shape it. With that I decided to give up on this experiment. I still think there is pleating going on, but I think that the shawl was probably first sewn together to get the silhouette, and then smaller tucks were made to create the fringe. Since I want to finish this fairly quickly I will probably go back to the common way of doing the shawl, which is to cut cut fabric strips and sew them together. Like I did with my first tusken female. Bonus is of course that it's a fairly quick and easy method, I only hope that the fabric I have, and that I have made some cuts in, for example the face opening, will be enough. But first it time to undo all the pleats.

I still think it's important to show when something goes wrong, it's so easy to just post the good results. And I am still convinced that there are tucks and not separate fabric pieces, I am just not the person to figure it out completely.


Saturday, 10 February 2024

Female tusken mask build

 So back in 2013 I posted about my Female Tusken and that I had sold the mask and that my main goal was to build a new mask and start using the costume again in 2014.

My old female tusken costume

Since then I have sold the mask and bag, lost the bracelet and gotten rid of the underdress. So what I have left is a leatherbag, without the bone clasp, gloves and armwraps, boots and the hood. Now I think that I will remake the hood anyway for this new project, but my first priority is to make a new mask, and in fact I bought a mask kit in 2012. It is not available anymore, it was a run of masks made for people in Denver, Colorado, and I got in on the last remaining one after the Denver build. I have started the mask a few times, but I have been a bit too worried about my skill in building and then I've quit the project.

Now I really want to finish it so I hauled out my mask, and realized that in my start with the kit so many years ago I had made a few things I would not have don today. I had made cuts in some of the bricks to what I then thought would make them align better with each other, I had also cut out and clued the white, flat "bone"s to some of the pieces. In doing that I had cut them shorter than I would have preferred today, but I don't know what kind of glue I used I simply couldn't get them off without risking the integrity of the pieces. So I had to continue where I left off.


The first I did was to paint the main pieces. For a base layer I used the brand Cospaint in espresso gold. The good thing with cospaint is that it is a bit flexible and it also works as a primer so you can paint directly on foam with it, you don't need to seal the foam first. 

I felt that the espresso gold was too brown though, so I dry brushed a layer of antique gold acrylic paint on top of the espresso gold. This gave it a beautiful brass colour. Now if you follow the 501st legion CRL for this costume they have an example of a mask that is very brown copper, but if you look at the reference pictures of the actual costumes they are much more brass than copper.


With that all the base paint was done. 


I then sanded off the paint on the pieces that I was going to glue to the connecting "bone" pieces. For glueing I used contact cement.


Where I glued the "bones" to the square pieces I got a bit of a gap. As I mentioned the "bone" pieces were done back in 2014 or so, today I wouldn't have assembled them like that. The gap was filled in with foam clay. And the good thing with cospaint working on foam is that I could then paint the foam directly once it was dry.


The squares, and bones, were glued to a backing piece of canvas using contact cement. I also had to bend the top bone pieces so that they can fit to the curved mask. Here is where I noticed that when I cut the bones I hadn't taken the curve into account, so today I would have cut them longer.


Once the glue had dried I cut the backing canvas to just follow the outline of the harder mask. Then it was time for the fun that is weathering. I dry brushed a mix of verdigris and ivory black acrylic paint, I also used a paper towel to wipe off excess paint when it was on. In some places I felt that I went a bit overboard and then I dry brushed some more antique gold acrylic and cosplaint in copper over that.

And with that the mask is finished and ready to assemble so I can wear it, and then it's time to start on the hood itself.


Saturday, 30 November 2013

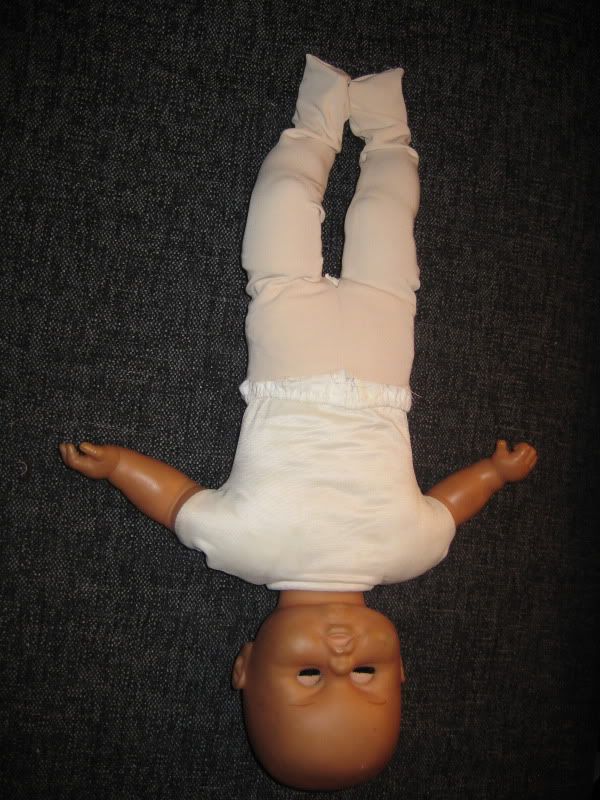
baby tusken

Original uli-ah costume
As an accessory to my female tusken I have also made a uli-ah, a tusken child. My first wish for accessory was a big tusken rifle, but unfortunately I discovered that that was impossible since I can't lift my arms enough in the shawl to be able to carry a rifle. I'd like to get a gaffi stick one day though. Anyway, since I am a seamstress I figured that I could sew something instead of building or sculpting a weapon.

I didn't have a fully grown child to go with me, but instead I took one of the dolls I had saved from my childhood. The doll that I still had left was my favorite doll, which meant that for sentimental reason I had to make the clothes fully removable. One day I'd like to buy a cheap doll and dress it in the costume so I can return the original doll to its cute clothes it had when I played with it. For the materials I simply used leftovers that I could find in my stash.


Step one was to make a pair of tights for the doll I used a doll pattern that I had from making doll clothes to my nieces and a piece of sand coloured stretch fabric. It was the same stretch fabric that I had used to make gauntlets to put my arm wraps on for my female tusken.


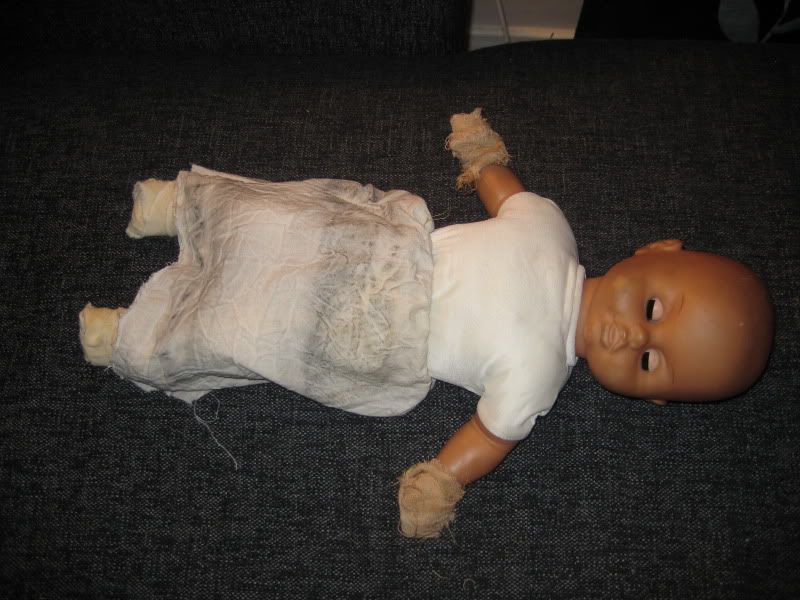
Then I added a skirt made out of crinkled cotton. The dirt is simply watered down hobby paint that I've sprayed on to the fabric. I also wrapped the feet and hands with small strips of teadyed cotton to make it resemble boots and gloves. The fabrics for these were all leftovers from my own female tusken costume


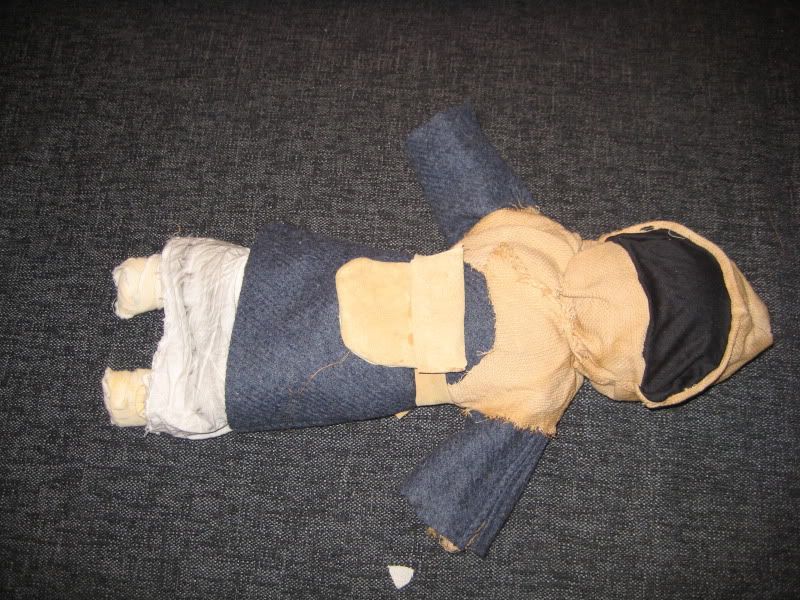
Then came a tunic made from the last remnant of the wool coat that I had used to make the flak vest for my A-wing pilot costume.


The last thing was a little pouch and belt, made from what was once a suede bag I found for 10 SEK at a second hand store and that I have used when I needed strips of leather.

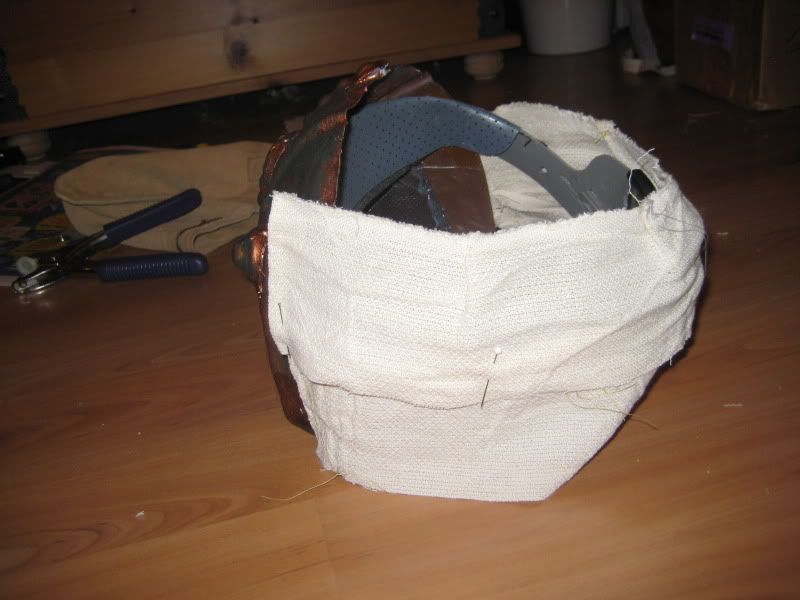
I didn't do a fully constructed mask, but rather a hood that I sewed some casing into and put a bit of wire so that it could hold its shape. The vest and the hood are made from the same cotton as my female tusken shawl, and then teadyed.


Friday, 29 November 2013

tusken female

original costume
After having been a member of the Rebel Legion for 8 years, I felt it was time to go to the dark side as well, and I wanted to make a costume that would be approved with the 501st Legion. The choice was simple. I'm a seamstress, and I wanted something that I felt would be interesting to sew, I also wanted a contrast to all the fine details and finishing of my last projects. I decided to make a female tusken raider. The female tusken raider is just visible for a short while in Episode II, before they are cut down by Anakin Skywalker. Still there were a lot of references to the costume, and I felt that it was really beautiful. A good thing is that it's been out on quite a few exhibits as well, so there was a lot of photos of the original costumes.

I must also say that the thought of a worn and weathered costume appealed to me, all my costumes up to that point had been pretty, or made to look as neat as possible.

One decision that I took early on with this costume was that I only wanted to use natural fibres. I wanted fabrics that could breathe, since I knew that the costume was going to be a hot one anyway. I ordered all my fabrics from broarne.se. It's a web shop with a segment of natural fibres, the bad thing is that they tend to run out of fabrics, and when they are out of stock they don't come back. I also have a feeling that they have less fabrics in their selection now, compared to when I started looking inot them.

The first layer is an undergown in a lightweight crinkled cotton. I made it up as an historical chemise,
undergown
but I don't remember exactly which pattern I used. One thing I did though was to leave out the underarm gussets, instead there are just holes there. I figured that would help a bit with ventilation. When the underdress was finished it got a thorough rest in a tea/coffe/cinnamon bath. I also left some of the teabags in the water when I threw the gown into it, so that they would stain the fabric unevenly.

Building the hood.
The next step was to make the shawl. I decided to make it in two parts; the hood and the shawl.  The hood was build up around the foundation for the mask, I simply cut strips of the fabric and pinned them on top of each other until I had a hood. The rest of the shawl was a bit more complicated, In order to figure out the pattern for the stripes I wrapped myself in an old bedsheet, then I shaped it until I had quite a tight fitting piece around me. I drew the lines of where I wanted the stripes to go, cut up the bed sheet and used it as a pattern. I of course added seam allowance and some extra for the fringes of the strips.
the shawl before sewing it closed at the back

The rest of the fabric parts were pretty simple; tubes of stretch fabric to cover the arms, that I then covered in strips of fabric, a pair of cotton gloves, a pair of boots that I glued strips of fabric to as well. Then in order to get everything really dirty and weathered I too advantage of my job. I work in a historical mine, and it's very dirty. Par of my job is to go into the mine and check on the lamps that we have there. I simply wore the outfit on these rounds, which have made it really dirty. I also use the undergown every year when I'm doing our special Santa tours there. I simply wear the undergown together with a knitted sweater and a Santa hat. The bag was made by a friend, an

The big thing with this costume is the mask though. I bought a kit, the most readily available kit out there, painted and assembled it. I was never really happy with the result. It basically falls to pieces and the glue that keeps the pieces together can't hold it. I am very happy with how I painted the mask though.

The last time I wore the mask was at Celebration Europe II in July. I had actually already sold the mask and gave it and the bag away right after the tusken photo shoots. Since then I have bought a new mask kit, from another maker, and I have made a new leather bag. I only need to find a bone to put in the front. One of my main projects of 2014 is to finish the mask so that I can wear this costume again, it's really funny costume and since we have quite a few male tuskens around it's fun to run around and play out tribal life together.

Status: under reconstruction
A group of female tuskens at Celebration Europe II, 2013
April 2011