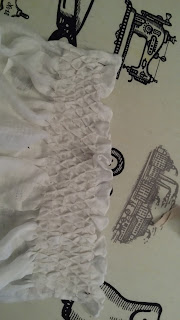
I decided to start my 16th century project with a shift, and a smocked shift at that. Smocking of course fitted well with the HSM challenge of tucks and pleats. This is a new area for me, and I haven't totally gone into full research mode on it. I relied heavily on the tutorials and instructions for a smocked shift, or hemd, by Katafalk and by Genoveva.
For fabric I used the last piece of fine linen that I had in my stash. It was a piece of 110x270 cm, and I thought it would be enough to make a narrow, but still smocked shift. I wouldn't had had a problem getting an 18th century chemise out of that.
Here is Genoveva's pattern for a shift that I used, even if I had to make every piece a bit narrower than in the pattern. I didn't sew the gussets, the sleeve or side seams, but just around 20 cm down to connect the sleeves to the back and front sections.
Then it was time to start with the smocking. I started with the cuffs, since I figured it would be good to start on a smaller section. I also first hemmed the edge of the cuff.
I made a template to mark out the dots for the smocking. For the cuffs I felt that the pleats were too wide, so I halfed them compared to the template, by simply putting an extra dot in the middle between all the dots of the template.
I first used my chalk pencil and then chalk, but it didn't work. The chalk broke all the time and the dots got too big. Still I did the cuffs with chalk.
I then sewed the gathering stitched and pulled the cuff together to fit my wrist.
I did honeycomb smocking, which was quite easy, but maybe not the best smocking pattern for my size of pleats. Still I'm really happy with my first ever attempt of smocking.
I covered the back of the smocking with a piece of fabric, to make sure it kept its size. I had ran out of fine linen so I used a piece of coarser linen for that.
Then it was on to the neckline. After having asked in the HSM group for a better way to mark the dots than chalk I simply used an ordinary pencil. The dots got a lot smaller, and it never broke.
I gathered and did the same honeycomb smocking as with the cuffs.
Then I needed to bind the neckline, and my first try was to make a casing strip and bind the edges with it. Like this example from Mary of Habsburg's shift.
Since I was out of fabric to make casing with I simply cut off a piece from the hem, thinking that as long as the shift reached below the knees it would be long enough. I sewed the casing on, and then I sewed the sleeves and side seams.
Then it was time to try the shift, and I was really disappointed. I had always known that the sleeves were on th edge of being too short, and now with the smocking done they were definitely too short. The neckline was gaping, since I hadn't cut the strip on the bias, and it was also somewhere in between a low and high neck. Still I wore the shift like that on the 29th of February, so technically I was done with the HSM challenge.
I started with making the sleeves longer. I ripped up the seam and to be sure that I would get a straight line, despite the pleats on the sleeves distorting the fabric, I pulled a thread in the linen.
I cut off the sleeves there, and then I cut two strips from the bottom of the shift (again) so that I could add them in and make the sleeves longer.
I then ripped off the casing, stretched the neckline until it was wider, and just like with cuffs I just covered the back of the smocking with a strip of fabric. For that strip I used the old casing, and I had to patch it with some of the coarser linen as well. One problem now was that the edge of the neckline hadn't been hemmed, since I had planned to keep it within the casing. With all the smal pleats it was not going to be fun trying to hem it. In the end I simply folded the edge over to the wrong side and attached it there. It was a selvage edge so I didn't have to worry about fraying.
With all the strips that I had cut off from the bottom, by now the shift was way too short. So I finished by adding a strip of the coarse linen to the bottom. For the photos here it should be noted that the dressform is around 10 cm shorter than myself.
 |
| The whole shift, front |
 |
| Side |
 |
| Sleeve, with the added strips of fabric |
 |
| Close up of the neckline smocking |
Just the facts
What the item is: An early 16th century smocked shift
The Challenge: 2 Tucks and pleats
Fabric/Materials: 110x270 cm fine linen, 150x50 cm coarser linen
Pattern: http://germanrenaissance.net/wp-content/uploads/2014/05/low-neck-hemd-pattern.jpg
Year: ca 1520
Notions: silk thread, hook and eyes (for the cuffs)
How historically accurate is it? I would place it around 85%
Hours to complete: 1,5 months
First worn: 29th of February (in it's first version)
Total cost: $5 for the silk thread, the rest was from really old stash fabrics.


This comment has been removed by a blog administrator.
ReplyDeleteThis comment has been removed by the author.
ReplyDeleteThis comment has been removed by a blog administrator.
ReplyDeleteThis comment has been removed by the author.
Delete