Friday, 25 October 2024

The Seatoun 1916 skirt

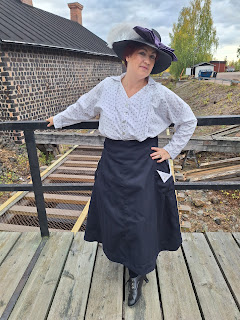
 Did I have the time to thrown in a random project last month? No. Could I stop myself when Leimomi Oakes of TheDreamstress and Scroop Patterns asked for pattern testers for a mid-1910s skirt? Also no. I already have the Scroop Patterns corset, petticoat and blouse for the time period and this would be perfect to get a whole outfit finished. The fashion 1915-1917 with the crinoline revival and swishy skirts is probably my absolute favorite historical era, after all it's no coincidence that I modelled my wedding gown after it. 


Leimomi said that it took her around 4,5 hours to make the skirt, so I figured it would a fairly straightforward project, and it was. It would have been even easier if I had chosen another fabric. I used a very dark navy herringbone twill in cotton, and it was so dark that all the seams simply disappeared. I couldn't see them, which led to me chosing a simpler finish on the long seams and missing some when installing the placket. I really like Scroop Patterns because of the instructions though, they are so so easy to follow and I know that even if something feels daunting I could just take a breath and follow the instructions step by step and I will end up with a nice end result.

The changes I made to this pattern was that shortened the skirt with 6 cm at the hem and I used slightly larger seam allowances on the waist belt. I made a size 42 and my belt ended up 92 cm instead of the 91,5 if I had made the pattern with the indicated seam allowances. 

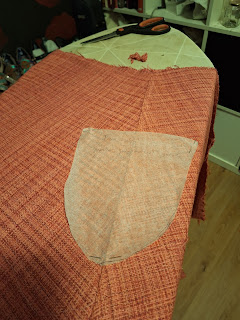
Another thing that I changed was that I raised the pockets. Mostly to make them reachable for my arms, but it also had the bonus of covering my wonky sewing at the bottom of the placket. In order to mark the new placement for the pockets I simply cut out the pocket placement marking from the pattern and placed it on the skirt until I was happy with where it was, then I marked it on the skirt and sewed the pocket on.


I am wearing the skirt with a Wearing Historys combinations, the Rilla corset, the Ettie Petticoat, my own pattern of a corset cover and the Selina blouse. This combination of clothes really illustrates the changes my body has gone through the last few years. The Rilla from 2017 is size 44 and it is slightly too large now, I had to fully close it in the back and I could have cinched it some more if I could have. The Ettie is made in size 48 or 50, and in order for it to stay up I made a hole in the casing for the elastic and then shortened the elastic quite a lot. This large Ettie was maybe a bit too large to get all the fabric properly under the skirt, it felt a bit bulky, especially since it is starched. The Selina is a size 46 and it definitely feels too big now. The hat is a summer straw hat from H&M that I've simply added a giant bow and some feathers to.


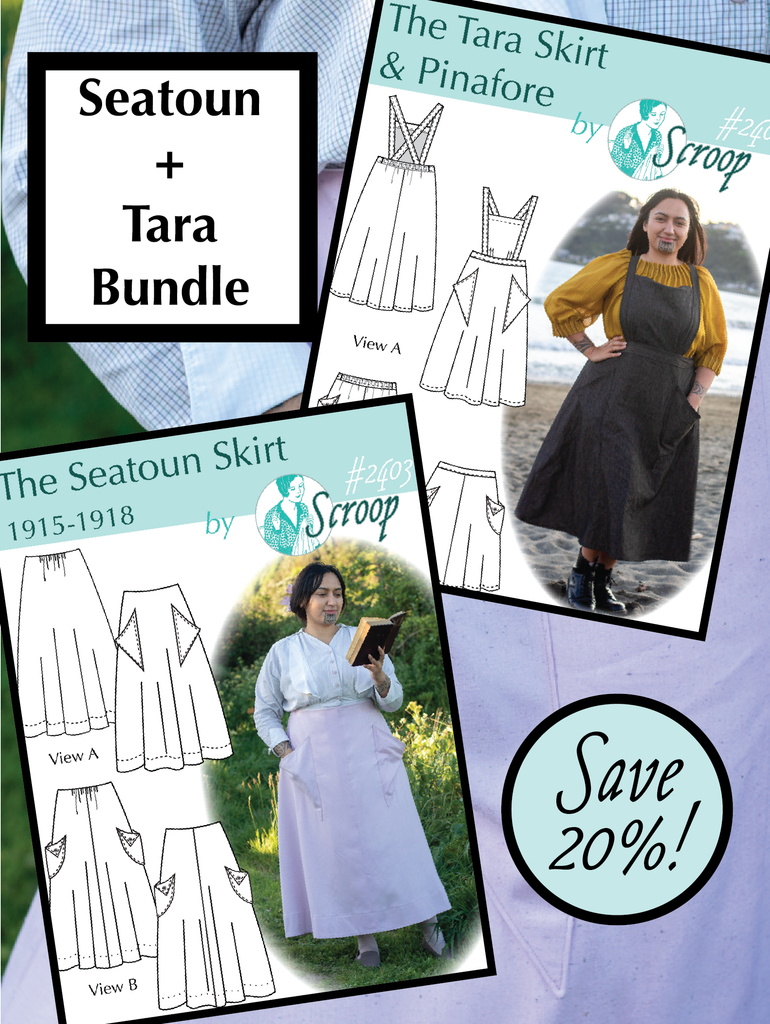
The pattern is now launched at Scroop Patterns and it also comes with a modernised version, the Tara skirt and pinafore. I was so happy with the Seatoun that I have already bought fabric so that I can make the Tara versions to use as everyday wear.


Sunday, 20 October 2024

A 1520s master miner/burgher couple

 Since I first started to make 16th century clothing I have wanted to make clothes that could have been worn by the master miners in Falun. Master miners were part owners of the mine and owned their own smelting furnaces where they produced copper, they then sold it. There was a wide variety of economical rank and they can be compared to landed gentry, with some being very rich and some just scraping buy. Over all they can be compared in wealth to the burghers of the towns around the Baltic sea.

My impression of a master miner's daughter back in 2018

When David entered my life I started out with making him a coat, but then we have concentrated more on the landsknecht style, not the least because he really wanted a landsknecht outfit and I mostly do events with the landsknecht group Stockholmsfänikan. 

Anyway this weekend Stockholmsfänikan and Proknekt had a party, and even if it was landsknecht themed, we decided to go as master miners, also because it's October and David didn't want to wear shorts and I felt that I for once could wear my longsleeved green gown without dying from the heat. Also for once I was not cooking so I could wear my blackwork cap and a white apron without risk of putting stains or scorch marks from the fire on them.


I have made a new best apron, that is white and with both whitework and blackwork and I wore my blackwork cap and black furline partlet. For David I had made a new pair of long hose, and instead of his usual blingy hat he got to borrow my red and more simple hat. A good reason to have accessories that you can mix up, and his headsize is the same as mine when I'm wearing a wulsthaube so that works out really well. He is also wearing the hairnet that I am wearing in the top photo from 2018, once again accessories are so good for changing up your costume.


The hose are mainly machine sewed from a quite small piece of wool. I used the pattern for the landknecht shorts but simply lengthened it. I am glad that my husband is fairly short, and still the hose legs just reaches his ankles. I will see if I can piece together the scraps that are left to make them go down a bit over the foot, even if there isn't enough fabric to make them footed hose. I have alsoe piecred the fabric up under the bum and the codpiece and flag that its attached to to make it work. They are held up by being connected to a sleevless doublet, I might add sleeves to it in the future but it is quite comfy to have just the west under the coat. It's up to him to fix a pair of proper shoes though, that isn't something I can make for him. 


Sunday, 29 September 2024

A fun and different Star Wars troop

 This year the Swedish garrison was invited to Gothenburg Book Fair, which is northern Europe's largest book fair and a huge cultural event. The theme for this year was "space", so we were invited to hang around and spread some space fun, especially in the area designated for children's literature and the like. 

We had a small booth but most of it was mingling around with visitors, and unlike a comic con and other kinds of science fiction convention I thought this was even more fun, because the visitors were really surprised and it was something fresh, unlike when people are more or less expecting us to be around and show off our costumes.

Since Gothenburg means a long journey by train I wanted to pack light, so I brought admiral Daala. Here I am in the Elsa Beskow diorama, Elsa Beskow is a classic 19th century children's author where the images are as important as the text in a way I guess she can be compared to Beatrix Potter.


What really made me travel though was the fact that my husband, who is an author after all, were there as well, so it was the first fair/convention we could be together. Well I trooped with the garrison, but when my troop duty was over I could change clothes and be with my husband and our other friends who are in working with literature in different ways.


Sunday, 22 September 2024

Scroop patterns summit dress

 I rarely make clothes for everyday wear. I simply think that my finishes aren't good enough. But when Scroop patterns released the "Summit dress" I felt that this was a pattern that I really wanted to make.


With my changing body after my gastric bypass last year I need some new clothes. I wanted a new autumn/winter dress. I have also wanted a dress that is  nice and neutral, but gives an air of historical fashion when doing lectures. The pattern is based ont he 14th century Herjolfsnes finds, but with modern construction methods and an option between modern lantern sleeves and historical sleeves, and different skirt lengths. I have made a simple medieval gown by measuring and cutting rectangular and godet pieces, with this pattern I also got a medieval pattern that I can use if I want to make another one, I only need to replace the machine sewing with handsewing and lengthen the 3/4 length historical sleeves.

The basic pattern is a very loose fitting dress. The size chart contains both your body measurements and the measurement sof the finished garments. I was exactly on the size 44, but having seen the tester makes I went down a full size to 42, and it is still very loose. I could probably have gone down another size on the main gown, but then the arms would have been on the small side. If I make this as an historical pattern one day I will probably go down to 40.

With the original pattern there were two things I wanted to change and that was the length and the sleeves. To shorten the dress I used the view B length, but I also shortened it 8 cm by the "shorten/lengthen" line on the lower part of the pattern. I didn't just cut off everything at the hem since I wanted the full width at the bottom. The sleeves, both the historical and lantern version, are 3/4 length, and since I wanted to use this in the autumn/winter I wanted to have full length sleeves. The lantern sleeves would make it hard to wear a cardigan or something over them to keep warm.


I made a quick pattern for where the bottom part is the length of the sleeve opening on piece K - lower sleeve, the lenght is the length of my forearm and the width at the top is width around my wrist. In a spur of th moment I added the point at the end of the sleeve. I added a facing in the same fabric instead of hemming it, to keep the nice point, and then sewed my pattern piece to piece K before sewing pieces J and K together as the pattern called for. 

The finished sleeves

The pattern for the bottom of the sleeve

The sleeve right side out

The sleeve wrong side out, with the facing


The sleeve is just enough wide at the wrist that I can get my hand through, so I don't need any closures there.


I definitely prefer to wear the dress belted, and that also gives some oppportunities to give some pop of colour to this rather plain dress. I usually wear a lot more colours and patterns in my everyway wear, this dress I can match with different belts and thights to keep it fun.

The dress is made up of a wonderful wool/viscose blend that I found at a real bargain online, so in the end the dress cost around $35. The patterns instructions were easy and good to follow, the mistakes that I made were totally up to me being sloppy. The one advice I would give for anyone making the dress is to switch the order and insert the back godet before the front godet. That was the most fiddly part of the pattern and my back godet went in better than the front, since it was the second one I made.

If you are curious about the pattern Leimomi/the Dreamstress and creator of Scroop patterns has one post about the pattern and two full posts about tester makes, here and here

And for full disclosure I have been a pattern tester for Scroop patterns and it is probably my favorite pattern makers out there, I bought this pattern with a discount code that I got from answering a customer survey earlier in the summer. This was the first time I made something from its range of modern patterns rather than historical patterns.


Sunday, 15 September 2024

Learning whitework embroidery

 After coming home from Visby I have been a bit both worn out from sewing, and restless from not having something to do. All the work I put in with making David's landsknecht meant that I got used to sewing a couple of hours every day, at the same time I don't know what to do right now. I don't need any historical clothing, and also don't have the inspiration to make something that I will just put in my storage, and I don't have a huge inspiration for a cosplay project either. I have made some progress with my female tusken, but when it was clear that I am going to miss the remaining conventions in the autumn I don't feel like putting on some extra drive into it.

So I decided to learn how to do whitework embroidery, and started with drawn work. Now I am not a person to make a sample, I am too impatient and wanted to make something I could use. Since I don't have a fine, white 16th century apron I decided to take the apron that I whipped together last year, but didn't have time to do anything with and add embroidery to it.

I started with drawing away threads, and this was the most fiddly bit.

Now I am unto separating bars of the remaining thread and this is slow, but fairly simple work. Quite nice to do while watching tv.

As for whitework and the 16th century there are definitely examples of white on white embroidery from the early 16th century. From the end of the century there are loads of wonderful, lacy aprons and other examples of drawn threadwork, white on white embroidery and pulled threadwork. I don't want to go for the late century though. The Sture-shirts have drawn thread work on them, and they are from the 1560s. It might be that the simply style was just coming into fashion then.


This drawing of Dürer from 1475 shows a faint line on the edge of the apron. It's impossible to say what kind of decoration it is, but at least a line of embroidery shouldn't be too out of place for the early 16th century judging from this. 

To help me learn the teqhnique I am using some of the books I have at home, but I am also very happy for the Royal School of Needlework's stitchbank with their clear instructions and images.


Friday, 23 August 2024

laundry day

 After the summer it is time for a big costuming laundry day. That means washing a lot of historical costumes and prewashing the fabrics that I have bought during the summer. In my apartment building with have a laundry room in the basement, and the best thing is the room for drying clothes, with an electric fan and heater.

kirtle, shift, wams/doublet and several meters of fabrics in the drying room

The shirts, shift, aprons and everything that is done in linen, cotton and hemp goes in the washing machine. That includes my blackwork shift. It is so old now that I don't consider it a "fine" shirt anymore. I wash them on a regular setting, but I hang them to dry instead of going into the tumbler. My experience is that the linen only gets softer with every wash. For my large apron, that had quite a few soot stains after cooking in Visby, I first sprayed it the stains with stain remover and that worked fine. The same goes for my wulsthaube that takes up red dye from my hair. For the wulsthaube I remove the wulst before washing, it is only tacked on in a few places, so I can simply wash the cap part of it.

Wool clothes are best taken care of by simply airing them. I live in an apartment without balcony though. I used to bring them home to my mother and hand them in her garden, but she is getting old and her short time memory is lapsing. That means that I am still missing some of my linen stuff from last year's airing that I had in her garden, I am pretty sure that some time in the future I will find them among her handkerchiefs or bedlinen, so I don't dare to do it any more. After shorter events I leave the clothes hanging in my living room, but now after the summer and a long event where I've been sweating and standing in smoke it is time to clean them. I simply use the wool setting on the washing machine together with a wool/silk detergent. I also only wash one item at the time. So far I have not had anything happen to the clothes.

For David's landsknecht outfit I was worried, the red fabric was bleeding a lot. His shirt that he had worn under it when it was raining had a lot of pink stains. That shirt was his cheap cotton shirt and it worked fine with stain remover and then a wash in the washing machine on the cotton setting. I was worried that the red would bleed and stain the pink part though. I did an experiment where I started with his socks, since one is red and one is pink. I threw them in the washing machine together with colour cather paper. 


When the socks came out fine, except for a slight stain on the heel, I decided to try the hose. For the hose I put stain remover on the pink stains on the lining and then I added three colour catcher papers to the wasching machine. I also removed all the loose ribbons and ties. When that worked fine I dared to do the same with the doublet/wams as well, adding four colour catcher papers.

The colour catcher paper after the doublet/wams washing

I was happy that I could wash the landsknecht outfit, and that means that I will probably do it at least once a year, after single day events I am happy with just airing the clothes. A reason why I dare use the washing machine is also that I have prewashed all fabrics, and if they survive the prewash they should survive washing as well. So during this washing day I also washed the wool that I bought at Medeltidsveckan and the fabrics that I am going to use for my female Tusken, so that they are ready to get some dye.


Tuesday, 20 August 2024

HSM24: stripes and dots - the landsknecht hose

The challenges: August: Stripes and Dots: Make something using striped or dotted material. The stripes or dots can be printed on the material, knitted/woven in to the material, or created with surface embellishment (ex: embroidery). Textural stripes or dots (i.e: those that are the same colour as the base fabric) are permitted!

For this challenge I will share the finished landsknecht hose that I made. The hose are not checkered since the pattern is elongated to form stripes of alternating red and pink. I made the stripes with alternating pieces of red and wool that were sewn together, and then the pattern for the hose were put on the new striped fabric. I have posted about the construction here: part 1 and part 2.


What the item is: a pair of landsknecht hose
How it fits the challenge: They are made from stripes of red and pink sewn together
Material: 1,5 m red wool, 1,5 m pink wool, 0,5 linen for lining
Pattern: my own with inspiration from the Alpirsbach hose
Year: 1520s
Notions: linen thread and silk ribbons to tie everything together
How historically accurate is it? 60%
Hours to complete: 1,5 months
First worn: at medieval week in Visby
Total cost: $150

Saturday, 17 August 2024

HSM24: Up your sleeve - the landsknecht wams/doublet

The challenge: June: Up Your Sleeve: Level up your sleeve game by making a garment where the focus is on the sleeves.

For this challenge it is time to post photos of the finished doublet. I have made posts about the construction here, part 1, part 2 and part 3. Especially the third part is all about the construction of the sleeves. 


What the item is: A landsknecht doublet with huge sleeves
How it fits the challenge: The sleeves took the most time and fabric to make
Material: 2,5 m red wool, 2,5 pink wool, 0,2 m grey wool, 2,5 linen
Pattern: My own
Year: 1520s
Notions: line thread, braided ribbons with aiglets for closure
How historically accurate is it? 85%
Hours to complete: 1,5 months
First worn: at medieval week in Visby
Total cost: $150

Thursday, 15 August 2024

HSM24 - all natural - a pair of socks

The challenge: April: Colours of Nature: Make something using undyed material, or material coloured with natural dyes

I have thought for a long time about making a pair of socks, what is normally called "trossfrau socks" if you google them. They are low cut socks made in linen and worn by women in the tross in the 16th century. There are several tutorials out there, I just haven't taken the time to make my own pattern. When I bought the docken barret pattern from Thimble&Plume I saw that they had a pattern for socks so I bought it.

They had a size guide, but since I bought it at work I couldn't measure my feet. I have quite normal feet (size 38) so I bought the medium pattern, but that was a mistake. Apparently I have small feet and should have gone with the pattern in small.


My feet were definitely smaller than the pattern. What I did was that I took in the upper part of the sock in the backseam, and then I pinned the sole piece until it fit. I sewed everything together using backstitch and then I used the time on the ferry to Gotland to fell all the seams and hem the opening.


A mistake that I made was that when I took the seam in of course made the opening smaller, and I didn't adjust that or make the slashes longer. Now they fit very well still, but I had to wiggle in the feet when I put them in. I also learnt that I had to be careful when putting the shoes on, if I just slid the feet with socks into the shoes the excess fabric bunched up at the heel and they felt tight at the toes. If I unlaced the shoes and put the feet down straight into the shoes they were really comfortable.

The linen that I used was a bit coarse, it was a scrap piece, but after having washed the socks once they were much softer and more comfortable. After having walked in them for almost a week I already have a small worn out hole in them that I will have to fix.

I will make more of these socks, so that I can change them more often during an event, but I think that when I make the next pair I will start with adjusting the sole, and then sew the backseam, and not other way around like I did with these. I also like that the pattern is not complicated when it comes to cutting them on the grain or bias, so it is easy to make them from scraps of linen.

What the item is: a pair of socks
How it fits the challenge: made from unbleached linen
Material: 20 cm of unbleached linen
Pattern: Thimble&Plume trossfrau sock
Year: early 16th century
Notions: linen thread
How historically accurate is it? 95%
Hours to complete: 5
First worn: at Medieval Week
Total cost: $5


Tuesday, 13 August 2024

HSM24: new clothes from old - the pink gown

 Back in 2022 I made a post proudly claiming that I would finally finished my pink trossfrau gown.  Well that never ended well. I got it into a wearable state, but I never finished the closure, instead I just pinned it together and I was so dissatisfied with it that I can't find a single photo of myself in it. It went into a bag to saved sometimes in the future.

With my weight loss journey the last year I decided that it was time to see if I could salvage it. I started with simply ripping off the bodice and the skirt. The bodice had always been a finished piece and the skirt were two lengths of fabric gathered together and whip stitched to the bodice. I also decided to see if I could change the cut of the skirt. I have more and more come to the conclusion that even if it's easier to just gather square pieces of fabric together, the more historically accurate way of making 16th century skirts is to make them as circle skirts. The two old pieces were enough to piece together an almost full circle, made up from gores. The end result is a skirt that is quite slim at the waist, but with a larger circumference at the hem compared to the first version. If I made a new skirt I would do gores, but I would like to make the skirt something like a 1,5 circle skirt and pleat in the excess at the waist. With the gores I had to cut the skirt shorter to fit them, so I haven't hemmed the skirt, just relying on the wool to not unravel to save a few cm in length.

The bodice was taken in quite a lot at the sides. For the sleeves I had to redo the upper part of the sleeve, thankfully the old parts were so big that I could cut the new part from them. They were to short though, but I added an extra strip of fabric to lenghten it, and then I added a decorative border over the seam to hide it. The lower parts could probably have been saved from the original, but I had lost one of them while they were in the stash, and there were enough fabric left from the recut skirt that I could make two new ones.

I also recut the neckline of the bodice, that was gaping on several places, but making it lower it fit much better. Finally the original gown had never gotten a finished closure so I made lacing holes to be able to close it at the front, and then I added more guards in a darker fabric at the neckline and sleeves. 

I wore the gown like this at Leksands medieval fair in May, and realised it was still way to big and bunching up a lot in the bodice.

So last week before leaving for medieval week in Visby I once again ripped off the skirt. I decided not to take in the width, that would have taken too much time to redo all the side and back seams. I big problem was that it was too long in the bodice though, so  I simply resewed the skirt on, but now 3 cm higher up to the bodice.

The new version worn without the lower sleeves.

I wore it like this in Visby. It is once again too big, I have lost more weight since May, but with the yellow kirtle under it it still looks nice. The bodice doesn't give any support, so when it was too warm to wear a kirtle, basically all the days, I wore it with my modern bra to get support for my breasts. I usually stay away from modern underwear to avoid a modern silhouette, but it was needed. I will probably take it apart and take it in again, and I need to make an underkirtle that isn't as warm as my yellow one.

What the item is: a pink trossfrau gown from 1510-1530
How it fits the challenge: The bodice was taken in and altered, the sleeves and skirt are totally recut from an older version of this gown that doesn't fit any more.
Material: and old pink wool gown
Pattern: my own
Year: 1510-1530
Notions: linen thread
How historically accurate is it? I actually think the cut of this version is more accurate, with a gored skirt instead of just gathered rectangles of fabric. I had to put some decorative bands on it to hide seams where I had pieced the sleeves together and that I haven't seen in sources, but somewhere around 75%. 
Hours to complete: it's been on and off during the last few months but probably around 20
First worn: Visby medieval week
Total cost: everything was made from the original gown, which probably cost around $150 for the fabrics originally

Sunday, 11 August 2024

The HSM portrait

 I'm going to share my favorite photo from Visby, and also explain why I love the HSM, or Historical Sew Monthly, challenges.

I joined the HSF, or Historical Sew Forthnightly, as it was called then back in 2014. My first entry on this blog is from the 13th of January 2014. The challenge was "make do and mend" and I fixed the fraying edges of my 18th century Snow White. Back then there were 24 challenges to a year, but it was later changed into a more easily managed Monthly challenge with 12 challenges to year. Some time later it was also changed so that you didn't have to finish the challenges in the corresponding month but could do them any time of the year.

The HSM is great because it keeps med going all year with sewing projects, instead of just trying to finish something for an event. They have challenged me to both do more accurate things, and to do things that I wouldn't have done otherwise. I would definitely not have made as many accessories if it hadn't been for the HSM, especially in the end of the year when I try to challenge myself to finish more challenges I usually go for using scraps and left over fabrics to make something.

The HSM is a Facebook group, and it's also a great community to post about progress and comment on each other's projects. 


On this photo we are wearing the following challenges

David
HSM24: September - new stitch in town - the docken baret
HSM 24: June - up your sleeves - the doublet
HSM 24: August - stripes and dotes - the hose
HSM 24: November - worn by all - the socks

Johanna
HSM 24: May - new clothes from old - the pink gown
HSM 24: April - all natural - the linen socks
HSM 19: September - everyday wear - the mustard kirtle
HSM 15: February - tucks and pleats - the pleated shift and HSM 23: January - back to the beginnings - repairs and mending of the shift
HSM 18: October - fabric manipulation - the smocked apron

So basically everything except what I am wearing on my head has been an HSM challenge, pretty fun to go through it and see how productive the challenges have been for me.

This is also why I still prefer to keep this blog going and not just post things on Instagram and Facebook, it's so much easier to go back in time and look for old posts and what I have done even if it's many years old by now.

Medieval week in Visby 2024

 So I have just come home from Medieval week, and as usual, it has been a wonderful time. There were two things that made this week different though. The main thing was that for the first time I was there with my husband, David, and sharing it with him made it so much better. Since he refused to live in the camp we stayed in a cute 18th century loft in the town century instead. I forgot to take photos of it, but it was basically a small and cute wooden house, complete with a hedgehog in the bushes outside the door, and even if we had to walk to the neighbouring building to have access to the bathroom, since the 18th century building didn't have any running water, it was very private and cozy.

Here are an assortment of my favorite photos of the week.

Most of our time were spent in the camp, even if we didn't live there

On Friday David's niece was visiting and she could borrow my yellow kirtle and helped out in the camp

I spend most of my time cooking and preparing food

My new huge apron was so good in that I didn't have to worry about my gowns under it

My favorite photo of us by the wall

Once again the apron really covered my wool clothes

The pink ladies of Stockholmsfänikan

I was mostly wearing my pink gown, but two of the days I simply wore the yellow kirtle


Saturday, 10 August 2024

HSM24: just peachy - a new gollar

The first HSM 24 challenge is: January: Just Peachy: “Peach Fuzz” is the Pantone colour for 2024! Make something in peach— or in the related colours of pink or orange

When I first saw the list of the HSM challenges I thought this would be the easiest challenge to finish, since my main projects this year (my husband's landsknecht and my remake of my pink trossfrau) involved pink. Then I felt that a lot of the projects fitted other challenges better. Well when I was finished with the landsknecht I still had some scraps of fabric left in the pink and red, and I decided to see if I could eek out a gollar from it.

Previously when I have made gollars I have based them on a circle pattern, now I decided ot make a more shaped and pieced garment. 

I first draped some pieces of scrap cotton on my dressform


Then I managed to get four pieces out of the last pink fabric. At this moment I didn't realize that I had forgotten to change the neck size so when I sewed these pieces together they were too big. I had to take them in at both the shoulder seams and back seam. The shoulder seams got a bit more shapingover the shoulders as well.

I added bias cut strips of red as decorations and the collar is also a strip of bias cut fabric. It is closed with a cloth button.
The backside was a bit more uneven.

I lined the gollar with a grey finer wool, to make sure that it was warm and nice, and to be able to make turn it inside out and wear it with my more simple clothes.

When I had finished the gollar I found that I still had scraps from the old furcoat left, the one I have used for a lot of garments by now, so I decided to edge the neck and opening in fur.

As I always do now when I add fur I first cut out the pieces that I wanted to have lined in another fabric, this time more of the pink wool. I then basted the fur to that fabric before I attached the fabric, with fur, to the gollar. 

With the fur on it's now quite as good looking on the inside to make it reversible, but it is really comfortable to have that feeling of fur around the neck on chilly nights.

I used it at Medieval Week in Visby, but most of the time it was warm so it was only at late nights that I used the gollar, and I didn't get any photos of it being worn.


What the item is: a wool gollar
How it fits the challenge: the base fabric is pink
Material: 0,5 pink wool, 0,5 grey wool, 10 cm of red wool, scraps of wool
Pattern: draped by me
Year: 1520s
Notions: linen thread
How historically accurate is it? around 75%
Hours to complete: 2 days
First worn: at medieval week in August
Total cost: $20