Friday 14 June 2024

Starting a landsknecht outfit

 After the big parade of landsknechtsbig parade of landsknechts last year in Stockholm David really wanted a landsknecht outfit. First he talked about making it himself, by Christmas we had both realised that wouldn't be feasible. I have spent a lot of time in the winter trying to drape a pair of hose for him, and now with less than two months to go until Medieval Week in Visby it was time to for me to really start. Early May we also visited friends in Borås and could pass some of the fabric shops to actually pick ut fabric. This also meant a redesign, since he had talked about wanting a pink costume, but here we found a beautiufl red so then he wanted red with pink lining, to be seen through the slashes.

The fabric that will be used, red wool, pink wool and a linen lining.

One reason why it has taken me so long to start is that I am really unsure about making male clothing, and that I couldn't decide on a design. I did want to make something fairly easy, but at the same time it is a landsknecht so it has to be flamboyant. There are also so many variations on decorations and models that it was simply hard to choose. I am not going to make an exact reproduction, so in the end these are some of my inspirations

Matthäus Schwars was a man in Augsburg that made a book with all the outfits he had worn throughout his life. This is from 1524. This was when I finally got something that I felt was a good inspiration. It's a fairly simple outfit, but the doublet has massive sleeves, and then the hose are not as heavily slashed and decorated as for example Urs Graf's Swiss mercenaries.


This painting had been an early inspiration when David said he wanted a pink outfit. The pink and red remains as colour inspiration.


Another original inspiration was this soldier that's on a mural in Lojo church in Finland, dated to around 1510-1520. His clothes are a bit more 15th century, but I liked the pattern of the hose.

Since the hose is going to be at least striped I realised that it would be better to start with the doublet, since the sleeves will take the largest single pieces of fabric, and once I have that done I could use the rest to created stripes for the hosen. Since the double isn't going to be as fitted as the hose I also felt it would be easier to start with it.


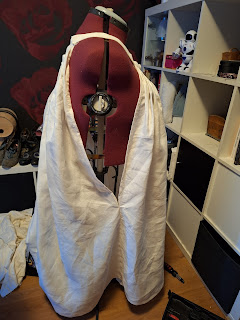
I have started with cutting out the bodice of the double. It consists of three parts. A full back and two fronts. The larger front will be overlapping the smaller piece, and that is why the smaller isn't a full piece, only the side going up to the shoulder and a flap that will be tied to the other piece to keep it in position.


Tuesday 4 June 2024

HSM Challenge 2024: Made to move - a generous apron

 At the moment I don't have any "fine" aprons, because all my 16th century aprons have been used when cooking and doing work in camp. They have stains and holes in them and look generally worn out. I'm also worried that the gowns that I wear get stains as well from workin, so I decided to make a big apron to really protect all my clothing.

In late 15th century and early 16th century art you see this kind of apron quite a lot.

Among reenactors it's commonly called a "midwife's apron", but this kind of apron shows up on people in a variety of occupations, even men. 

On a trip down further south I passed by a fabric outlet that had hemp fabric for sale and I bought 2 m of it for a bargain. I then started with cutting off a strip of fabric that I could use for the strap.


It's not cut on the bias, so the the strap doesn't curve perfectly, but here it was more about not wasting fabric. What was left of the fabric after the strap was simply cut in half to form the front and back pieces.


The fabric was marked and pleated one one side to the width I wanted it to have. I then hemmed the sides and sewed them together. It was simple trial and error to get the side seam as long as I wanted it.


The strap is one continous piece, with the top of the back and front sewn into the strap. This was also a trial and error to make the strap long enough. Since the late 15th and early 16th century is all about large headwear it is i mportant to make the head opening large enough to be able to get a wulsthaube through it. I might have done mine a tad too small. The front and  back are exactly the same.

Looking at the finished apron it looks a bit too wide, maybe I should have used less fabric? On the other hand all my wool gowns have skirt with a cirumference at the hem of at least 3 meters, so I don't want an apron that is much narrower than that at the hem. A thinner fabric might be better to get those soft folds that are seen in the art, but this is definitely an apron that will give a very full coverage over my wool gowns.

What the item is: working apron, also called a midwife's apron
How it fits the challenge: I made it so large so that I could move around the hearth, without having my finer gowns that I wear under it bunch up under it.
Material: 2 m of hemp fabric
Pattern: my own
Year: Late 15th early 16th century
Notions: linen thread
How historically accurate is it? around 75%
Hours to complete: 24
First worn: not yet
Total cost: $25


Monday 3 June 2024

HSM24: Challenge UFO spotter - an embroidered cap

 Back when I made my 1520s court gown I was quite a lot into embroidery, and I wanted to make an embroidered hood, that was not as fancy as my embroidered gold hood. In 2021 the Royal Armory made a challenge to take an object from their collections and turn it into an embroidery for World Embroidery day in August of 2021. 

One of their objects that I've always liked is this prayerbook, probably owned by Malin Sture, it's her family's coat of arms in the front and signed with by her siblings and cousins, she was cousin to the royal family. It is dated to the 1550s/1560s, so a bit later than my preferable time period, but I still took inspiration from the edge decorations and created a cross stitch pattern from it.


The photo above is dated to August 2021. I realized that I wouldn't finish it before the set date for the challenge, and since then it's been an ongoing project. I've packed it up with a plan to finish it, realized that I wouldn't do it and then I've packed it away again. It's also been a project that I've brought to our cosplay meets when I haven't had anything special to work on.

I had finsihed the bottom border just before Christmas 2022, but then I decided that it would look so much better if I doubled it, and then I packed the project away again. Finally I finished the whole embroidery in January 2024, only 2,5 years after I started it with a plan to have it done in a month or so. 

I felt that the empty spaces in the middle of the pattern should have something, and I had two different sets of metallic spangles. The larger ones were to big, but I added a small metallic spangle all the way.


I finally had a finsihed embroidery, with some extra bling. 


To protect the backside of the embroidery, both from wear and from my hair dye I added a strip of linen in the back. This can more easily be removed so that I can wash it if I need to.

Now came the rest of the challenge, and that was to remember how I had planned to make this project into a hood. 


I draped it over my wulsthaube, and it looked pretty good, but I felt that it was too bulky in the middle back ,and the result was also quite poofy, and I want a sleeker look for this hood.

Marlein - 16th century wardrobe has posted about three different kind of hoods, I don't quite understand her explanations, but I used her photos as inspiration for a new try.


I did remove quite a lot of fabric at the back corners to get rid of the bulk. I also hemmed all the edges, both because the fabric had started to fray at the sides during the handling of it over the years and because it means that I don't have to worry about finished them afterwards. It makes it easier to work from the outside.

I folded the fabric double and sewed the first 5 cm of the curved edge together.


The back of the cap, which shows the 5 cm ceam, but it's open above that. I also made eyelets along the edge under the seam, to be able to tighten the hood.


Then I decided to make an experiment and starch the hood before pleating the back. I don't know if hoods were starched, but starch was used for frilled veils in the 14th century, and I like the look and feel of starched linen. It also repels dirt. I used a medium starch, and dipped the hood while holding the embroidered border, I tried to avoid getting starch on the embroidery and spangles.

After pressing the hood it was time to pleat the back.


Folding the extra fabric and pleating it down doesn't have a specific formula. I try to work from the middle and get it even. Personally I like the look of a few larger pleats better than a more and narrower pleats. Since there are so few images of the backside of these kinds of hoods I don't know what was most common back in the day. The fabric was tucked in under the sewn seam in the back and the pleats were tacked in place.


This is what the inside looks like. I pleated the fabric from the outside, so you can see that it got twisted on the inside, but the important thing is that it looks good on the outside.


The hood is held tight by threading a ribbon through the eyelets and pulling it all together. The ribbon is tucked under the embroidered border, and that border is closed with a pin in the back. I used a satin ribbon, but might switch to a linen or silk ribbon later, but I didn't have one at home.


So here are the facts.
What the item is: an embroidered hood
How it fits the challenge: I started it in 2021, and just finished it in 2024 after a lot of procrastination
Material: linen fabric, silk thread, metallic spangles
Pattern: My own
Year: 1540s
Notions: linen thread
How historically accurate is it? around 85%
Hours to complete: It's a UFO so way too many
First worn: At a dinner in January 2024 (making this post was also a UFO)
Total cost: $50

''