Saturday 10 February 2024

Female tusken mask build

 So back in 2013 I posted about my Female Tusken and that I had sold the mask and that my main goal was to build a new mask and start using the costume again in 2014.

My old female tusken costume

Since then I have sold the mask and bag, lost the bracelet and gotten rid of the underdress. So what I have left is a leatherbag, without the bone clasp, gloves and armwraps, boots and the hood. Now I think that I will remake the hood anyway for this new project, but my first priority is to make a new mask, and in fact I bought a mask kit in 2012. It is not available anymore, it was a run of masks made for people in Denver, Colorado, and I got in on the last remaining one after the Denver build. I have started the mask a few times, but I have been a bit too worried about my skill in building and then I've quit the project.

Now I really want to finish it so I hauled out my mask, and realized that in my start with the kit so many years ago I had made a few things I would not have don today. I had made cuts in some of the bricks to what I then thought would make them align better with each other, I had also cut out and clued the white, flat "bone"s to some of the pieces. In doing that I had cut them shorter than I would have preferred today, but I don't know what kind of glue I used I simply couldn't get them off without risking the integrity of the pieces. So I had to continue where I left off.


The first I did was to paint the main pieces. For a base layer I used the brand Cospaint in espresso gold. The good thing with cospaint is that it is a bit flexible and it also works as a primer so you can paint directly on foam with it, you don't need to seal the foam first. 

I felt that the espresso gold was too brown though, so I dry brushed a layer of antique gold acrylic paint on top of the espresso gold. This gave it a beautiful brass colour. Now if you follow the 501st legion CRL for this costume they have an example of a mask that is very brown copper, but if you look at the reference pictures of the actual costumes they are much more brass than copper.


With that all the base paint was done. 


I then sanded off the paint on the pieces that I was going to glue to the connecting "bone" pieces. For glueing I used contact cement.


Where I glued the "bones" to the square pieces I got a bit of a gap. As I mentioned the "bone" pieces were done back in 2014 or so, today I wouldn't have assembled them like that. The gap was filled in with foam clay. And the good thing with cospaint working on foam is that I could then paint the foam directly once it was dry.


The squares, and bones, were glued to a backing piece of canvas using contact cement. I also had to bend the top bone pieces so that they can fit to the curved mask. Here is where I noticed that when I cut the bones I hadn't taken the curve into account, so today I would have cut them longer.


Once the glue had dried I cut the backing canvas to just follow the outline of the harder mask. Then it was time for the fun that is weathering. I dry brushed a mix of verdigris and ivory black acrylic paint, I also used a paper towel to wipe off excess paint when it was on. In some places I felt that I went a bit overboard and then I dry brushed some more antique gold acrylic and cosplaint in copper over that.

And with that the mask is finished and ready to assemble so I can wear it, and then it's time to start on the hood itself.


Wednesday 3 January 2024

costume plans 2024

 So what am I looking forward to make in 2024? My body is going through changes, and I will probably not get my final body shape and weight after my operation this year. The normal development is that a person that has gone through with a gastric bypass first looses around 20% of the weight, and then they gain some back again before stabilizing. With that being said I want to make new costumes, but I need to make costumes that are adjustable and not too depending on fit. 

My main cosplay plan for the year is to finally finish my new AOTC female Tusken raider.

It's been on my list so many years, but this time I feel that I am serious and I want to have it finished for Närcon in the summer. It is a totally new build, I will basically just keep the boots, gloves and the pouch. Or rather I will finish the pouch that I started with on one of my earlier attempts to remake it. 

Then David is coming with me to medieval week, and he has said that he wants to have a landsknecht outfit. Well first he said that he wanted to make one himself, but it will be me who makes it. He also needs two more shifts to wear with his costumes, so that he can change during the week.

He has said the he would like a pink costume, but we haven't decided on other design choices. I also hope that I will remake my half-finsihed pink trossfrau for myself, so that we can match each other during medieval week. 

I have some loose other plans, some cosplay and an idea for a new trossfrau in case I decide to go to a huge event in early 1525, but I will see if inspiration comes. It's also a question of my budget this year being a bit tight, since I have been on sick leave after my operation and needs to get my finances back in shape after that. For a costume it is also obvious how the inflation and low worth of the Swedish krona has made buying fabric and cosplay supplies a lot more expensive. 


Monday 1 January 2024

The yearly costume recap 2023

 So it is time to sum up the costuming/sewing year of 2023. I have definitely felt that I haven't made a lot of things, especially for myself. The reason for that is very simple. I haven't been been happy with myself, and most of my costumes that I have done over the years have been too small. I mentioned earlier on the blog that I made a gastric bypass in November. Now most of 2023 I have been aware of that I was going to go through with the operation, and that has just made me even more uncomfortable in my own body, and sad over the fact that I couldn't wear the costumes that I used to wear. I even skipped the yearly NärCon cosplay festival, even if it was also because I wanted to spend my whole summer holiday with my husband. I did do some events though, and one of the biggest events I've been part of.

It started with Star Wars Celebration Europe in London over Easter. Since 2023 is the 40th anniversary of Return of the Jedi I brought my ROTJ Mon Mothma for the Rebel Legion photoshoot.

I am the ROTJ Mon Mothma in the front, just behind the ewok

I also brought my jedi costume, which is a really comfy costume to wear at conventions, and the one new costume I brought was my fandom fashion take of Constable Zuvio.


SWC23 involved a lot of walking so I switched the high heeled boots that I had bought for the costume for sand coloured sneakers instead.

I have used the dress as an everyday dress since then, I quite like it as a comfy regular day dress.

After Celebration it was all focus on getting dressed for the 500th anniversary of king Gustav Vasa's triumph parade in Stockholm, and that meant meaking sure that David had something to wear. I first made him a pair of joined hose, a black cap and a faux double and gown.
It's faux in that the double and skirt is actually one piece of clothing instead of separate, still I thought it looked pretty well. I also made a coif, a shirt and trousers for our friend Björn who wanted to walk in the parade as a peasant.

Björn borrowed a doublet and for the day itself David chose to wear his older coat instead of the faux doublet, also because of the fact that it was 25 degrees warm and the coat is cooler. Under the coat you can also see the vest that I made to attach the hose to, so that they didn't fall off. This is also a bit unhistorical since it would have been a sleeved doublet in the 16th century, but I wanted to keep it as cool as possible so I skipped the sleeves.


For myself I decided to wear my 1520s court gown, but I had to add strips of fabric in the sides to make it bigger. It is hidden under the arm though so it wasn't too visible.

After the big parade it was time to prepare for medieval week. My one project for the year was to make a bathing shift.


It was a really good addition that made it so much easier to go bathing and keep clean during medieval week. I also made a new simple shift and a small untergollar, or partlet, to cover the neck opening of my yellow kirtle. I have had to make it bigger, and with that the neck opening had become so deep that I needed to fill it in, or risk being undecent.


Here I am, with the rest of the cooking team of Stockholmsfänikan, in my outfit that I wore the whole week, which is basically the yellow kirtle, new shift and partlet.

I did one last dash of sewing ahead of the annual Christmas market, where our 16th century guild is present. David needed new and warmer trousers. By now the joined hose that I had made for him had fallen apart totally, I also added a new furlined hat for him and mittens and a wool partlet for myself. Most of these items were lined with the fabric from the worn out hose.


I am really happy with this photo since it is the first time in a long time that I could fit into my green gown, so I am hoping that the coming year and with more changes to my body I will find the joy of making costumes for myself again in 2024.


Tuesday 19 December 2023

HSM challenge 1 - back to the beginnings

 January: Back to the Beginning: Re-make one of your very first projects. Or make something that is the beginning of an entirely new outfit.

Back when I started my 16th century costuming I of course started with a shift. It was challenge 2 in the HSM 2016 challenge. It's been my favorite shift, because it's so comfy, but this summer I couldn't bring it to Visby because the facings of the neckline and cuffs had totally disintegrated.


This cuff was held on with a few stitches. So I decided to do what I should have done ages ago and repair it. I've reattched all the facings and I also replaced the safety pins that cloaed the cuffs with new cloth buttons. 


Now I am ready to use this shift again.

How it fits the challenge: I went bak to the very first 16th century shift I made and repaired it by replacing all the facings around the neckline and cuffs that had come loose. I also added cloth buttons to cloae thw cuffs instead of the safety pins I've used the last years.
Material: scraps of linen and cotton
Pattern: none
Year: ca 1520
Notions: sewing thread,ä
How historically accurate is it? Patching and repairing is correct so 90%
Hours to complete: 1 hour
First worn: Not yet 
Total cost: A stash project, but bought new around $1


Monday 11 December 2023

HSM Challenge 8: All tied up - a wool partlet

 When it's cold it's nice to have something extra on your upper body. Over the years I have mainly used my red gollar, and for really cold times my pink cape. Now it's hard to wear both the collar and the cape at the same time, so for this years Christmas market I wanted to make a partlet instead.

Partlets are visible in the art at the time period I'm mostly interested in, so 1520-1540. It seems to have been mostly popular in southern Germany and the Low Countries, which is a bit outside of my interested of Northern Germany/Scandinavia. Still there exist some examples of partlets from further north as well, not the least the famous wall painting from Åbo/Turku castle where the woman is wearing a vestlike garment. I was a bit stressed when making the partlet, so I don't have any progress photos, but I will try to describe it.

The partlet consists of three pieces, one back piece and two front pieces. I kept the armhole and front edges raw, but folded the bottom hem to create a drawstring channel.
Backside, wrong side out

Side, wrong side out
The partlet goes out over my shoulderds for width, and the fabric under the armhole is just a few cm wide.

The fur was first added to a piece of thin wool fabric and then that fabric was sewn to the partlet. I also add ribbons to close the parlet.

Front, wrong side out


I didn't have enough fur to line the whole piece, so it's just around the opening and the neck in the front. I used the strings so that I can chose to wear the partlet with the fur on the outside or the inside.


Jere I am wearing the partlet, and it was really nice and it worked fine under the pink cape as well.

How it fits the challenge: A parlet closed with ribbons
Material: wool fabric, fur
Pattern: Draped by me
Year: ca 1530
Notions: sewing thread, ribbons
How historically accurate is it? The ribbons are synthethic, but the rest is proper materials, around 80%
Hours to complete: 1 week
First worn: At a Christmas market December 10th 2023
Total cost: A stash project, but bought new around $30

Sunday 10 December 2023

HSM23 Challenge 12 - paired to perfection - a pair of medieval mittens

 With some time at home and some scrap wool I decided that I would do a pair of medieval mittens, since that would also help me complete one of the HSM challenges.

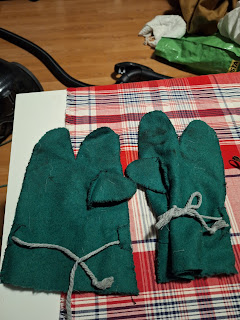
A lot of image sources for medieval mittens can be found here and Margaret Roe Designs also has a write-up and pattern for medieval mittens. Me being me I also decided that just a simple  mitten would be too boring and easy, so I decided to make a three-fingered set of mittens. Also since I know from my modern winterwear that I really like the three-fingered design a lot, more nimble than a simple mitten but still warmer than gloves with individual fingers.

I started out with simply drawing an outline of my hand on white scrap fabric. (it's the table cloths from my wedding that I've kept as scrap fabric for making patterns and muslins.)

I have extremely short fingers, after all I forced my violin teacher to teach me differently since my reach was so much smaller than most people. At this time I also thought that I was going to make the mittens for my husband so I added quite a lot of extra length.

I made a thumb piece and a slit in the palm to add it. As you can see this first version of the thumb didn't work. It was so narrow that I could hardly get my thumb into it, and you have the big wrinkle going from the split of the two fingers and towards the thumb, there was obviously a lot strain there.

The new version of the thumb was a lot wider, and I moved the slit in towards more of the palm of the hand. With this version  I was ready to cut out the proper fabric. The fabric that I used is a very green wool, I think the colour is too bright to really feel historical and it is kind of a stiff fabric, so I treat it as my "worst" wool fabric, but good for this kind of small experimental projects.


Each mitten consists of four pieces, a front and back main piece and two thumbpieces. The thumb was made more narrow from the pattern. All pieces were joined together with whip stitches, and I started with the thumb before sewing the main pieces together.


Along the way I kept adjusting the size, so I kept taking the fingers in and make them shorter.


Here are the scrap that I cut off from the mittens while working on them.


I added two fabric loops on each mitten so that I could pull a string through to tighten the gloves. I had made them fairly wide so that I could pull them outside of my cuffs on my clothes, but I wanted them to be tight around the wrist so that they fall off too easily. 


And this is me wearing the mittens, while holding a cup of hot, spiced beer

What the item is: A pair of medieval mittens
How it fits the challenge: it is a pair of mittens
Material: Wool fabric
Pattern: My own
Year: Late Middle Ages
Notions: thread, cotton string
How historically accurate is it? Accurate pattern, but the material is decent but not totally accurate so somewhere around 50%
Hours to complete: 4 hours ( I am a slow handsewer)
First worn: At a Christmas market on December 10th
Total cost: All made from stash, but bought new around $10.

Sunday 26 November 2023

HSM Challenge 5: Hair apparel - the finished renaissance flat cap

So in order to finish the flat cap that I started here I wanted to line it to make it warmer. I have a stash of fur pieces left, from when I made my pink furlined cape. It's old fur from a vintage furcoat that I bought several years ago on an auction. 

Just when I had finished that cape, or schaube, I learnt that the fur was usually attached to a separate layer, and I wanted to do this. This will also allow me to remove the fur if it is too warm, say in the summer. For the layer that I attached the fur to I used the pair of hose that I had made for David, but that had really split and are not repairable anymore. The fabric is really thin, but still wool so it doesn't unravel.


The fur was sewn with fairly large stitches to the interlayer and then the lining was whipstitched to the seam allowance on the inside of the cap, and sewn to the edge of the cap with prickstitches. 

We took the cap out to try it in the winter weather.


According to the wearer it's really nice and comfy, and he has enough space to put a modern thin cap under it as well if it gets really cold. 

Challenge 5, May 2023: Hair Apparel Make something worn in the hair or on the head.

Be sure to tell us the following:

What the item is: a renaissance winter flat cap
How it fits the challenge: it is worn on the head
Material: 1 m of wool, scraps but something like 0,3 m of fur
Pattern: inspired by internet tutorials for Tudor flat caps
Year: 1520s
Notions: sewing thread
How historically accurate is it? 60% - it seems as if the caps were mainly black, but I didn't have any black fabric, the main cap is also sewn on the machine while the lining is made by hand
Hours to complete: 3
First worn: not yet
Total cost: a stash project, but probably $30 if I had bought the material new