Sunday, 26 November 2017

TLJ Leia coat is finished (almost)

Over the weekend I finished the coat, except for hemming it. I started on Saturday, but then I was thwarted by the fact that I realized that I wouldn't be happy with the fabric I had for a lining, it was both too light grey and to flimsy. I needed another fabric. There are no fabric stores in my town and the one in the closest neighbouring town is closed on Saturdays. I wouldn't let that stop me though. I searched the two op-shops for anything that could work, but my hope of finding black taffeta curtains were squashed in a sea of red. There were just Christmas stuff everywhere. In the end I found two sets of 100% cotton satin bedsheets in white, and even if they were expensive at least they were marked down for Black Friday. Then it was off to the paint store, where they have a small sortiment of textile dyes, and I got all the black dye packages they had (4) for dyeing by hand and not in a machine. I spent the afternoon cutting up the sheets and putting them in a dye bath, I normally just put all the fabric in the dye bath, but I suspected that I had too much fabric and not enough dye so I wanted to just put enough fabric in the dye bath. I ended up with a dark grey fabric with a slight sheen to it, so I was pretty satisfied. I was also really behind my original time plan.

I used my coat pattern, and in the end the coat did go together really well. It's a simple design, with basically just four pieces. Wool and cottons are such easy fabrics to work with as well, you can make them do almost anything you want just with some steam and pressure. I did find the main fabric through etsy. Ever since I started thinking about doing this costume I have searched really wide on both etsy and ebay. This fabric showed up when I searched for grey wool. It's a black or very dark navy wool, with a chainmail pattern in grey yarns over it. The pattern and texture is great, but the fabric is a bit too soft and not shiny enough to be perfect. I am very satisfied with it though.

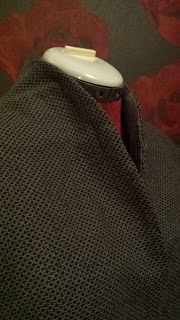
I sewed the lining the same way. In order to help the stand up collar I added fusible interfacing to the collar part, and down to the bust, on the inside of the lining. I then sewed the lining and outer fabric together at the neck and front by hand.

The lining photographs quite brown, but it is grey. This is the part with the interfacing.

On Sunday I continued with the sleeves. In order to make them more structured I also added fusible interfacing to the straight seams of the sleeves.

If you wonder why I have added the interfacing even out in the seam allowance it's because I don't trust it to stay fused to the fabric, so I wanted to sew it in place as well. I baglined the sleeves and gave them a good press before sewing them to the coat. I sewed the sleeves to both the coat fabric and lining, and then used the lining of the sleeve to cover the seam.

With that the coat is done. I need to hem it, and I want to wait with that until I have finished the underdress. All in all I really love this coat already. Since it's based on a mid 16th century loose gown
I definitely need to make one of those for myself. I guess with the older Leia I finally have a character that I can cosplay, with a body similar to my own. Both with this one, and the general Leia costume from TFA, it's obvious that the costumes are made to accomodate a fairly short and curvy person. The proportions and where the pieces emphasize some parts and hides some part of the body simply makes me feel that they flatter me and that isn't something I'm used to when it comes to cosplay costumes.


Now I need to start on the underdress, and I'm actually more worried about that. I have more fabric to make mistakes, but the fabric that I have will make every mistake clearly visible, and I don't have that much fabric.

Saturday, 25 November 2017

The Last Jedi Leia coat pattern

I finished the pattern for the Leia coat, and even if I didn't take a lot of photos of the process I will share what I did. It also shows how I usually work when I make my patterns.

I cut up my first mock-up. I cut it off at the hips, since it's not fitted below the hips it felt a waste of fabric to work on a full-length version, when I only needed to fit it on the upper body. I also cut the back piece in half, since I had discovered that there was a center back seam.


On this photo the left side looks smoother and better fitted than the right. That is because I start working on both sides, by pinning and repinning the pieces to each other. Once I feel that one side is starting to look better than the other I concentrate on that side and don't work on both sides. I don't take it off though, since I still need the other side so I can hang the mock up on my dress form and on myself.

This stage is a lot of testing. Once I'm happy with what it looks like on the dress form I make sure to test it on myself. The dress form is a great help, but it also has an idealized shape, while I have lumps and bumps and soft flesh that makes me less than ideal.

Most of the shaping was done on the back seam, I also cut the shoulder seam shorter, which make the armscye larger than the first version.

Then it was on to the sleeves. The sleeves were made through trial and error. I simply started with two large square pieces of fabric that I sewed together to create what looked like an oversized pillow cover, with two open sides. Then I folded more and more fabric away, and cut off the excess until it had a shape that I liked.

The last thing I did was to sew the sleeve to the bodice to make sure it all fit together.

back of the mock up

Front of the mock up
The fabric that I'm using is a little bit too flimsy to hold the shape of the sleeve. I will try to make the sleeve with just the main fabric, but I am prepared to do some kind of reinforcing to make it stiffer. I won't know until I have started working on the actual fabric though.

While the mock up is still on the dress form I make sure to write all notes I will need. The most important is of course which piece it is, and how much seam allowance I have used. I also make marks where the pattern pieces should join up.

After I have made all the markings I need on the mock up I cut it up, I do that by simply cutting the seams. During the work I have usually changed the seam allowances while adjusting the fit, by cutting at the seamline I know it will all go together and I can then add my own seam allowance when cutting the main fabric.

These are my final pattern pieces. Top left - back piece, top right - front piece, bottom left - back sleeve, bottom right - front sleeve.

Here is also a close up of the sleeve pieces. They should be joined at the bottom and where they face each other.


Friday, 24 November 2017

The Last Jedi Leia choice of seams

Now when I'm working on the mockup for my TLJ Leia I just want to post about my observations on the grey coat, and why I've chosen to put seams where I have them.

 In my last post about the Project I was unsure on whether there was a back seam or not. After looking at some more photos, especially from the trailer I'm now sure that there is a back seam.

This photo has been adjusted and it's quite small, but there are better versions of this particular shot out there, still the seam is visible. This of course made me happy since it's much easier to make a well fitting back piece with a seam in place.

At the shoulders there are a couple of visible seams.

There is the shoulder seam and a seam connectinc the sleeve to the armscye. There is also a visible seam on the sleeve itself.

In this close up it's possible to follow the seam from the neck and down the sleeve, meaning that the fitting of the sleeves need to be really good to make sure that there is no break in the seam.

This last photo give some more information. One is that the sleeves are not connected all the way around the armscye, less fitting there yay!.

When it comes to the lower part of the coat the red lines do not indicate seams, it's rather to show how the front and back piece falls in different directions. The front piece is more or less straight, while the back piece has more of an angle.

Well that's it, now I'm on to more work on the mock up.


Wednesday, 22 November 2017

Some fun finds in Uppsala

Last Saturday I was in Uppsala, both to visit my aunt and to have a wonderful reunion/nostalgic dinner with almost the full original Star Wars-group that were together in the days of the prequels. Nowadays only two of us are active in the Star Wars fandom, but we still enjoy talking Star Wars and singing Star Wars karaoke drinking songs, so it was a great night.

Anyway while in Uppsala I snagged up some fun costuming stuff. I keep mentioning that I don't have any fabric stores around, but in Uppsala they have and I got myself 5 m of gunmetal grey poly micro satin that I will use for TLJ Leia. I'm not a fan of polyester, but the colour and drape of the fabric was lovely.

The gunmetal satin is in the front, in the back is a silver grey silk, that I Think is too light, and in the back is the silk I failed to dye grey.

I had also found out through my historical costuming friends that there would be a Time Traveller's bazar (Tidsresenärens basar), and of course I had to pass by it, both to say hi to my friends and to see if I could find something. Of course I found stuff.


One beautiful fan

A pair of simple pearl earrings. I'm thinking that this will work for most historical periods up until the 19th Century.

A pair of viking tortoise brooches. I don't have any solid plans for viking clothes, but I have met a lot of nice viking reenactors so I figured I can start with the brooches instead of having to look or them if I want to make a full costume. These are based on an original from Tröndelag, Norway and made out of tin. Now tin is softer so not as durable, but the price was a lot lower than what I've seen on other places, where they sell replicas in silver and bronze.

All in all it was a nice visit in Uppsala, now it's time to get serious with TLJ Leia.


Thursday, 9 November 2017

Starting the Last Jedi Leia

With around a month to go until the premiere of the film I really need to start working on it. I have started on a mockup for the coat. I'm going for the grey version, with a distinctly patterned fabric and a lower standing collar, compared to the more dramatic brown version.

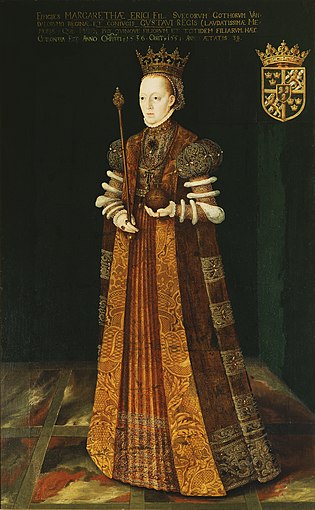
Since I'm interested in historical costumes as well I tend to find inspiration from history, and the TLJ Leia coat has screamed mid-16th Century loose gown for me.

Margareta Eriksdotter Leijonhufvud (1516-1551)
Margareta Eriksdotter (Vasa), dead 1536 Copy after: Mäster Hillebrand

Then I found a photo of this extant dress 

garment of Margaretha Francizka Lobkowicz née Dietrichstein, 1st half of the 17th centuryRegional Museum, Mikulov
It has the open, hanging sleeves and the dramatic collar, so it just screams TLJ coat inspiration to me.

With inspiration from this time period I opened up my "Creating historical clothes" and used their pattern for a 16th century loose gown as the basis for my mock-up.


I changed the neckline in the front though to continue as a straight edge from the center front, this gives the collar a large lapel.

I trimmed the collar down and curved it to match the references.

There was a crease going from the shoulder seam and all the way to the front though, so I added a dart that continued up from the shoulder seam.

I was very happy when I found this reference photo that shows that there is a continues seam, from the sleeve, over the shoulder and up all the way to the collar.

I still want to tweak the collar a bit, but then it's on to the sleeves.

One thing that is guesswork at this time is the back. I don't know if there are any seams there at all. At this moment I'm going to treat the back as one large piece, if we get a reference for the back it's easier to add the seams in later, than if I make seams and it turns out that they aren't there.


Sunday, 5 November 2017

AvestaCon

The last weekend in October it was the first try with a small convention in Avesta. I was ther both representing Cosplay Dalarna and the Nordic Legions.

The Convention was held in a really fascinating building called "Verket" which is an old iron foundry, all built in wonderful brick. I love these old industrial buildings, and it was a great environment for cosplay.

Verket i Avesta
Cosplay Dalarna had a corner where we showed off some of our props and costume parts, as well as working on some smaller projects.


We had also offered to show visitors how they could work with different materials, so for that reason the organizers had bought a lot of worbla. We decided that the best things to do, that was simple, easily recognizable and quite quick to make were wands. We made wands, and had kids from aroud 8 doing them as well, by wrapping chopsticks in worbla and then create different markings and decorations with more worbla.

wandmaking in progress
On Saturday I held a presentation about Nordic Legions and cosplaying for charity.

Link to a short video from the talk

For Saturday I wore my Mon Mothma, since it's comfortable and I could do crafts in it. On Sunday I premiered my first version Luna Lovegood. It was also a great costue since I had to leave after lunch in order to go to a work-related thing, and it was practical to have a cosplay where I basically just needed to take off the wig and tie and then nobody would guess it's a costume.


Unfortunately I ended the event with dropping my wand on the brick floor and it broke, so I need to get a new one. Well I need to get a lot new things to upgrade Luna to a more accurate version, but I still enjoy this first version.

Saturday, 4 November 2017

Luna Lovegood earring tutorial

I was very happy with my first try at beading which turned out to be the Luna Lovegood dirigble plum earrings. Still when I wore them they felt flat, and I had to correct them all the time when they twisted and turned, I had also just put two leaves on each, when it's clear the original has three leaves. I decided to make a new version that's threedimensional and more like the original, and here is how I made them.

It's a bit hard to find good reference photos from the films, sinse they are usually covered by her hair. This photo I Think is from an official jewellery set that isn't available anymore, but since most of the more expensive official Harry Potter products are very accurate I decided to use them as my main reference.

Start with cutting a piece of jewellery wire, it needs to be a wire so that it can hold its own shape, not just a piece of string. I used around a meter, or an armlength of wire.

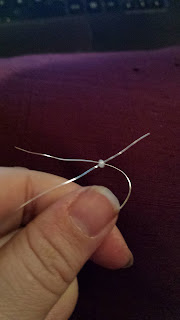
Start with a putting a single bead at the middle of the string, then loop one of the ends through the bead again.

Pull the wire taught around the bead.

Do the same with a new single bead.

Then take three beads. When you have pulled both ends of the wire taught around the bead they should make a curve, bend this curve to the right.

Repeat this step, but bend the next three beads to the left. You should now have a small circle of beads.

Next time use five beads and bend them to the right, and then five beads and bend them to the left.

Then use six beads, bend them to the right and then bend them to the left. Now you have finished the white bottom part of the dirigible plum.


Then take 8 red beads and bend them to the right, followed by 8 red beads that you bend to the left

The next row is 10 beads to the right, 10 the left.
The next row is 12 beads to the right, 12 to the left
The next row is 11 beads to the right, 11 to the left

The next row is 9 beads to the right and 9 to the left. But now when you have finished each side you push it not just to the side, but also a bit upwards.


This will start closing the top of the plum. 

The last row is 7 beads on each side. If there is still a gap at the top you can do another row of beads with 5 beads on each side.

Do a small twist on the wire to close it.

Then it's time to start with the leave. Use the same technique of pulling both ends of the wire through each row, but this time you make sure that the rows lie flat after each other, instead of bending them into arches.


The rows of the leaves are as follow:
2
3
4
5
5
4
3
2

Now I varied all my leaves a bit, doubling different rows to give them all an individual shape. If you want to be really accurate you should use two different kind of green beads, and alternate them. I only had one colour of green though.

When the leave is finished you tread the wire back through the last rows and cut off the excess.

For the next two leaves you need to cut a new piece of wire for each and thread it through the top of the plum.


And here are my finished dirigible plums

Attach an earring hook, or some other kind of fastening to the top and they are ready to wear.


The number of beads in each row is as follows:

1 - white
1
3
3
5
5
6
6

8 - red
8
10
10
12
12
11
11
9
9
7
7

2 - green
3
4
5
5
4
3
2