While I was working on the shirt for my fiancé the challenges for the Historical Sew Monthly 2022 showed up, and the first challenge of the year was the "anniversary choice" - choose any challenge from the Historical Sew Fortnightly 2013. One of the challenges in 2013 was
Re-make, Re-use & Re-fashion – due September 9. Sew something that pays homage to the historical idea of re-using, re-making and re-fashioning. Turn one thing into another. Re-fit or re-fashion an old gown into something you would wear again. Re-trim a hat for a new outfit, or re-shape a modern hat to be a historical hat. Re-purpose the fabric from an old garment (your own or a commercial one) into a new garmen
Since this particular shirt is the third version of this shirt I definitely thought that this was a fitting projekt. To reiterate from the first post on this project the shirt that I started out with was my first simple 15th century shift.
 |
| Here worn in Visby in 2018 |
I had remade it once when I needed a quick solution for a shift to go under my 1520's courtgown. Then I had ripped away the collar and just tacked on a gold ribbon around the neck instead.
 |
| Worn under the courgown |
Since then I had always planned to redo it in some way, and when my fiancé needed his first 16th century shirt I decided that the easiest and fastest way would be to remake the shift, rather than starting a new shirt from scratch.
I started with cutting off 20 cm off the hem of the shift to make it more suitable to a man. I then used the cut off hem to lengthen the sleeves, so they would get long enough for him, and even some extra puffiness.
 |
| The new length of the shift and sleeves |
Then I gathered the cuffs and the neck.
I made the cuffs a bit wider, with 6 gathering threads, than the neck, where I only used 4 gathering threads. The sleeves would have looked better if they had been a bit wider, the pleats on them got a bit uneven and sparse. I also took the chance of trying out some new smocking styles on this shift, and saw it as a bit as a training project.
On the cuffs I used stemstitches that I sewed in diagonal lines to try and create the diamond pattern that is common on paintings and woodcuts in the period. For the thread I used four strands of the same linen thread that I used to sew the shirt together.
The finished sleeve with the visible seam where I have lengthened it and the cuff. I also made some fingerbraided strings to close the cuff.
The neck was gathered and there I used smocking stitches to weave between the pleats. I was not too happy with the look of this. It might work better with a thicker thread or an embroidery yarn.
To close the neck I sewed strings of the fabric to tie with, rather than the fingerbraid strings that I used on the cuffs.
The inside of both the neck and the cuffs are finished with a strip of fabric. Both to protect the backside of the embroidery, to hide the ugly back side, and to make sure that the the cuff/neckline doesn't stretch and get bigger. This has happened to me when I have relied on just the smocking embroidery to keep the size. The strips of fabric were also cut from the hem that I had cut off earlier.
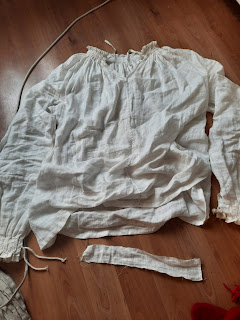
The finished shirt
When I had finished the shirt that small strip of fabric was all that remained from the old shift, but I also hadn't had to use any other fabric than what was in the shift from start.
The Challenge: Anniversary challenge - Challenge "Re-use, re-make, re-fashion"
Material: 1 old kneelength shift
Pattern: No pattern used
Year: early 16th century
Notions: linen thread, wool yarn to make fingerbraid strings
How historically accurate is it? Around 75%
Hours to complete: two weeks
First worn: At a 16th century guild feast on January 22nd.
Total cost: Everything was re-used, but if bought new probably around $25


No comments:
Post a Comment