Saturday, 21 December 2013

Snow White III - accessories and final gown

In order to finish the Snow White look I needed to add some details. I decided to add her standing white collar and a red cape. I also wanted to make her sleeves a bit more closer to the original slashed sleeves, so I added red cuffs to them.

 The sleeve was probably not very historically accurate, but it still looked good. I started with a half circle and added three darts to give it some shape.

The base layer was heavy cotton canvas, and on both sides of each dart I added boning tape and put short pieces of synthetic whale bone in.

The outer layers were heavy poly satin. I had planned to actually use some nice silk for it, but it was too flimsy. Instead I found this heavy poly satin in my stash and decided to use it. I also
added some iron on interfacing to them. Then I sewed the two outer pieces together, so that they formed a pocket, I kept the lower, straight edge open. I then slid the canvas layer, with the boning, into the pocket and closed it with a piece of cotton bias tape. 

The cape was a rectangular piece of silk charmeuse that I hand hemmed. The top of it was gathered into a piece of red cotton bias tape. I sewed the cape on to the dress by folding it over the neckline and tacking the bias tape to the lining. The reason why I had used biast tape was simply because I didn't want to to stitch through the silk, since this is a cape that is going to be taken on and off.


At this stage I also realized that Snow White's cape is tied in front, so I had to make two ribbons and attach them. This turned out really well though since the red ribbons gave a nice frame to the front neckline. After the cape was sewn on I also attached the collar by tacking it to the lining.

I don't have any pictures of the cuffs, but they were basically just tubes that I sewed on to the hem of the sleeve, folded up and attached to the sleeve. I also added some small flounces of silk chiffon to the sleeves.

Here you can see the dress from the back/side. Together with a gorgeous Little Red Riding Hood. One thing I hadn't calculated was that my hair was actually so big that it pushed the collar more backwards than I had planned.
Here's the dress from the front/side. Quite late at night in a hot room, so excuse the glazed and seaty face.

My plan for the future of this gown is to turn it into a more historical costume. I still have some of the blue taffeta left and I want to make a lot more trims for it. I had planned to make some bows for the skirt from the red cape fabric, but simply ran out. I also want to make bigger flounces. This was to try to make the flounces from the RH822 pattern, but I'm more happy with the ones I've made from tutorials on the internet.


Thursday, 19 December 2013

Snow White II - sleeves

As mentioned in my posts about my other two robe anglaises I had a big problem with the sleeves. For Snow White I wanted that fit well and went down to below the elbow. I also knew that some day I want to make a gown with a full length sleeve. So for the first time in a really long time I decided to take my time and draft a pattern that fit me, and that I would be able to use for other projects as well. I didn't start from scratch though.

 To the left is the lining of the sleeve for my 1760s jacket, that i ripped out, and to the right is my modified sleeve pattern for the RH822 gowns. The 1760's sleeve had a good size and the other one had a good shape, but was too big in the sleeve head and too short after my modifications.

I measured the length of the sleeve head from the good fitting sleeve and put markers on the good shaped sleeves. Then I took a good look at the sleeves in Arnold and freehanded a line that followed both the markings and the shape of both sleeves.
The sleeve was still too short though, so I cut it in half and spread it out, I think I added around 10-15 cm.


This is the final pattern for a full length 18th century sleeve. I didn't just measure though. It took a lot of pinning and marking with pen until I had a good fit.

The resulting sleeve goes all the way down to my wrist, is shaped so it doesn't just hang straight down but has a nice curve, and I have no problem getting my fat over arms into it.


Here are the sleeves attached to the bodice. As you can see these sleeves are just 3/4 sleeves. In order to shorten them I folded away the middle of the sleeve pattern above, so I would keep the curves at both ends of the sleeve.

Unfortunately the sleeves didn't fit perfectly, but it has more to do with shape and size of the armscye. It was too small, so I had to make more pleats than planned to get the sleeve the fit, and I got a bit of a bulge in the back as well

Still I'm happy with the sleeve pattern, and this one of the most self drafted pattern pieces I have ever made, so it has given me confidence in trying to do more of that in the future, as well as managing better with scaling up patterns from books.

Read more in Snow White III

Tuesday, 17 December 2013

Snow White 1780

In October it was time for my biggest 18th century event ever. A ball held at a private mansion in the south of Sweden. It was a masquerade and the theme was fairytale. Since I still consider myself a beginner when it comes to 18th century costuming I realized that I wouldn't be able to make the most accurate or the most stunning costume, but I could make one with a lot of humor. I decided to dress up as a Disney princess, but as if she had lived in the 1780's. My choice fell on Snow White, since her colour scheme and style is easily recognizable.

The basic idea was simple:
Dark blue bodice with puffy sleeves lined with red, a red cape and white stand up collar
Yellow skirt

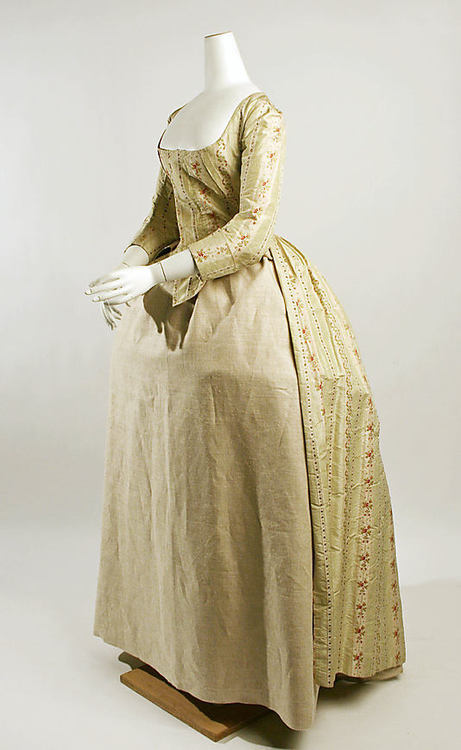
My first thought was to do a short blue jacket and plain skirt, but when I imagined it I realised that the puffy sleeves would look too unproportional to that. Adding a flounce to the skirt might help, but I haven’t seen any flounced skirts to that kind of jacket. It could work with a jacket with a short skirt or tails, but I don’t have a pattern for that, and I don’t trust myself when it comes to draping totally new patterns. Then I found this extant gown from the Metropolitan Museum.

It’s still a robe anglaise, so I could use the same pattern I used for my spring gowns, but the skirt of the robe is put so far back that it wouldn't overwhelm the yellow skirt. So when I had decided what style I going to use I had a plan of attack.

Then came the fabric decisions. I can only rely on websites to find suitable fabrics, but that means taking risks when it comes to the actual colour and feel of the fabric. The big decision was if I should use silk or not. Silk is expensive, but the feeling is just so much better than everything else. In my heart I had probably decided that I wanted to make a silk dress, but it took some time to be able justify the extra cost. For the petticoat I’m using a gold/yellow brushed cotton though. Also making a cotton petticoat means that I can use it for some more every day attire in the future. Still since it’s brushed it’s a bit shiny, and heavier than just a normal cotton.

Petticoat breakdown
Materials used: 4 yards of 110 cm wide brushed cotton. I made a mistake and didn’t notice that the webshop took orders in yards and not in meters so I thought I had bought 4 meters. The difference isn’t that big, but since I used absolutely all of the fabric, wit 4 meters I could have gotten a deeper flounce rather than just a small ruffle as a trim. I also used a couple of meters of cotton ribbon for the waistband. It’s white, but it won’t be visible and I rather use white but sturdy cotton than the yellow but slinky satin ribbon that I had.

Historical accuracy: I sewed the side seams and the waist band on the machine but hemmed the petticoat and the ruffle by hand. The ruffle is also attached by hand. I’ve only used pure cotton, no polyester or other synthetic materials
The Robe
 I got to borrow my sister’s dressform, so that I could get started. I really need to buy a dressform for myself, it’s been so much easier to be able to try and pin stuff togeter before cutting and sewing.

I used the RH822 again and started with cutting out the lining out of cotton canvas. As you can see it was too big and the neckline was really high. I took out most of the width in the side seams and then I simply cut the neckline wider. To be honest I cut it a bit too wide, but it works, I just have to fiddle a bit to make sure that the upper binding or the straps of the stays don't show through.


This is the bodice, just before finishing the neckline and the bottom. The outer fabric is a navy silk taffeta. It's closed with hook and eye tape, sure that's not the most historically accurate but it works really well. You can also se how far back the skirt of the robe is set. From the front you will see the petticoat and the bodice, but not much of the skirt of the robe.

Read more in the next post: Snow White II


Monday, 16 December 2013

Fabric shopping in London

I've just come home from a short holiday in London. Since I had most of the days just by myself, and since I have already seen most of the "must sees" in London, I had decided that it was time to do some fabric hunting. I first went to the Swedish sewing forum sysidan.se and found this thread about fabric stores in London I also found the blog Tilly and the Buttons, and her recommendations for fabric shopping. Both places recommended Liberty, Goldhawk Road and Walthamstow.

I spent the first day in London in the shopping district around Oxford Cirkus, so of course I went to Liberty. Since my focus is mainly on finding fabrics for historical costuming, or Star Wars, I didn't find anything that caught my eyes there. It's mostly prints, so it must be a heaven for quilters, but not my kind of fabric store. On my last day I decided to visit Goldhawk Road. It was mostly because I was quite tired and it's closer to central London. It's still in zone 2 on the Tube so I could go there on my daypass, unlike Walthamstow that's further out at the end of the Victoria line.

Goldhawk Road was great. A full street with little shops with Sikh owners that were really friendly, but not pushy when I went into their shops. Most of the fabrics were really shiny and glitzy poly satins, there were some shops that had a lot of prints as well. Once again I'm not really into fabrics with small flowery prints, or African inspired prints. The poly fabrics were cheap, at least compared to what I'm used to, but there were also at least one shop with quality, natural fibres. It was filled with nice tweeds, wools and linens. I of course ended up there and spent most of my cash in just one shop.

The one thing that is so great about being able to go to a physical store is just the inspiration that you get by seeing the bolts of fabric, and being able to feel them and compare them. That is nothing you can do on ebay. In the end I bought three different fabrics.

The two top fabrics are good example of me just getting floored when I saw them. They are a very fine and pure wool, great draping. I hadn't planned on buying anything like that, but the bolts were on top of each other and the yellow and blue/dark green colous just looked so great together that I knew that I wanted to use one fabric for something, and to trim it with the other. Now this wasn't a cheap fabric, it cost £20/m, but I'm pretty sure that I would still have to pay the double if I found anything like it around here. My thought definitely goes toward a little 18th century jacket in the blue/green fabric with yellow trimmings.

The third fabric was a changeant poly chiffon. This one was really cheap though, £2,5/m. I've been on the lookout for a changeant chiffon to make a new veil for my Amidala Purple Travel gown, and this might be it. I have to see if it's a tad too dark though, I guess I have to see it compared to the rest of the gown and in different lights. Otherwise I'm thinking about doing a simple bias cut party dress out of it. I have a vogue pattern for that kind of dress that I haven't tried.

It was definitely fun going on a fabric safari, and maybe next time in London I might even go to Walthamstow.

Sunday, 15 December 2013

Rebel Cheerleader

Not all costumes are serious. The Rebel Cheerleader is a pure fun costume, and all parts are bought, I didn't make anything myself. It's simply a costume to run around in during cons, when you want to be in something really comfortable, but still show that you are a costumer. It's expensive, but the price is due to the quality of the fabrics and the construction.

July 2013
One thing is certain. When I started costuming I sure didn't know that one day I would have to learn how to "fluff" a pair of cheerleader pom poms.

Status: active

Saturday, 14 December 2013

jawa

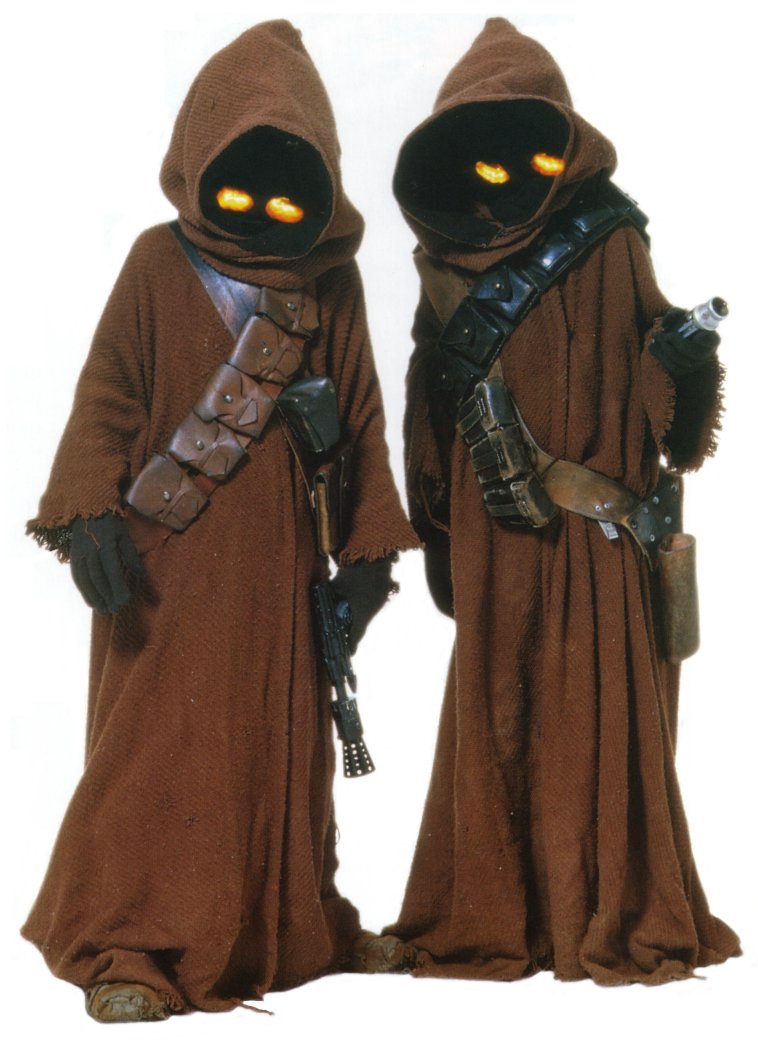
One thing I've noticed lately is that in order for me to get going on a project, it has to feel like a challenge. A good example of a project that I didn't feel so interested in was to make a jawa costume. Basically I needed a 501st costume to wear, while my tusken female is under reconstruction, and I had promised to make my nephew a proper Star Wars costume. With the jawa I made a costume that we can share, which made it more justified for me to spend some more money on it, for example buy finding a vintage ammunition belt and not a modern replica.

The costume didn't involve any interesting or challenging sewing, and I didn't think it was fun to make the mask and the eyes. When I finally sat down to do it, it didn't take long though.

jawa robe spread out
The most important thing for me when doing the jawa was to find a good fabric. The original is made from a very heavy twill, and that turned out to be impossible to find. Most jawas I've seen made up have used thick upholstery fabric, but I didn't want to use that. My goal was to use a natural fibre, so that it could breathe, with a pronounced weave. In the end I found a cotton-linen-viscose mix that was perfect. It was in a natural colour so I had to dye it. This turned out to the most challenging thing with the costume. Finding good dyes isn't easy, basically I only have one brand to choose from and they have quite a limited range of colours. In the end I used two packages of brown and one of red, to get a brick colour. It ended up a bit more brown than I had hoped for, but in some light you can see the red tones.

detail of the neck and arm seams
I thought I would be able to make the robe a simple t-tunic, but the fabric was just a tiny bit too narrow for that. Instead I used the instructions from this link
 and set two separate sleeves. One thing I added though was a facing around the neck, in brown cotton. I made that to be sure that the neck opening didn't stretch, and to also make it more comfortable. I didn't want the rough fabric straight onto my skin at the neck.

For the hood I used this tutorial, but I cut the straps at the bottom from the same fabric, I didn't sew them on. Since my fabric is quite soft I lined the hood first with an interlining of brown cotton before adding the visible black lining, also cotton. In hindsight this has made the hood quite warm, but it holds its shape very well. To make it keep its shape for the front opening I made a boning channel and inserted a piece of synthetic whalebone from my stays project into it. That's one way that it pays off to be both an historical costumer and a Star Wars costumes.
The one that worried me about this project was how to make the glowing eyes. I'm confident when it comes to sewing, but scared to death about plastic and electronics. I found a lof of tutorials with fancy ways of adding LED ligths and different kind of batteries and wire them together. I also had a half promise from my brother-in-law to help me. In the end I made something a lot simpler though.

I found a pack of yellow halfglobe lights at IKEA, made to be table decorations. They had batteries in them and had the right colour. They were a bit too big though, closer to 4 cm than the maximum size of 2,5 cm. I taped some black electric tape around the bottom to make the light source smaller, and then I simply used the same tape to attach them to a cheap Halloween/hockey face mask. Then it was all covered in a black interlock fabric. The fabric looks solid, but it's just transparent enough that I can see through it. Sure it's not the best visible but it works. To finish the jawa I bought a set of autenthic Swedish bandoliers from an auction site. I also wrapped a pair of boots in the leftovers from the robe. The weathering was done by lending the robe to a friend who was going to do a dramatization in the mine where I work, and she needed a long dress that could get dirty. In fact it got so dirty that I had to wash the robe, and it's still look really weathered and worn down.

I am a bit of a tall jawa, but there are actually examples in the film of jawas in adult human size. Still this isn't a costume that I consider a main costume. It's been accepted in both the Rebel Legion and the 501st Legion, and my main use of it will probably be to bring it to celebrations or bigger cons. It's nice to have a costume that's easy to pack, isn't fragile and I can be in the photos of both groups.

I used it at the Stockholm con and also got a chance to run around the R2-builders booth and steal some droids.

Thursday, 12 December 2013

1780 Robe à l'Anglaise (printed cotton

I found the test gown for my robe à l'anglaise was so straight forward, that I decided to make another one. So this another version of the Reconstructing History 822, with my modified sleeve. I also skipped on the "en fourreau" back. I simply used the same pattern piece for the outer material as I did for the lining, and thus I got a waist seam. To make it a bit more correct I should probably have split the bodice back into several pieces, now it's just one whole bodice back, not even a middle back seam.

This was made from a lovely hand printed Indian cotton. It's a very soft and thin fabric, and I love the feel of it. To make it sturdier I used cotton canvas for the bodice lining, but some softer cotton for the sleeves. The pattern of the fabric is maybe a bit busy for the 18th century, but it's made with exactly the same technique as back then. Since it's hand printed it's quite narrow though, and I also hadn't bought very much of it, it was quite expensive. By puzzling all the pattern pieces I managed to get a full robe out of it though. It's a bit less width in the skirt than ideal, and that is also one reason why I I simply couldn't do the "en fourreau" back. They had to save on fabric in the 18th century as well. The sleeves are a bit too short, due to the problems with the sleeves I mentioned in my post about the blue anglaise, but I'm going to add a proper flounce to them one day, so then it won't be so noticable. I can't add a flounce in the same material though since I used up every single cm of the fabric to make the gown, that is also why it's quite plain and has no decorations or trimmings.

This is the craziest sewing project that I have ever done. I managed to make the whole robe in less than a day, from rolling out the fabric to finishing the last hem. I had after all just tried the pattern with the light blue dress, so now I could just sew on without any breaks or problem. For the event in June I wore the same petticoat as the year before, but for an event in October I had had time to sew a new, prettier, white petticoat.

Status: active


October 2013
June 2013