Saturday, 2 April 2022

My Amalia Star Wars jacket

 My big plan for Star Wars Celebration 2022 was to make an 18th century ensemble out of a Knitorious Toile fabric. When I realized that I wouldn't be able to go to SWC I decided to make this outfit for my 40th birthday party instead. After some stress so I didn't have time to finish anything but the jacket at least it was done. I then went to the party, had a great time, and realized afterwards that I didn't have a single photo of me from the evening.

So here is the jacket instead on my dressform, which is totally the wrong shape to fill out an 18th century garment.


I used the Amalia jacket from Scroop patterns, but I didn't follow the instructions exactly. The instructions are for a very historically accurate, and I opted to use the sewing machine as much as possible. I also skipped the lining for the sleeves, I am not going to wear this jacket so much that I need to strengthen the sleeves, instead going for something with less layer to keep it cooler in the summer or at crowded conventions.

As usual Scroop Patterns have a lot of instructions on how to get a perfect fit. I found it hard to follow them all though, since they very much depend on draping the garment on your body. I can't drape on myself and my dressform is nowhere near my measurements when wearing stays. There were some fit issues due to that, and not because of the pattern.

One part where fitting on your body was necessary was the sleeves though. I have huge upper arms, and still the sleeves as made up straight from the pattern gave me a big puff sleeve.  I followed the instructions and smoothec and repinned the fabric over and over again though. In the end this is how much fabric I had to remove when the sleeve was attached to the bodice.


I could probably have removed even more, but I was in a hurry to finish it. Still it was great to follow the instructions, even if it felt wrong to remove so much fabric, and the upper arm still didn't get too small for me.

Monday, 21 March 2022

HSM22: Challenge 11 - fitting. The 1780s stays

 It took a lot longer than planned, and in the end I hurried them, but I did finish the 1780s stays.


One thing that stalled me was when I couldn't find eyelets with washers in the right side, so I had to handsew the lacing holes instead. Now here I should say that I deviated fromt he instructions and instead followed the instructions from Scroop Patterns Augusta stays, which have instructions for making historically accurate stays. It gave me the confidence to make the lacing holes and that they would be strong enough to hold for the lacing. The stays were then boned with synthetic whalebone, I was lucky to have a roll of it at home and it was just enough to get the stays and the stomacher boned.

I wore the stays at party on Saturday, where I managed to get from the party without a single photo of me in costume. While wearing them it was obvious that they were too long for me, they kept poking me in my armpit. 

It is possible to see the foldlines. Before wearing them again I need to cut the stays down to the foldline and rebind them. One good thing with the plastic boning is at least that it's easy to shorten them.

Here you can see that one of the bones even poked through the fabric.

Overall I am happy with the pattern, even if I need to adjust them. There were some instructions that were really helpful, like how to bind the tabs by machine, while others were a bit unclear. I did also use the Augusta stays instructions when I felt that I didn't quite understand or had the ability to use the pattern. I'm hoping that with some tweaking at the armpit they will become a pair of comfortable stays.

What the item is: A pair of 1780s stays
How it fits the challenge: Stays need to fit well, and they are necessary for the clothes on the outside to fit as well. This pair of stays show that a small miss in fit can be really bad. I tried them a lot when making them, but when I finally wore them for real they were too long and poked me in the armpit, so in the end I didn't wear them for the whole party I had made them for. So fit is important, and this is a reminder to not rush in the end, or think that "it won't be too bad, I will be able to wear them and then go back and fix it". 
Material: 1 m cotton twill, 1 m coutil, 1 m floral patterned cotton
Pattern: Redthreadeds front lacing 1780s stays
Year: 1780s
Notions: plastic boning, cotton bias tape for binding, sewing thread
How historically accurate is it? 50% 
Hours to complete: 1,5 months
First worn: at a party on March 19
Total cost: around $120


Sunday, 13 February 2022

A short visit to 1922

 I've started to learn myself to take more and more chances to dress up in historical dress. Yesterday there was the 100th anniversary of the Vasaloppet ski race, and to celebrate it the organizers had decided to make an anniversary race where the participants had to do the race in the same conditions and equipment as in 1922. Since the Swedish covid restrictions were lifted on Wednesday the organizers were very happy to invite the audience to cheer on the race, and to come in old fashioned clothes.

I wore my one hour dress, my handmaiden velvet cloche and a furcoat that I have inherited from my grandmother.


Here is a video of the winner, who finished the 90 km in around 7 hours.

Overall it was a nice little daytrip, and it is always fun to dress up.


Saturday, 5 February 2022

Back to the 18th century

 It is time for me to return to the 18th century. I haven't done anything since the Lady Poe gown, and already when doing that I realised that I needed a shift and a new pair of stays. Now my pair of stays works for the mid 18th century, but I have always loved the later 18th century silhouette, and the only stays I had for that was my Desert Rose stays. And they were done when I was at my tiniest, so I was able to wear them twice before I started gaining back my weight again.


This is my start. The mound of fabric in the lower right is a new chemise. I have sewn it together and is working on felling the seams before hemming  everything. This is a project that I will bring with me to our cosplay meets on Tuesdays since it's a simple thing to just sit and handsew and talk.

Then it's on to the stays. Together with my weight gain I have also had a lot of issues with my shoulders the last few year, and now it is impossible for me to lace up a corset or stays in the back. I need a pair of frontlacing stays. I decided to buy the Redthreaded 1780s front lacing stays instead of fiddling with drafting my own pattern.

For the stays I'm doing more of a theatrical than historical constructions. I'm using coutil as the strength layer. My original plan was to use linen or cotton canvas, but I couldn't find any in my stash. Since I had to order fabric and the place that I ordered from had a sale on coutil if you bought more than 3 meters I decided to use coutil, and buy enough of it so I can make the 1910s corset that I will need to make later in the year. Here is a big difference from the last time I made corsets or stays, brexit has made it hard to order from my favorite supply site, so I now have to go back to Swedish sites. The good thing is that there are now several options selling boning and corset fabrics in Sweden as well, which really wasn't the case when I started making corsets.

For the inner layer I'm using a sand/grey cotton twill from the stash, and since I want my stays to look good I found that floral cotton in the stash as well. It's not 18th century, but I go for cute rather than accurate with the stays.


Friday, 28 January 2022

Sten Stures ben - 16th century guild feast

 On the 22nd of January it was time for the annual Sten Stures ben celebration. It's where you commemorate the anniversary of the battle of Åsunden in 1520 where the regent Sten Sture got his leg shot off by a canon. Sten Stures ben is celebrated by snowballfights and eating chocolate balls, and our 16th century guild has taken it as a good reason to have a guild feast every January. For a long time we hoped to be able to keep it inside, but with new covid restrictions it was moved to our outside gathering location.

We got at least one photo of me and my fiancé inside in good light

I had made my own chocolate balls, but the main thing was the giant chocolate ball that one of our members had found in a store.
Since it was outside and we wanted to keep warm I had made Tyrolean knödel that we heated in a broth. They were delicious.
When it was time to get into the chocolate ball we actually had to use an axe, after having tried with a dagger and knife first.
Kål-Henrik was victorious against the chocolate ball.
Even if it was -6 we kept quite warm around the fire, and in the end we stayed outside for almost 6 hours. The fact that I used my stash to make our clothes means that we are actually quite matching in pink and red.


Wednesday, 26 January 2022

HSM22 Challenge Protection - a late medieval jacket

 When I planned to bring my fiancé to our 16th century guild feast the plan was to be indoors, so I figured it would be enough with a shirt and a pair of hose. Well with new covid regulations in place the feast was moved outdoors. And outdoors in Sweden in January meant that I needed to quickly come up with something that would keep him warm. I ditched the idea of making a pair of hose and instead decided to make a jacket, which definitely fits the challenge since it was made to protect from the cold.

First I needed some inspiration. I would not have time, or enough fabric in my stash, to actually make a proper 16th century jacket or doublet.

Looking at the images of a Swedish peasant army from 1502 it looks like a lot of them are wearing upper garments with fairly wide sleeves, a bit of a stand up collar and skirt under their breastplates.

I decided to go from there, and make something generic late medieval looking, rather than trying to get something totally accurate. The end result would be something fitting at a market or fair. As a start I took the pattern from my own historical jacket that I made last year.

My main jacket pieces

Instead of the extra fabric to create pleats I cut the sideseam and back seams fairly straight and added gores there instead. Both to save fabric and to make it more medieval.

For sleeves I used my large s-sleeve pattern. For fabric I rummaged through my stash. I knew that I still had enough of this mottled black/grey wool, even if it's a modern fabric. I also found enough of a red wool flannell. This is the fabric that has really proved useful and I have gotten a gollar, a hood, a pair of hose and now a jacket out of it. There really is nothing left now. Just with my own jacket I wanted to make this jacket reversible so he would have a two in one jacket. The black and red fabric made this into a garment for someone richer than a peasant though, but I really didn't have anything else to work with.


For closure I went with cloth buttons and thread loops. This would make it easy to switch sides. The black fabric is very thin so I added a strip of sturdier wool on the inside that I added the buttons to. At this stage the fiancé wanted the black to be the outer fabric, so I sewed the buttons on to get them to be on the correct side when wearing the black as the outer fabric. But after having done that I felt that the red looked so much better, well, well. As I understand it the side to sew buttons on varied a bit in the middle ages as well.

The buttons sewed on on each side


Thread loops

The gores that were added at the back and side seams. I would have loved longer gores, but this was all I could get out from the fabric.

The finished jacket, and with the help of a belt it got a bit of skirt poofing out.


All in all I am actually quite pleased, and the double wool fabrics helped to keep him warm at our feast, so it definitely protected him. 

The Challenge: Protection

Material: 2,5 m of red wool flannell, 2,5 of black suiting weight wool

Pattern: My own

Year: late medieval

Notions: linen thread, polyester thread

How historically accurate is it? 30% it is inspired and works as a generic late medieval jacket. The fabrics would only have been worn by nobility, and the main seams are made on the machine even if the visible seams are handsewn.

Hours to complete: 1 week

First worn: On a 16th century feast on the 22nd of Januar

Total cost: The fabric was pretty expensive when bought new so I guess around $70 if I had bought it today.

Sunday, 23 January 2022

HSM22 challenge: Anniversary choice - the finished shirt

 While I was working on the shirt for my fiancé the challenges for the Historical Sew Monthly 2022 showed up, and the first challenge of the year was the "anniversary choice" - choose any challenge from the Historical Sew Fortnightly 2013. One of the challenges in 2013 was 
Re-make, Re-use & Re-fashion – due September 9.  Sew something that pays homage to the historical idea of re-using, re-making and re-fashioning.  Turn one thing into another.  Re-fit or re-fashion an old gown into something you would wear again.  Re-trim a hat for a new outfit, or re-shape a modern hat to be a historical hat.  Re-purpose the fabric from an old garment (your own or a commercial one) into a new garmen

Since this particular shirt is the third version of this shirt I definitely thought that this was a fitting projekt. To reiterate from the first post on this project the shirt that I started out with was my first simple 15th century shift.

Here worn in Visby in 2018

I had remade it once when I needed a quick solution for a shift to go under my 1520's courtgown. Then I had ripped away the collar and just tacked on a gold ribbon around the neck instead.

Worn under the courgown
Since then I had always planned to redo it in some way, and when my fiancé needed his first 16th century shirt I decided that the easiest and fastest way would be to remake the shift, rather than starting a new shirt from scratch.

I started with cutting off 20 cm off the hem of the shift to make it more suitable to a man. I then used the cut off hem to lengthen the sleeves, so they would get long enough for him, and even some extra puffiness.

The new length of the shift and sleeves

Then I gathered the cuffs and the neck.


I made the cuffs a bit wider, with 6 gathering threads, than the neck, where I only used 4 gathering threads. The sleeves would have looked better if they had been a bit wider, the pleats on them got a bit uneven and sparse. I also took the chance of trying out some new smocking styles on this shift, and saw it as a bit as a training project.

On the cuffs I used stemstitches that I sewed in diagonal lines to try and create the diamond pattern that is common on paintings and woodcuts in the period. For the thread I used four strands of the same linen thread that I used to sew the shirt together. 

The finished sleeve with the visible seam where I have lengthened it and the cuff. I also made some fingerbraided strings to close the cuff.


The neck was gathered and there I used smocking stitches to weave between the pleats. I was not too happy with the look of this. It might work better with a thicker thread or an embroidery yarn.

To close the neck I sewed strings of the fabric to tie with, rather than the fingerbraid strings that I used on the cuffs.


The inside of both the neck and the cuffs are finished with a strip of fabric. Both to protect the backside of the embroidery, to hide the ugly back side, and to make sure that the the cuff/neckline doesn't stretch and get bigger. This has happened to me when I have relied on just the smocking embroidery to keep the size. The strips of fabric were also cut from the hem that I had cut off earlier.

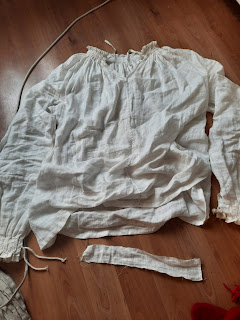
The finished shirt

When I had finished the shirt that small strip of fabric was all that remained from the old shift, but I also hadn't had to use any other fabric than what was in the shift from start.

The Challenge: Anniversary challenge - Challenge "Re-use, re-make, re-fashion"

Material: 1 old kneelength shift

Pattern: No pattern used

Year: early 16th century

Notions: linen thread, wool yarn to make fingerbraid strings

How historically accurate is it? Around 75%

Hours to complete: two weeks

First worn: At a 16th century guild feast on January 22nd.

Total cost: Everything was re-used, but if bought new probably around $25