Tuesday, 31 July 2018

A viking for Visby

This year I'm going to the Medieval Week in Visby for the first time. Since I haven't done a lot of medieval costuming I realized in the spring that I wouldn't have enough clothes for a full week. I then decided that I would do a quick viking costume before the event.

I cut out the shift earlier in July, it's a basic square pieces with gores shift. I will say though that for a busty girl like myself this is not the best shift. It's really tight over the bust, since the gores are too narrow at the top to widen it over the bust, and if I want to make the front piece big enough to be roomy over the bust, well then the shoulder seam end up almost at my elbow. It works though, even if it's more medieval than viking, and not as roomy as I had planned. It's made in unbleached linen, I have sewn the main seams on machine, but felled and hemmed it by hand.

Over the shift I've done a classic Viking apron dress. I made it from the leftovers of the green wool of my 1520's outfit, which also dictated how wide I could make the dress.

Instead of using a pattern I cut the fabric in four equal pieces. There are finds from Hedeby/Haithabu that show that the dress were made with shaped pieces and not just squares. I then simply pinned the fabric until it was tight just above the bust. I made it just tight enough that it almost falls down, but not quite. Under the bust I made an angled seam that met the edge of the fabric, to get as much width as posible out of the fabric. I'm not totally happy with the fit, but it will do, and I can adjust it later. All the long seams are sewn on machine, and since the wool doesn't fray I haven't done anything to finish the seams on the inside. That is also in case I want to adjust it later. It's hemmed at the top and bottom by hand.

The dress is held up by two sets of straps. Each strap is made of two loops of fabric, the same as the dress. The shorter loop is at the front and th longer in the back, I've placed them approximately where on the same place as bra straps.


tt
The loops are connected by brooches in the front.

All vikings love bling, so of course I needed to bling up my costume. I started with the decorating the front with a piece of yellow silk, leftover from my handmaiden gown. The strip of silk is a nice background to the beads that I added in the front. The beads come from three different necklaces that I already had, but never used.

The green beads are proper reproduction of viking beads. They are a prize from when I was 11 and competed on national TV with my knowledge of vikings. (Kvitt eller Dubbelt for those Swedes who remember that show). I failed on the last question so I never got the prize money, but I got the full prize table, wich included these beads. The necklace with blue and yellow beads are bought at a Viking market, so at least inspired by proper viking beads, the topmost necklace are just random beads. I strung the beads up on a piece of leather string, and got rid of the most modern looking beads.


This is the finished ensemble. My tortoise brooches are the most glaring inaccuracy, since they are way too small compared to actual finds, the also have a modern pin in the back instead of the hooks that should connect the loops of the straps. Still they cost a fraction of the prize compared to a proper pair of tortoise brooches.

All in all it took me a day to make the apron dress, the shift has been a work on and off during the summer. It's a passable Viking costume, and that was my goal with this costume. 

Wednesday, 25 July 2018

My NärCon costume plans

The biggest cosplay event of the year is here, and I'm finished and ready to pack my costumes and head to Linköping Thursday-Sunday. This year we are suffering a drought and heatwave in Sweden, and for the week they are warning of temperatures of 30 degrees Celsius, or more. This has of course affected my costume plans, but not so much.

I will bring three costumes with me to NärCon this year.

Admiral Daala

I will be trooping with the Nordic Legions. When I planne this costume I had NärCon in mind, I just happened to finish it earlier.

Heat adjustments - none, but it is a fairly loose jumpsuit and I'm using my own hair and no wig. I'm also going to be with stormtroopers who suffer a lot more in the heat, so I think we will take a lot of water breaks during the trooping.

Melisandre

My new costume for NärCon will be Melisandre. I think this will be costume that I'm mostly walking around in when I'm off trooping.

Heat adjustments: I didn't line the sleeves, I will have room for a linen shift under and I'm going to bring a pair of black plain shoes, instead of wearing the black boots that I had planned. I've also made a bag of the same fabrics so that I can always carry a water bottle with me.

Bellossom

I chose this costume due to the temperatures. I wanted a third costume with me and I think this will be the most comfortable one. It's light and breezy and I can fit a linen shift under it. The headwear keeps my hair off from the neck, I can even wet it down to keep cool, the big flowers also shade my face.

Those are my costume plans, I will definitely bring quite few changes to normal clothes though, in case I simply can't be in costume when it's that warm.


Tuesday, 24 July 2018

Melisandre - sleeves and closure

When it was time for the sleeves I decided not to line them. It's going to be really hot at NärCon, and the less fabric in the costumes the better. 

I did modify the shape of the sleeve compared to the pattern.

The trumpet part of the sleeve starts further down, just by the elbow, and I didn't have enough fabric so it's a bit shorter than the pattern. That's not a problem for me though since I'm short and have short arms.

I didn't want to have an ugly unfinished seam visible on the inside of the sleeve, so I felled the bottom seam on both sleeves. I didn't do that on the upper seam though, since that one is not visible. There I have just finished the edges with a zigzag stitch.


I will close the gown with two sets of strings. One invisible on the inside.


And a visible string on the outside.

I am thinking about changing the outer string to a ribbon made in the same fabric as the gown, but that will be for ComicCon. I will also carry a bunch of pins with me in case I notice that there is risk for a costume malfunction with the opening.

And with that Melisandre is finished and just waiting to be packed down for the trip to Linköping.

Monday, 23 July 2018

Melisandre's necklace finished

It was an easy thing to finish the necklace, once I had done the jewel.


The front side was painted with gold paint.


The back was painted black. Since the worbla was transparent it made it easier to see if it was totally covered, the black back also gives the gold a darker tone than when it's painted on a white or transparent surface.


The front jewel was glued on with contact glue.


The back is simply tied together with a piece of gold string, it's not going to be visible anyway.

Sunday, 22 July 2018

Making a hot glue jewel

Melisandre needs a giant jewel for her necklace. The best way of making the jewel would probably be to cast it in resin or something, but I have never done anything like that and I hoped that there was an easier way of creating big jewels. I stumbled upon a mention of making cosplay jewels out of hot glue, and I decided to try it.

This is how I made my jewel. The jewel for Melisandre is an uneven quite organic shape, I do not know how well this method works if you want to use a mold or have it look exactly as something.


Start with pouring the paint that you want to use for your jewel in a disposable container that can stand heat. If you want to you can of course mix colours. In this tutorial you might notice that the jewel changes colour, I will come back to how the choice of paint affects the result at the end.


Cut the hot clue sticks into smaller pieces. For Melisandres jewel I used 1-2 glue sticks.


Heat the glue with a heatgun until it melts, and mix it with the paint. I won't be a runny consistency, but there shouldn't be any lumps of glue.


Pour the blob of glue until a sheet of alumium foil.


You can now use some kind of tool to smooth it out and give the general shape that you want it to be. Make it bigger than it should be, since you are going to trim it down later.


Let the coloured layer cool down and then add a layer of clear glue on top of the jewel.


This is what it looks like when it has cooled down. The clear glue isn't very clear, but rather milky.


Start cutting the jewel into the final shape with a sharp knife. Then start cutting away the top layer of clear clue. The cuts will give the jewel a more faceted surface and make it look more like a jewel than just a blob.

When you are satisfied with the shape of the jewel, heat up the surface again to remove any small hairs of glue or ugly cut marks. Do this quickly, you don't want to destroy the facets that you have just created. When you are finished you can put a clear coat of gloss lacquer on top.


These are the four jewel that I have made, and this is where the choice of colour affects the outcome. The two jewels to the right aren't finished. I used glass paint for them, thinking that it would give the a nice transparent look. The glass paint hasn't bonded with the glue though. When the jewels cooled down they started to separate, leaving clear blobs of glue with wet paint between them.

For the two left jewels I use common acrylic paint. The acrylic made the glue-blob really sticky, compared to the glass paint, so it was trickier to work with but the process of cutting them were so much easier since they behaved like a soft plastic.

As for colour choice, well I failed there. I only had a winered paint, and it's too light and blue. When I mixed it with black it didn't get a lot darker but rather it turned purple, as can be seen with the leftmost jewel. The most red jewel is made with wine red, but I've added in a bit of copper to darken it and a tiny, tiny amount of black.

I will use the most red jewel for NärCon, but I will probably buy some darker red paint and redo the jewel for Comic-Con.

Thursday, 19 July 2018

Melisandre gown, main part

The main part of the Melisandre has taken shape. As you will see on the photos the fabric is quite impossible to photograph. The photo below shows the fabric in both shadow and sunlight. Going from tomato red to a deep wine.


I did decide to line the full gown, firt I had only planned to maybe just line the bodice. I used a quite heavy cotton for the lining.

I made the full lining so that I could try out if I needed to do any modifications, but it turned out to be good straight off the pattern. I then sewed the main fabric together. I attached the outer fabric and lining to each othe by zigzagging the front edge, neck and arm scyes together.


The fabric was so beautiful when it pooled on the floor, but I have to be a bit practical and have it just reach my toes. When I cut the fabric off I made a huge mistake though, and managed to cut off too much. I simply had to reattach the fabric again, and press the seam like crazy to hide it.

The seam is visible, but only if you look really close, and I think most people will only think that it's the hem.

Along the front edge I added a deep facing. The facing is cut on the straight, unlike the gown itself where the front edge is on the bias. The straight facing will hopefully keep the front edge from getting distorted.

I also added a deep hem facing, rather than just hemming it. The hem facing will protect the outer fabric, and it will be possible to remove it and wash it if it gets too dirty.

The front edge facing is sewn in place. For me that's used to invisible seams it felt strange to have something that's so visible, but it's clearly there in the reference photos.

This is the finished gown, now I only need to add the sleeves.

Tuesday, 17 July 2018

Starting Melisandre's necklace

One of the defining pieces of Melisandre is her big necklace wth a really big red jewel in the middle.

A friend of mine was really nice and printed a version of the necklace, that could be found on thingiverse. But then I decided to try and make my own version of it.

I started with making a hexagonal shape in paint and print it as a template. I then cut it out in clear worbla.


The worbla has been rolled up, and I decided to use the curved shape as it was, to help with shaping it around the neck.


Then I cut out the middle. To be honest I made the whole in the middle a bit smaller than it should be, but I didn't want to make the worbla too weak, by having long thing pieces.

I then took some brass wire and used it to tie the pieces together.


As of now I'm thinking how I should go on. The original neclace has some round dots around the heaxagons. At the moment it is also quite itchy, with the sharp points. I'm thinking about maybe making the points less sharp.

Then of course I need to make the red jewel and add it to the necklace. 

Friday, 13 July 2018

Melisandre from Game of Thrones

One of my redheaded costumes for the year will be Melisandre from Game of Thrones. More precisely I want to do her travelling outfit.


I want to do the travelling outfit, since that will allow me to use my own hair and just hide it under the hood of the cloak so that I can hide that it's not long enough.

My plan is to do the gown she's wearing under the cloak for NärCon in the end of July, and then do the full cloak for ComicCon in September.

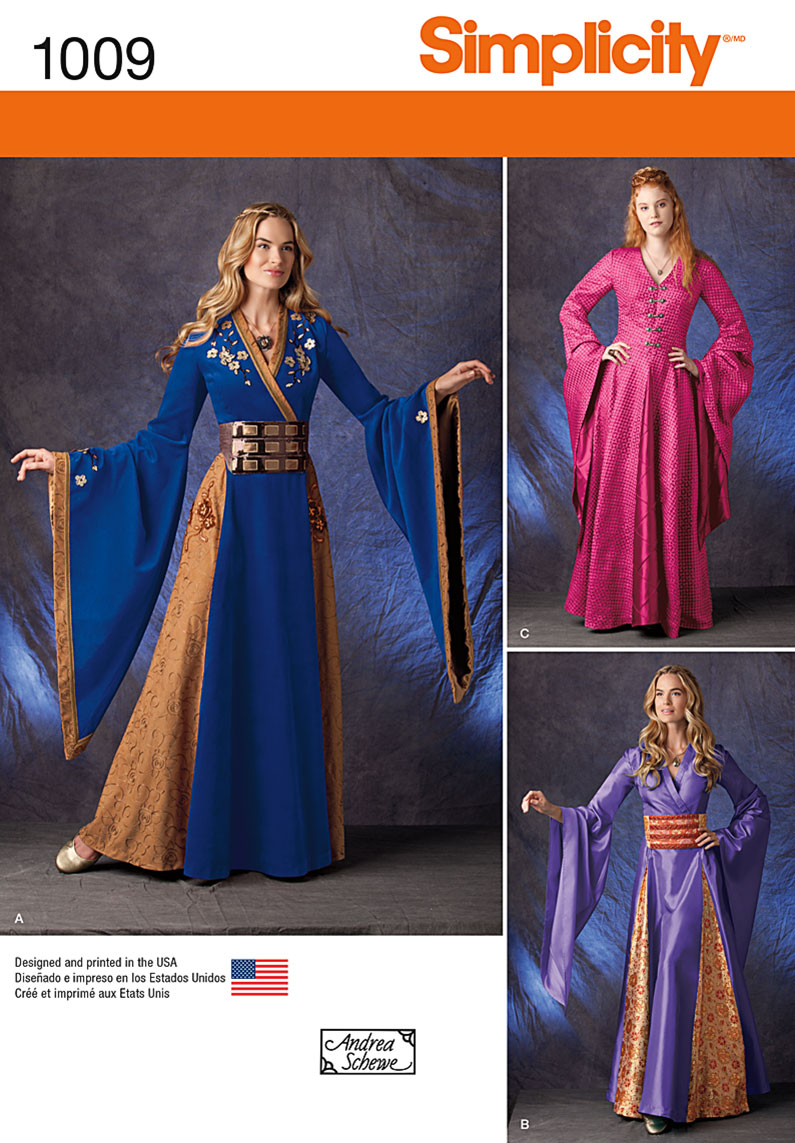
I started off with Simplicity 1009 as a base for the gown.

It's clearly a pattern modelled on the costumes from Game of Thrones, but simplified. In its original it is a bodice with a separate skirt, with the waist seam hidden under the belt. The gores are sewn into the skirt and not a separate underskirt. I only used the bodice pattern, and then I lengthed it to make a full gown.


The original pattern has sewn the front pieces to each other, but I have made the fronts so that I can wrap them properly over each other.

The fabric that I'm using is a polyester dupioni, with a lovely drape. I would not guess that it was a poly fabric at all. It's really hard to photograph though, it looks a lot more red/orange than in real life.

After having cut out all the pieces I had to pin the pieces together just to get a feel for the fit of the gown.


The general shape is quite nice, but on the big side. The next step will be to make a lining for the bodice that I can fit closer to the body, and then fit the fabric to the lining.

Tuesday, 10 July 2018

HSM challenge 7 - loose sleeves

When I bought my teal wool, that I used for the 1490's undergown, I also bought 2 m of yellow wool In fact it was the two bolts of fabric on top of each other that made me fall in love with the colour combination. I decided to use the fabric to make a pair of loose sleeves for the teal undergown. Loose sleeves were common to bring some variation to dresses, and it was also possible to use a finer fabric if you couldn't afford to make the whole dress out of the best fabric.

The HSM challenge for July was, very fittingly "sleeves".
JulySleeves: There are some amazing examples of historical sleeves styles out there. Put the focus on the arms and shoulders in your creation for this challenge.
 I used my by now standard S-sleeve pattern, but added a bit more seam allowance than I had used for the sleeves for the teal undergown. After all the loose sleeves should go over the teal sleeves.


I sewed the back seam with the machine, and I also zigzagged the edges to stop the fraying, the fabric frays a lot. I did hem both ends of the sleeve by hand though.


The finished sleeve, right side out


And the wrong side out.

I cut them out the morning, sewed the sleeve seam on machine and spent the day at Tuna Ting finishing them by hand. They were pinned in place with just one pin on top of the sleeve.

The Challenge: 7 - sleeves

Material: 1 m of yellow wool fabric
Pattern: S-sleeve pattern from this tutorial
Year: Late 15th century
Notions: thread: poly sewing thread
How historically accurate is it? The style and pattern is correct, but the fabric is too thin, and I used the machine. 30%
Hours to complete: 2
First worn: Tuna Ting June 29- July 1
Total cost: From my stash


Sunday, 8 July 2018

Late 15th century turban

The late 15th century had some really interesting headwear. I really like the turban style.

detail from the Birth of Mary, 1490-1510, Ansbach, Germany (Schwanenritteraltar, St. Gumbertus)

This is the style that I chose to wear during Tuna Ting, but maybe not quite as big and voluminous as in the pictures above.

It's necessary to have a really long piece of fabric to make this style. I butted my two 16th century veils together, to create one really long veil (3 m).

I braided my hair, starting the braids by the ears.

I pinned the braids in place on top.

I pinned the veil in place in the back, and started to twist it.

Then it's time to start placing the twist around the head. How hard you twist the veil determines how much volume you will have in your turban, I'm doing a fairly tight twist.

This is the full veil, three rounds around the head.

I use a few pins to secure the rounds of fabric to each other, and the last stump is hidden under the turban.

I prefer to wear it with just two rounds, and leave a long hanging tale to drape over the shoulder.

I can wear it as a scarf.

But I really like it when I can use the fabric as sun protection for my neck and bust.